Wordpress blog EN
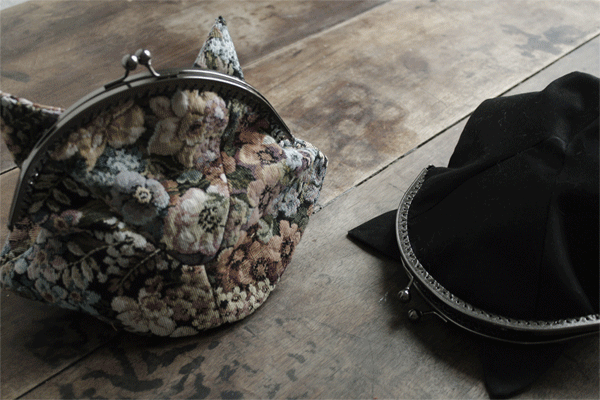
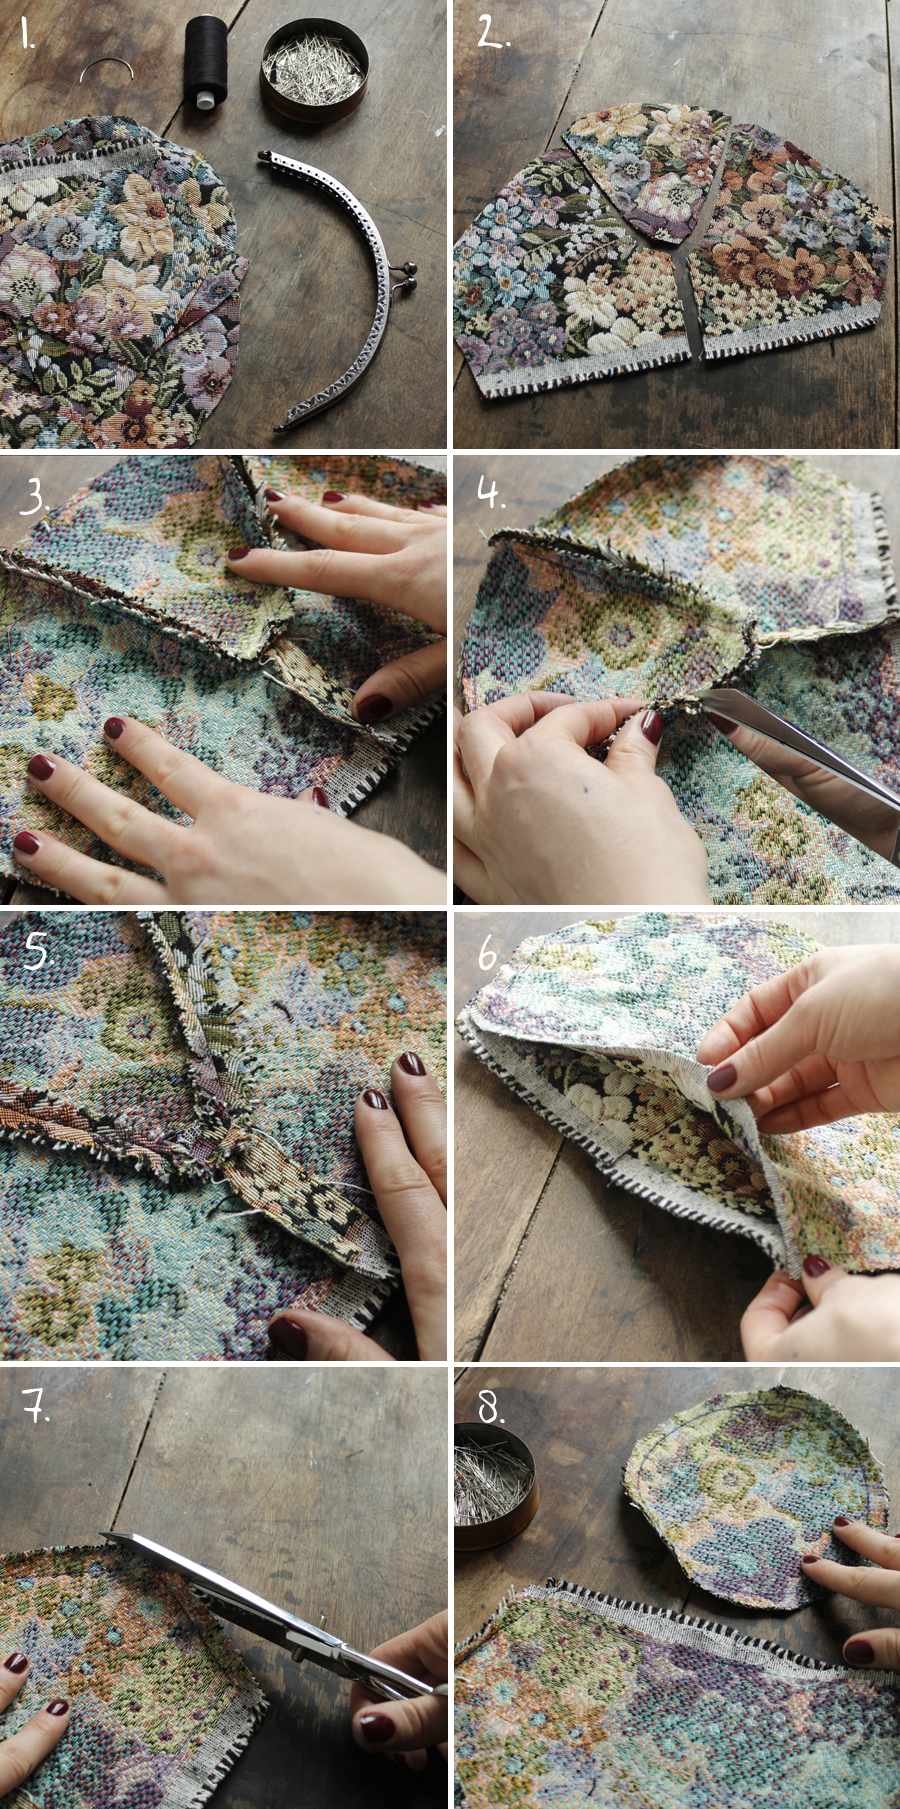
THE DIY TO THANK YOU MY KITTENS!
Happy Wednesday you beauties!
I have a real treat in store for you today; something I know will make some of you very happy! I told you on Saturday about the famous Etsy competition from last Christmas and, after this article and more particularly after this image on my inspiration board, I literally received hundreds of frantic mails, hysterically asking about the cat clutch. Nobody could live without knowing where it was from! And so, after hours of research I finally found the source of this oh-so-popular bag (sorryyy, I don't have the link any more...change over of computers and all that...mea culpa!) But it was from a Japanese site and came in pale pink as well...aaaand it's been sold out for a few months. Ah but don't worry your pretty little selves! I'm going to show you how to make one yourself in this DIY...better still this is a thank you DIY, because yes, as is the tradition for every 1000 new likes on the Facebook page, I have a little contest for you guys just to say "thank you!".
So, there we go my little cats, as a small thank you I am giving you the opportunity to win a little kitten clutch in black or a floral tapestry - just comment me, letting me know which one you'd prefer, and then ask me any question at all...something that's been bugging you or you've been meaning to ask me for a while - I'm going to make a small 'Frequently Asked Questions' (FAQ) section to put on the site! Big hugs to you all, and thank you yet again! I'll pick the winner out of a hat at midnight on Friday and will publish the winner's name at the end of this article.
So, to do this DIY you need:
- -To download the pattern HERE
- -The parts of the bag cut out from a thick canvas
- -A bag clasp, like the ones you find on purses, which can be bought from Moline haberdashery at St Pierre market
- -A curved needle and a normal one, as well as a thread of chord
- -Pins
- -A pair of scissors.
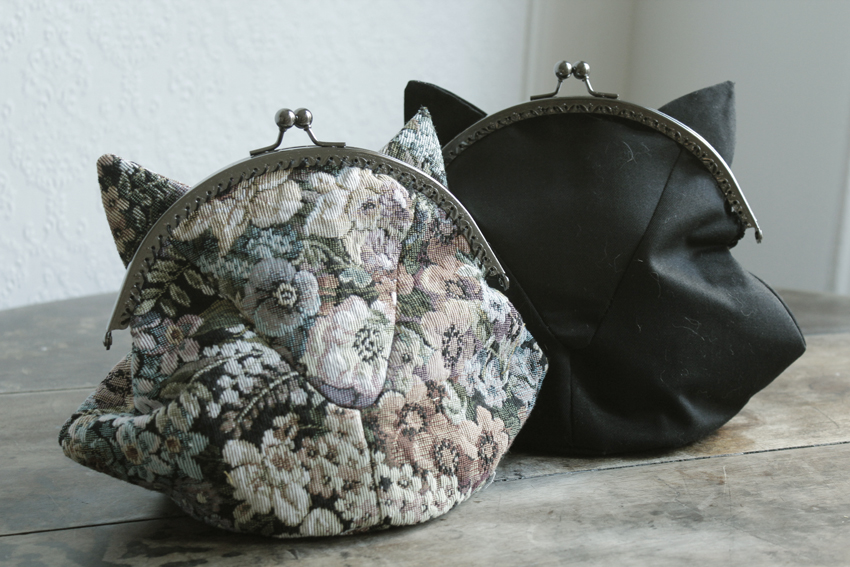
To start off, pin the 3 front parts to form the muzzle of your kitten! fig.2 Then sew with the machine, fig. 3. Clip each of the curved seams, fig 4. With the help of an iron, open up all the seams, fig. 5 Then pin the back and the muzzle/front together, and sew fig.6 Clip the corners of the sides, fig.7 and then open the seams with the iron. Now take the bottom of the clutch for the next part.
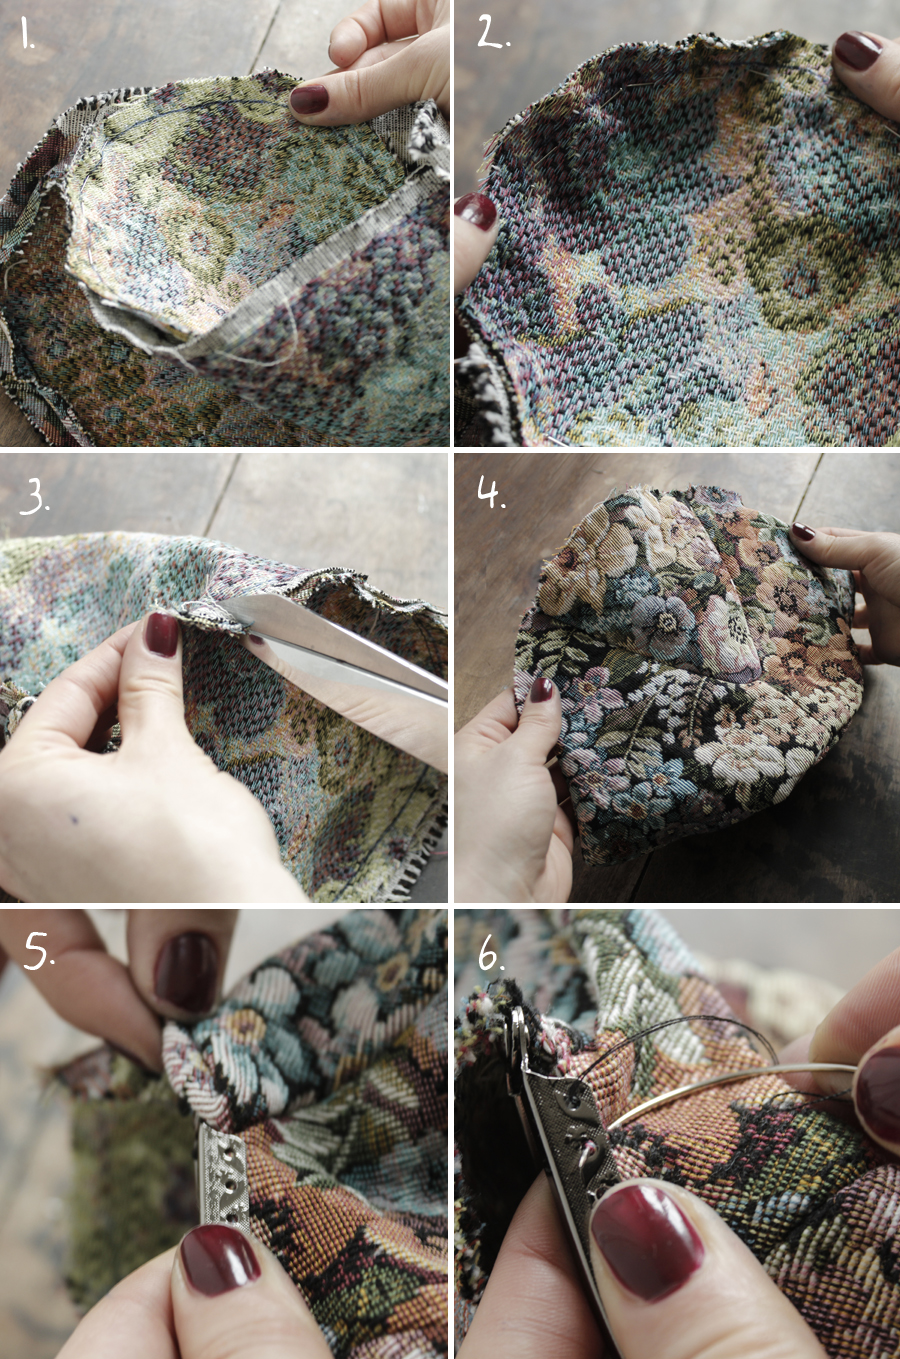
Pin the bottom of the clutch to the front/muzzle and the back, fig. 1&2. Sew the bottom of the clutch using the machine, then clip along the whole of the seam at about 1.5 cm intervals, fig.3 Open the seams with the iron...beginning to get the picture? And then turn the purse the right way round, fig.4 Attach the clasp to the material, fig.5 the metal has to sandwich the material and then with the help of the curved needle and thread, start to sew the clasp to the clutch, fig.6
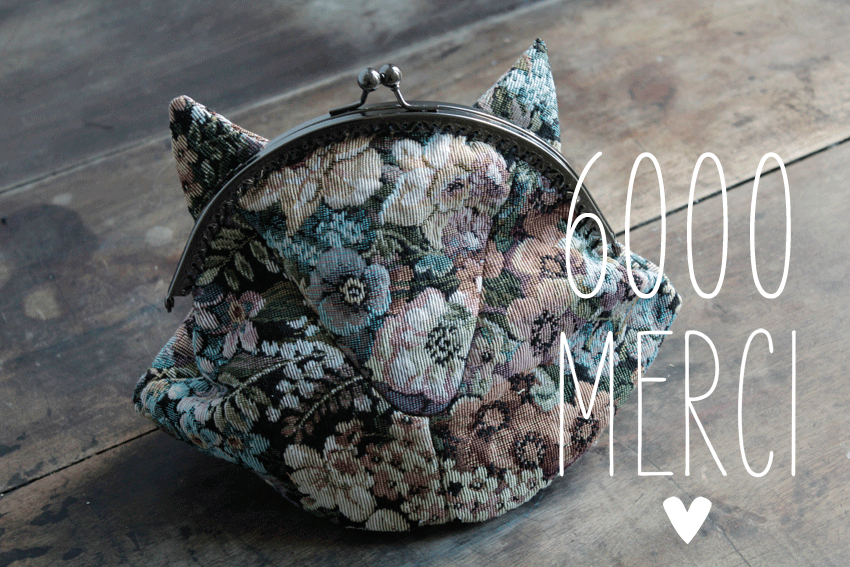
And now for the final stages...you see it's not so hard to make your own little kitten purse! For the ears, pin together the front sides of the front and the back of the ears, fig.1 then sew them together, and clear up the points of the ears, fig.2 Turn the ears the right way round, fig.3 and with the help of a pin turn up the frayed edges of the bottom of the ears and fix the front and the back together with your trusty pin! fig.4 Place the ears on the back of the clutch and to sew the ears on, I'd advise you to open the clutch, fig.5 & 6. With the help of the normal needle and the thread, fix the ears to the back of your clutch, fig.7 and TA-DA, fig.8! A little extra which makes all the difference! To make a little lining for the purse, just follow all the steps again, except the ears. And if you want your purse to become a bag, there's nothing to stop you from sewing two rings behind the ears to attach a chain strap. And a last little tip...I recommend choosing quite a thick material, so that your clutch stays strong, or alternatively strengthen your material by ironing on a stick-on thicker material inside!
Get to your scissors, and start sewing!

The winner of the competition is: Lullaby - she has already been emailed, and it won't be long 'til she receives the tapestry clutch! Lots of kisses, and I will respond to all your questions very soon! Lots of love!
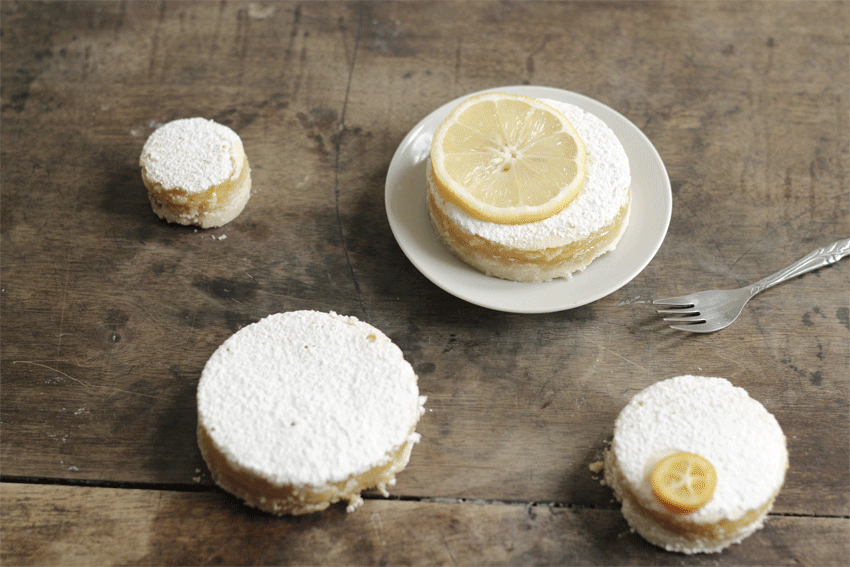
Key Lime Pie or something like that
I am craving for a break in balanced meal and other sporty-friendly-veggies... I'm craving for sugar actually ! The other day I was working at home alone and just like that, I wanted sugar, it happens sometimes. But my fridge was absent and my cupboards were abstaining... They were worthy of the before-the-fashion-week training. But the truth is I love eating so without a second thought I decided to make a mountain of crepes suzette (okay, not related to today's post but it's coming...). So then, only because working at home can also have its perks - like having one's kitchen around - I decided that from time to time I was allowed to a maxi snack... I show you today my craving-for-sugar #2, a NYC inspired snack from a cute book my mom offered my for Christmas: Marc Grossman's "New York Cult Recipes".

To make this snack, you will need, for the dough:
- - 150 g flour
- - 30 g powdered sugar
- - 4 teaspoon cornflour
- - A pinch of salt
- - 125 g softened pieces of butter
For the lemon custard:
- - 20 cl lemon juice + lemon zest
- - 250 g superfine sugar
- - 6 eggs
- - 5 tablespoons flour
Preheat your oven at 180°C.
With a fork or your hands, crumble all the ingredients for the dough until you roughly have breadcrumbs. Spread the breadcrumbs in your pie tin and make sure it is well compacted - I advise that you use the bottom of a glass to flatten and level your dough in the tin. Cooking can be just like building sometimes... Then bake in you oven for 20 minutes, until the dough gets lightly golden.
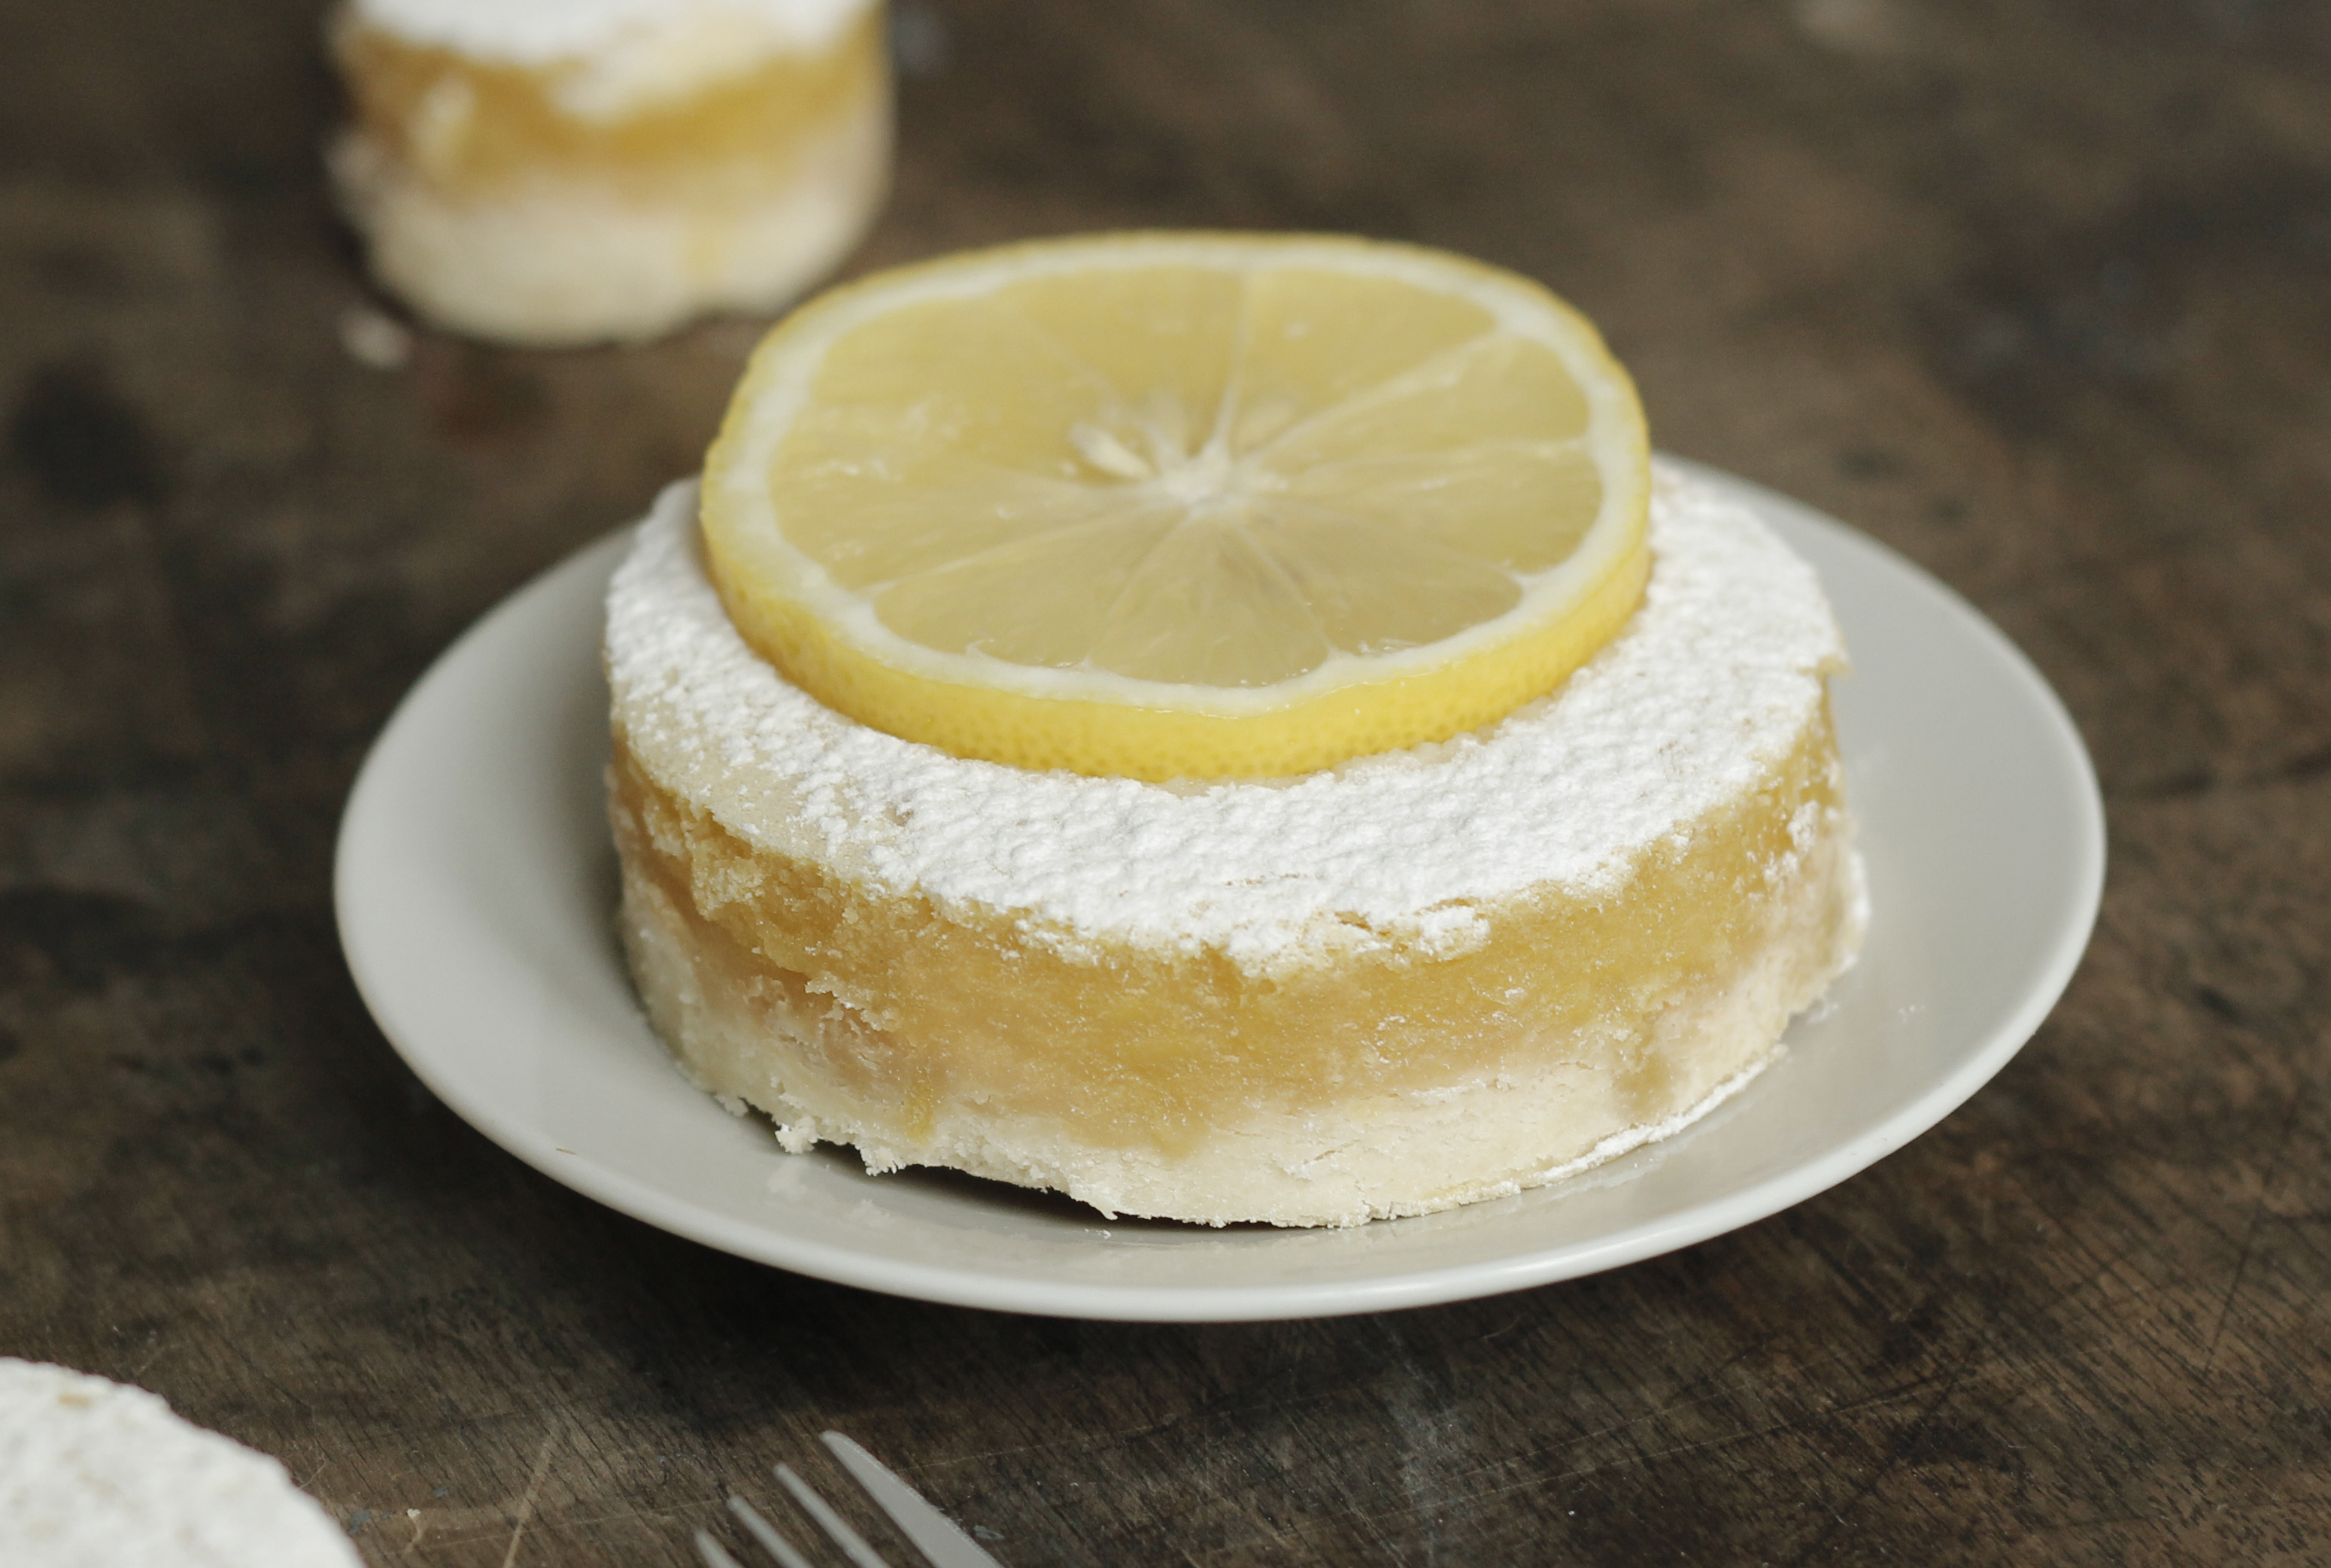
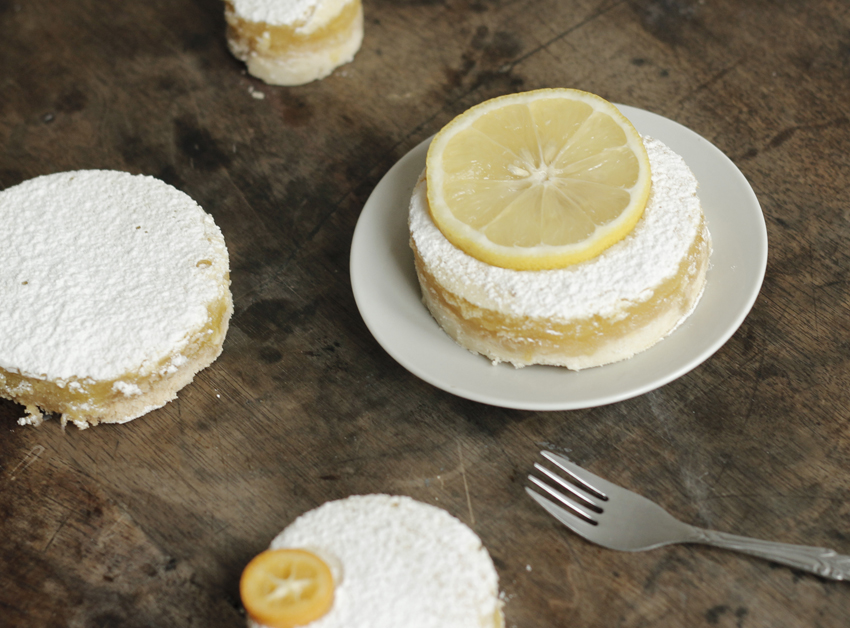
For the lemon custard, beat the ingredients altogether (I sieve the flour to avoid lumps) and pour the mix on the cooked dough. Lower the oven temperature to 150°C and cook for 40 minutes. Once your pie is cooked, take it out of the oven, leave it to cool for 15 minutes and dust it with powdered sugar. You are now free to choose your presentation: classical triangle shaped slices or squared slices or like I did, circles slices... CERCLE DE PATISSERIE works fine! Enjoy!
Big Bisous
Happy sunday my cats,
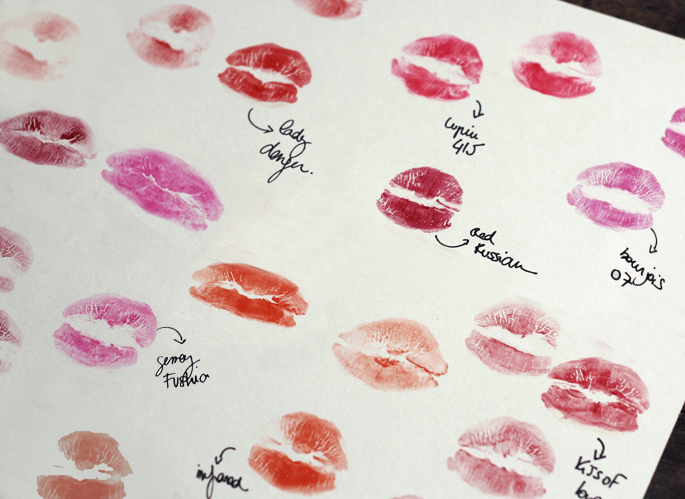
Beauty today, cause I know you all are beauty addicts... I have to admit I'm becoming one myself... I really don't care about eye shadows and smoky eyes (except for Klein blue, I melt for it...) but I'm crazy about lipstick. I have lots of them and I love it! And yet a few years back I didn't wear any, I only dreamed about it because I thought my lips weren't the lipstick type... How crazy I was! Truth is I didn't know how to apply it and I always ended up with some on my teeth, so GLAMOUR. I will spare you the date story with lipstick on my front teeth... Once I got home I saw my face in the mirror and I knew he wouldn't call me back... Imagine the bright smile with the big crimson stain on the teeth, like Zézette the ultimate chic. And one day, my aunt whose job it is (no, she doesn't make lipstick she is a professional make-up artist) took charge of it and show me the ultimate tip: "the finger in the mouth tip". When you say it like that it can be completely obscene but it is not, not at all. Once your lipstick applied put your finger into your mouth and close your mouth around it. The extra lipstick potentially on your teeth will then be on your finger, and it works every time! I will leave you to re-watch Mai's video where she shows you this professional move... Once I knew this tip, I can tell you I had a field day! Lipstick every day of the week! Here is my short list of my favorites... I never get tired of them! In the morning, I get dressed and I choose a color as if I was choosing a dress for my lips, a color for a mood... Basic you'd say!
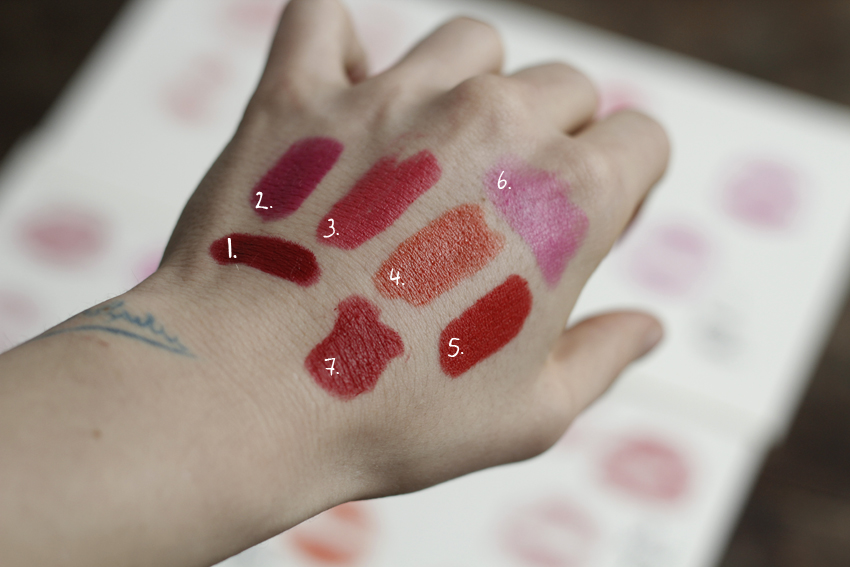
- Red russian, MAC. I don't have to introduce it to you it's Madonna's lipstick (80's Madonna). I wear it when I want to be Femme Fatale hehe, yes sometimes I'm like that!
- Bourjois. It was the love at first sight with this one, but for it packaging first... Then the color, with this transparency, but a little bit shiny as well.. Either I powder it, or I leave it sparkling it depends... And it's super moisturizing as well !
- A real grandma lipstick: Rouge baiser what a cute name (red kiss)... The shade is #415 LUPIN, a nice coral, very dense color. Little downside: it's not so moisturizing do I hydrate my lips with lip balm before and I powder it afterwards so it lasts more than 2 hours. I wear it less often because of its color - not easy to wear - but when I've decided it's the one, it means I am in a sophisticated mood (if such a mood ever existed!).
- A super super orange one, INFRARED by Topshop, super moisturizing. I draw the lines of my lips with a pencil because the color has a tendency to run... I wear when I want to have a good laugh...
- Lady danger, MAC. Truth is, it's my favorite. The color is almost fluo and mate, but like its brother the Red russian, it's not very moisturizing... I wear it when I feel down, it's my comforter, when I don't wear anything exceptional it does the trick... MAGICAL!
- It is the first lipstick I got, offered by my aunt when she was teaching me her tip... A fluo pink FUSHIA 84 like a Barbie, a good old Gemey that smells like a grandma, I love it! I wear it with vivid colors, a red/orange sweater or a green one, and it makes all the difference in no time, a kind of color block portrait, the final touch of a look!
- The red KISS OF LOVE 11 from Rimmel, it looks a lot like the Red russian but with more light. It is the real red, the one to mark the neck of your lover. Actually, it is the red that the woman in the Email Diamant ad is wearing. A red that makes everyone agree on. An indispensable...
And you, what is your favorite shade ?

ETSY CONTEST RESULTS!

Hello my chestnuts,
Do you remember the Etsy contest to find "my perfect present" ? Well I received it! And I love it, it is this crown that the most of you voted for... Great huh ? I personally love it and at first I thought it would be a bit too much for my everyday life if you see what I mean... But no, I've decided that 2013 would be the year where I dare and I really do what I want, and to tell you everything I even went to a job interview with my crown as if it was nothing... And I believe this is how it's the most acceptable, as if it was completely normal to wear a crown of black plastic flowers, as if I were wearing a hat... Let's stay cool. And I can assure you that people will remember you "You knooow, the crazy girl with her crown of flowers in the subway...". Anyway THANKS Etsy, thank you for knowing me and the winner from the lucky draw among the ones who voted for this crown is Hélène François!
HAPPY FRIDAY #37
My little kittens!
How hard it is to find a working rhythm when you work at home! Because yes, I've been working freelance for one month now! Freedom, I like it, I juggle it's crazy I love it ! But it isn't easy to wake up to stay home, to get dressed to work on illustrator all day long from your couch, to cuddle your cat every 10 minutes... Ah Frida... But you can be proud of me, I never not once answered the call of "what if I stayed in my pajamas until 4 in the afternoon, eating only chocapics and wearing my UGG?" Nope, I adapt myself and I love my new life, but I also wonder how was I doing before, when I had a real job! Because today I go out of my way to accomplish all my professional projects and I try to get some time to come here. I miss it you know but I feel like I'm going to do it, I'm getting back onto my feet! But if you happen to be working at home as well, do you have any tips ? Like giant planner ? Magic post-its ? Or even, if one of you is a real estate agent wishing to help me find an office, I'm a taker!
Sidebar, I am preparing DIY that will please you, I am also updating the design of the blog and working on getting it translated! And beauty tips will come here more often, starting next weekend... Yes yes.. I'm getting better at it, and even if I sometimes end up looking like Louis XIV, I train hard, and I remove my make up !
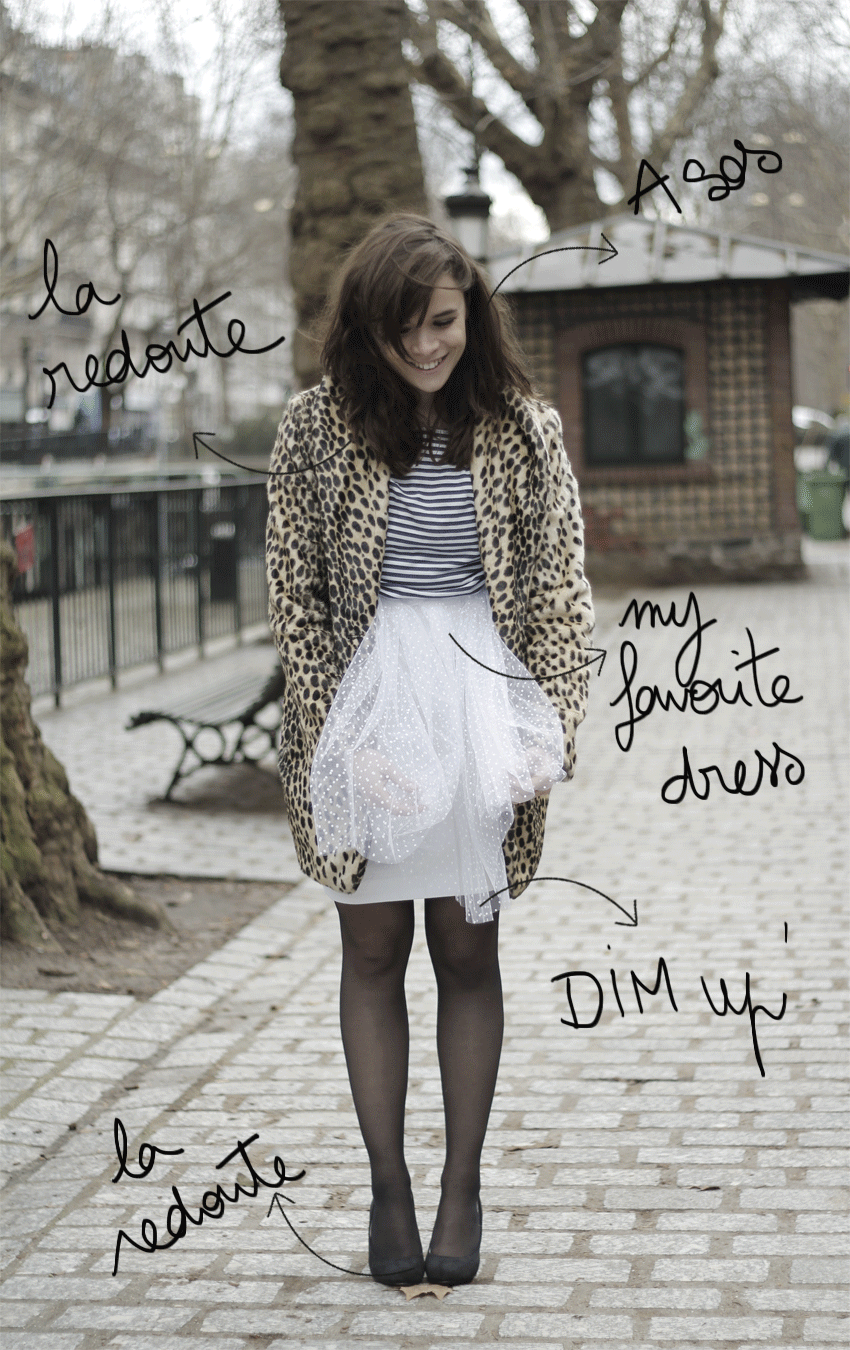
Today I wear my Asos love coat (remember I talked about it here) and it is on super sale! A stripped tee-shirt La Redoute x Ines de la Fressangeand underneath my favorite dress DIY in white doted swiss... Something tells me I will talk about this dress pretty soon... To be continued! Transparent Dim Up tights, I can't stand the opaque ones anymore, I feel like I have two poles instead of my legs, is it in my head? And negotiable high heels that you can afford to wear all day long from La Redoute ! LOVE
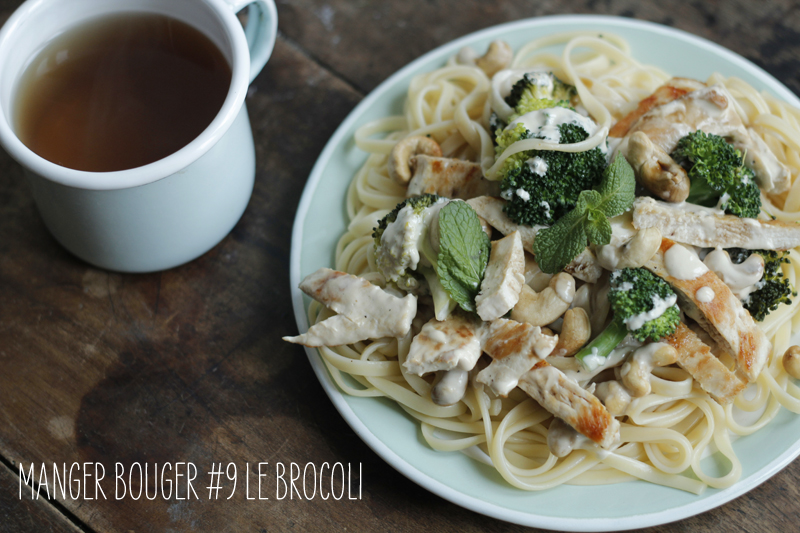
EAT MOVE #9 BROCCOLI
Hola kitties!
I'm back ! And thank you for all your sweet words, reading your reactions was galvanic, I'm so excited !!! I'm over the moon, it is gonna be soo cool ! I can' wait to show you this book... To hear your thoughts about it, to make you win one and enjoy it... Anyway, I don't want to tell you more! I'm here and I don't plan on abandoning you for that long again anymore! And a Theme Week is coming soon...
What would I do without you? Thanks for your ideas of broccoli recipes, this one is inspired by your comments but not only... I don't know about you but to have me eat some veggies my mum had a special trick: the I-hide-the-veggie-that-you-hate-in-your-macaronis trick, like a noodle surprise party you see, and it worked a few times... So here is a pasta recipe for my Club Med Gym Challenge, the only thing that was missing actually, a good balanced meal with starch, white meat, vegetables... The deal is almost done, one more recipe to go!
And you know what ? Broccoli became my friend... It didn't happen like that, I had to add coconut milk, soy sauce and cashew nuts but now we are together for life...

To make this recipe you will need (for two people):
- - Pastas
- - 2 chicken breasts
- - 1 broccoli
- - 1can of coconut milk
- - A handful of cashew nuts
- - Soy sauce
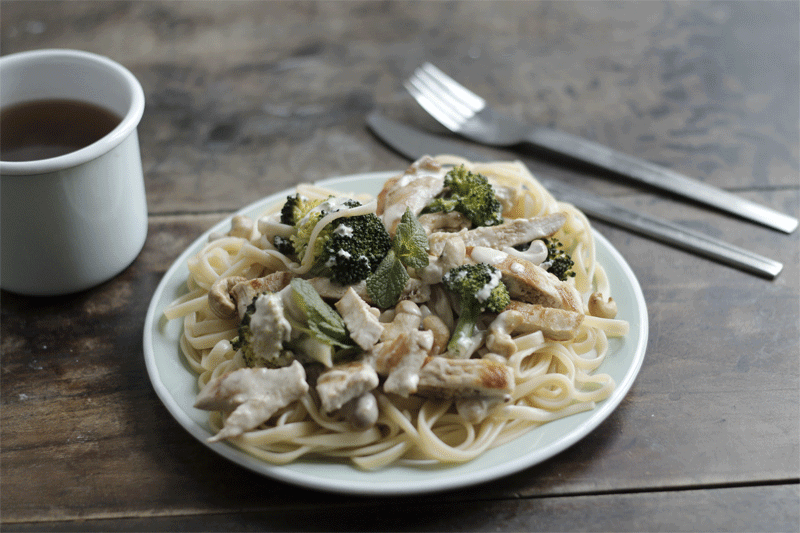
Soo, I'm not gonna teach you how to cook pastas right ? You've got to be kidding me.... So while your pastas are cooking, put an asian wicker basket above the pan to cook your previously cut broccoli (like little trees) with the steam. If you don't have any wicker basket a steam cooker will do. It's just that I tested the cooking-into-boiling-water for our broccoli friend but it didn't like it that much... It was sad and flabby, and nothing beat a few minutes of steam cooking to keep the crunchy. While your pastas and broccoli are cooking, brown your chicken breast in a non-sticky fry pan with a trickle of olive oil. When cooked, put away from the fire and cut them lengthwise. Put them back into the fry pan and pour the coconut milk and the cashews. Stir often, leave the coconut milk to thicken and when it's ready add the broccoli at the last minute! Present your plates with pastas and add the rest of the ingredients on top, decorate with chiseled coriander and soy sauce (I only had mint available that day..) Enjoy !
Out of sight, in my mind![:]
My little cats,
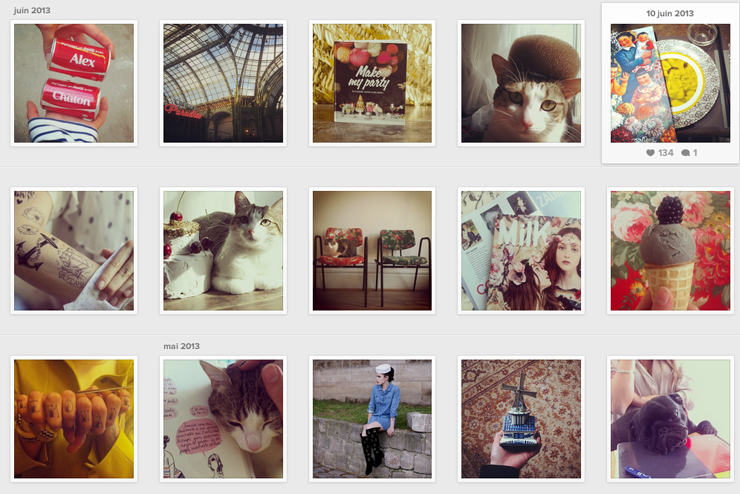
I drop by quickly because I have an hectic, flat-out, chaotic, US-President-like schedule... Today I'm going to tell you a little bit of my life: if I'm not around it's not because I'm too lazy or in lack of inspiration but because I am preparing something for you, something HUGE...like a BOOK! A DIY book about making a party, from the decoration to the recipe... In a few months for Spring "Make My Party" will be born and I am so proud right now, like I was telling you about my first child! So I have to find myself back or a normal rhythm at least (that should be around the middle of next week) and in the meantime you can follow me on Instagram... I'm telling you this because I miss you and I thought it might be a mutual feeling... Sincerely yours, Lisa Obama.
HAPPY FRIDAY #36
Okay I'm kidding, I'm not actually going out in the street half naked, I could literally rename this Happy Friday into "How to catch pneumonia" or "DIY: how not to go to work tomorrow". I quit. I can't stand wearing my coat anymore. I feel like I am dressed the same every single day. Life is too hard! So, I ran to make this Gif downstairs (below any human temperature) and I went back up as fast as I could to cuddle my radiator until my ends get their normal color back. Today it is all in transparent black look because it occurred to me that "in the real life" I'm very often wearing black. I should make an erratum on my resolutions post because if there is one pointless (we agree on this) thing that I'd like to do more often is wearing colors. Not navy blue bur pink, red, green... COLORS ! When I think about it, it isn't so pointless after all because I don't know about you but when I wear colors I always feel much better, my self-confidence is better as well, as if colors were therapeutic...
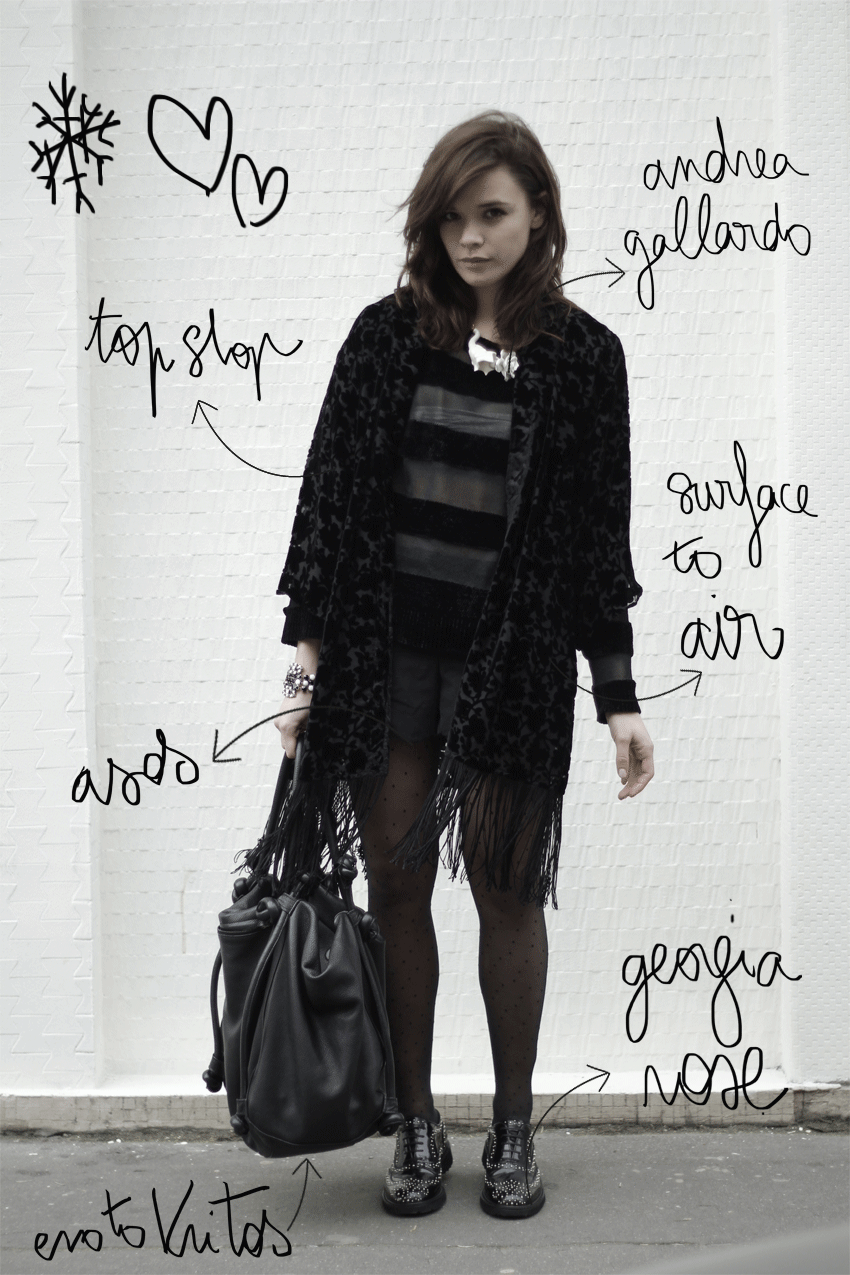
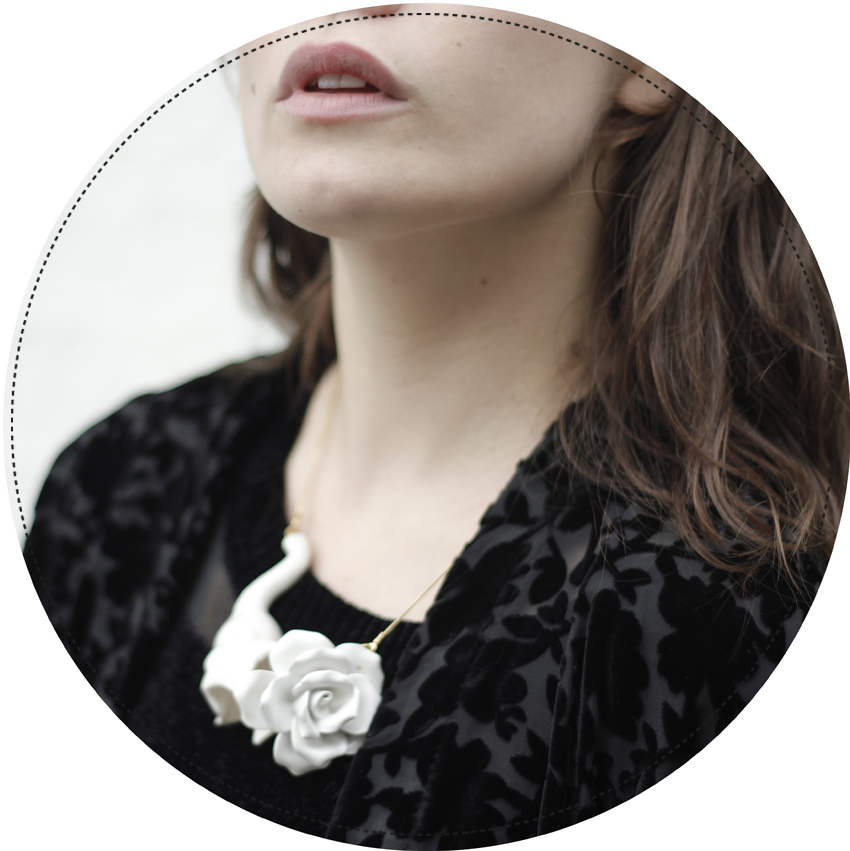
Today, I'm wearing a devore velvet Kimono jacket with fringes - I'm really into fringes these days... - from Topshop (perfect to stay at home...), a pullover from Surface to air that I love, very nice with casual jeans (and your radiators on max!)... The same shorts from Asos that you see here often, my looove derbies from Georgia Rosethe Sarenza brand. My giant bag Erotokritos and my awesome, not wait, fabulous necklace Andres Gallardoa small spanish brand that I discovered at Première Classe, a huuuuuge case of love at first sight...
EAT MOVE #8 PAPAYA

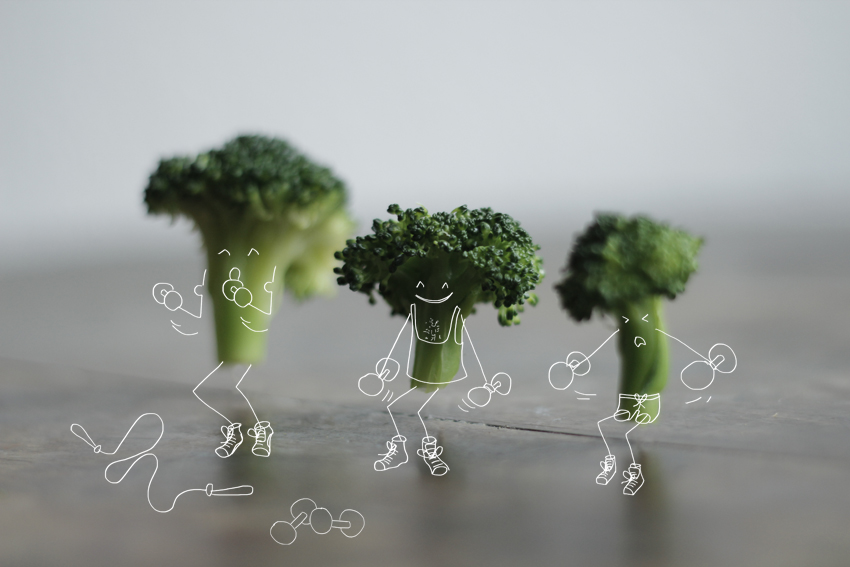
The collaboration with Club Med Gym is almost finished and I only have two more ingredients to show you from my list of required fruits and veggies, and one of them is the broccoli! And I have to tell you that the broccoli does NOT make me dream because it and I are not buddies, and I find it ugly it looks like a little tree... But I made it a personal challenge to find a fun idea to make the broccoli friendly...
So today here we go about the papaya, I wanted something exotic and sunny for my tastebuds because I don't know about you but I'm writing from my couch with a fluffy blanket, my cat on one knee, my MacBook on the other knee and a smoking tea not too far, like a grandma 2.0...
I promised I'd be a little bit more active in 2013 and it doesn't look very good for a start... I'm like a machine with a thousand of projects all more exciting, time has never been so liquid than now! It is frantic and I will come back soon to tell you all about it, I like to tease you a little, you are my guidance. Stay warm and make good tropical smoothies...

To make 3 of this champions smoothie you will need:
- - half a papaya
- - A small mango
- - 2 persimmons
- - A banana
- - A can of light coconut milk
- - 2 tablespoons of agave sirup

Start with cutting the persimmons, the mango and the papaya into dices. Put the fruits in a fry pan after keeping aside the two third of the papaya and cook for 10 minutes, medium heat, with the agave sirup (it also works well with honey). Then, put the rest of the papaya, the banana and the coconut milk (light right..) in a blender and mix ! For the presentation, I suggest you take big glasses or small bowls, then you put the caramelized fruits in first and you pour the smoothie on top of the fruits, and enjoy ! A special mention to the persimmon, I was worried but it was a delightful fruit! And for the curious who want to make the icy effect on the glass, you need a quarter of lemon that you rub against the edges, and in a plate put loooots of coconut powder and turn over your lemoned glass (empty of course!) and put it on the plate... The coconut powder will stick to the glass using the lemon as glue...

HAPPY FRIDAY #35
Happy Friday to todos!
I could have called this post "Le changement c'est maintenant" (François Hollande's presidential campaign slogan meaning "the change is now") but I sincerely wish this blog to stay apolitical... Anyway, who says new year says new projects, new challenges, and I want a new design for the one-year anniversary of this blog... I can hear you ask "Already?!" but I won't change everything, no because I find it quite disturbing for you and for me, but I'm always on the move you know and I want to renew myself as well. Would you like any new gadgets ? New special buttons ? More or less stuff ? I'm listening !
And it is interesting to know how to constantly evolve, I realize today everything is going so quickly, everything is in perpetual motion. I think I am a real victim of this constant high speed of the seasons, of the means of communication etc... I'm bored so easily, especially with the trends... I always try not to buy clothes because it's trendy but because I love them, I got a real crush on an item, a cut or even a material... So here is a new kind of happy friday... A Gif because it's me, and I introduce you to my writing! I was a little fed up of making you believe I was 1,80 m ! Anyway, I hope you'll like it, sweet kisses!

Today I'm wearing an old American Apparel hat, an H&M coat that I love (you can find it in store now, the material is amazing). A Baruckello dress, a shirt-collar top from COSthe polka dots tights from Gambettes Box and my love booooooots Mellow Yellow that you know already... Big hugs and kisses! Can't wait to read you!
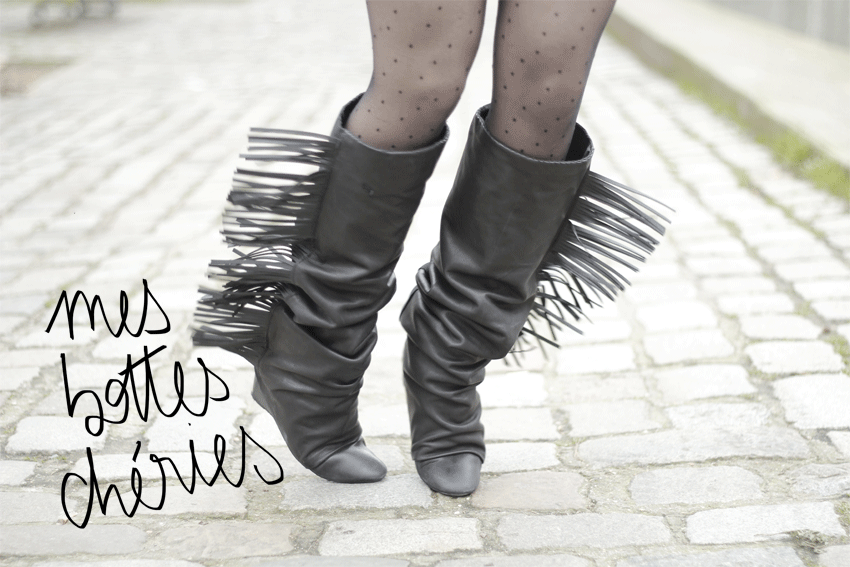
DIY BOOTS MYMARANT[:]

Ah THOSE Marant boots. The other day a girlfriend asked me about my 'relationship' with luxury fashion. Is it frustrating working for luxury prêt-à-porter fashion houses, where I've been educated around quality materials and sublime finishing touches? It led me to ask myself, "Am I fashion-frustrated?"
Okay so yes and no. Yes because let's face it, if I had the money to by incredible clothes, I'd do it in a heartbeat...but no because it's the empty bank account which keeps me creative and drives me to make the object of my desires myself (within the limits of my own skills of course!). Then I thought, alright, what if I found an envelope filled with cash on the floor right now, and I had to spend it all in less than hour, what would I buy? (Notice that I don't imagine winning the lottery. Oh no, I think far less realistically than that...'find an envelope full of money'...God, I tire myself out just writing it!) Well, I told myself that if I could only choose one thing it would have to be a pair of Isabel Marant boots. Ahh but no! I could never ever wear a pair of shoes worth as much as the GDP of Mozambique...
So yeah you could say it, my relationship with luxury fashion is pretty tumultuous and complicated. Anyways, that's why today I give you...MY Marant boots...and I think I get even more enjoyment out of wearing these than if I had the real deal. Without further ado, here are 24 simple steps to make my favourite DIY yet!
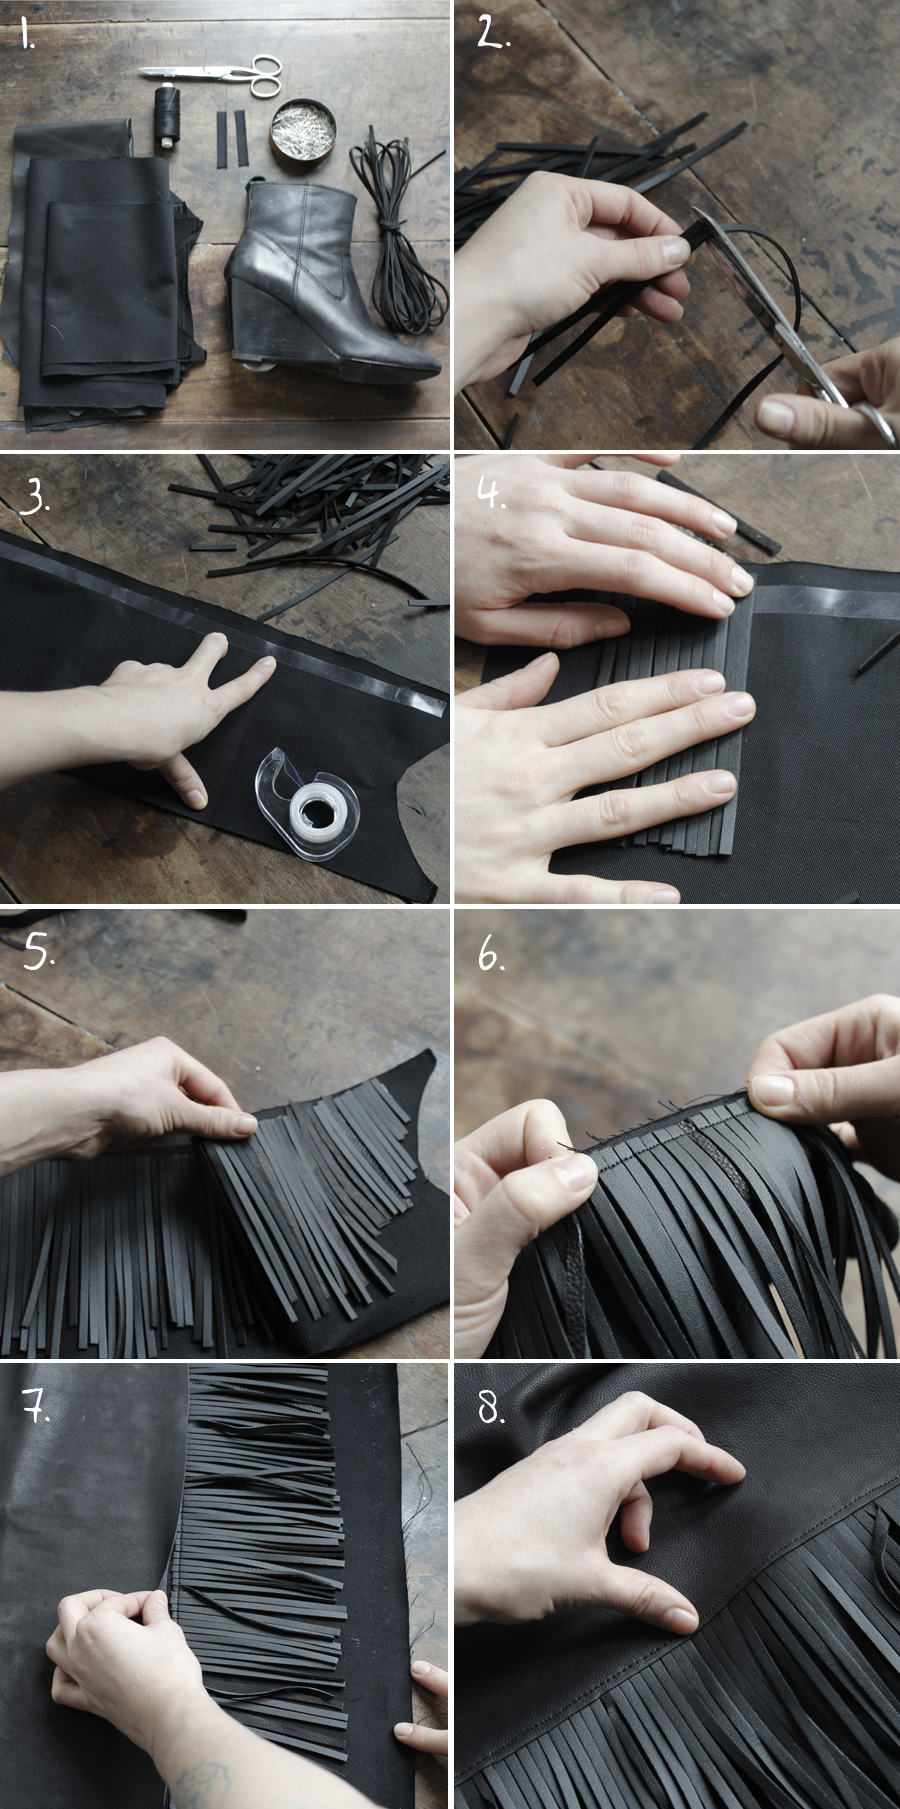
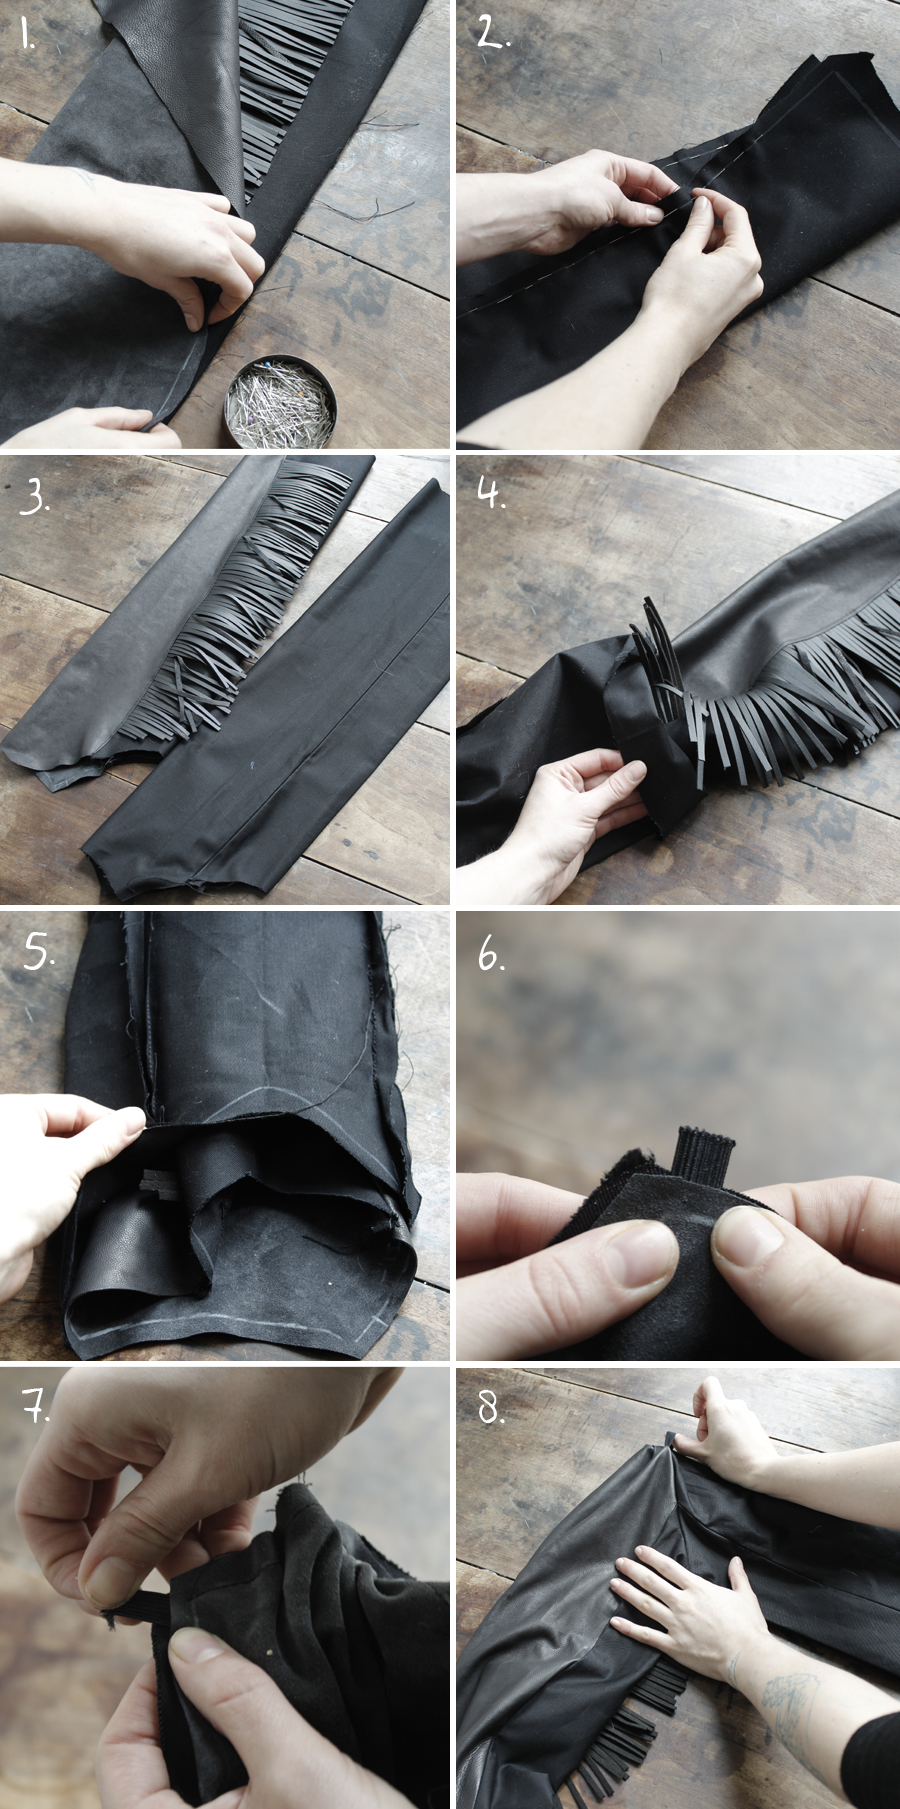
To make these boots you will need:
- -One pair of wedged boots (Mine were from Mellow Yellow)
- -Template cuttings of leather and black gabardine (download the template pattern HERE)
- -2 pieces of elastic, each 6cm long
- - 20 strips of about 1m left over leather, available from perles d'or
- -Pins, black cord and leather needles (for both hand and sewing machine). I can't stress enough it's really not worth starting if you don't have good equipment- needles and cord from fil 2000!
So, to start, cut the strips of leather into little fringes measuring about 12 cm each fig.2. To help, stick a band of double-sided sticky tape along the back part of one of the pieces of black gabardine, and put the fringes on the tape, letting them overlap a bit. You need to cover the length of the sticky tape fig 3, 4 & 5. Then sew it together using the sewing machine, making sure the machine is properly threaded with the leather needle and thread, fig 6. Take the Front leather piece and put it over the stitching of the fringing. The Front part should cover up the fringes by a few millimeters to hide the stitches fig 7. Sew the leather dead straight fig 8, so there is a blunt edge and an edge with a top-stitched seam on the outer part of the boot, the bit where the fringes are.
Pin the piece together to close up the boot, one edge against the other fig. 1. Do the same with the gabardine lining, fig 2, and then sew up the 2 parts. Open the pieces up at the seams and iron them, sliding them out, fig 3 & 4, (remind yourself of the technical terms here). Next, insert one part of the boot into the other, one edge against the other fig 4. Make sure the different points of the boot coincide with each other - heel, harness section etc, with the help of pins fig. 5. Then, on the Front part (indicated on the template) sandwich in the elastic and pin it together fig.6 - do the same on the other side fig 7. Sew them together, cutting slits into the curved bits, open out the corners, open the seams and smooth this over, fig. 8.
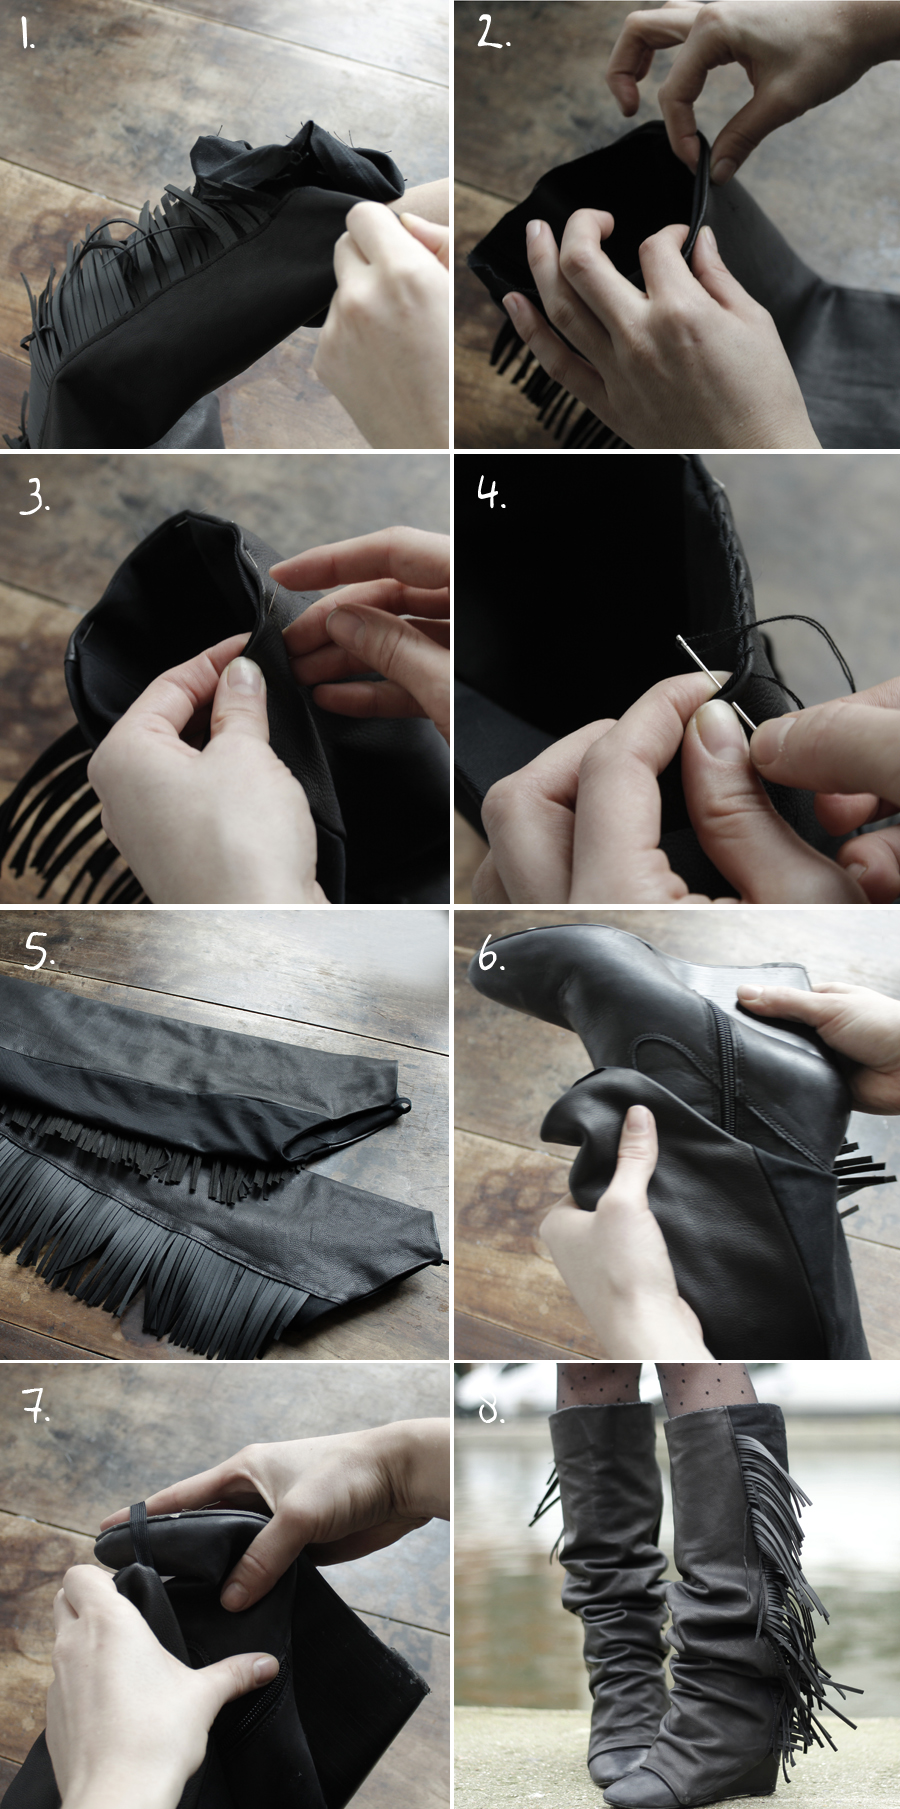
Re-insert the lining in the leather boot - fig. 1. Then to close up the boot, make two small folds around the whole circumference of the two parts, and fix one against the other with some pins fig. 2 & 3. Take a leather needle and the cord and sew around by hand, to fix the outside and the lining together fig. 4. Start again from the beginning for the second boot - you could do them at the same time if you want, hey, I'm easy, anything goes! fig. 5. Then put your boot into this leather 'gaiter' fig. 6, and hook them together with the help of the elastic, fig. 7. I know what you're thinking...'but then we have to walk on the elastic?' Yup...it's really not that scary guys. I've been using mine for a week now, test-drive after test-drive...and still no sign of breaking! Anyway, if it does break I'll just change the elastic...it's a small detail!
And TA-DA! If you religiously follow all these steps you'll see it's really not so complicated!
Thanks to Charlotte E. for the photos.
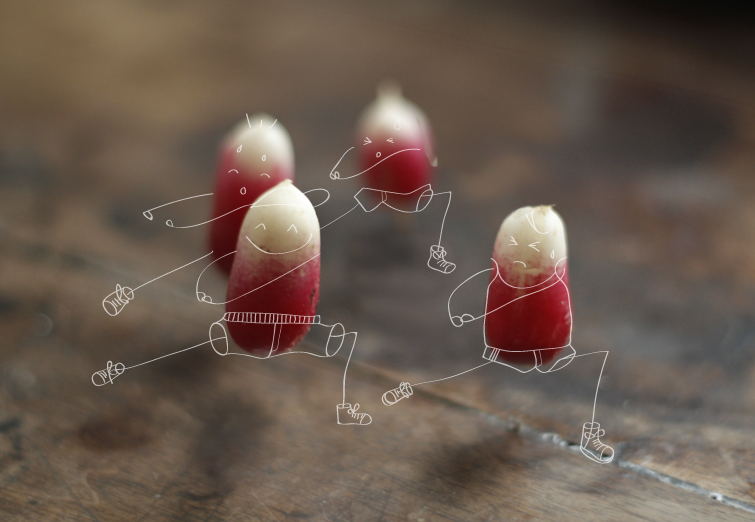
[:]EAT MOVE #7 LE RADISH
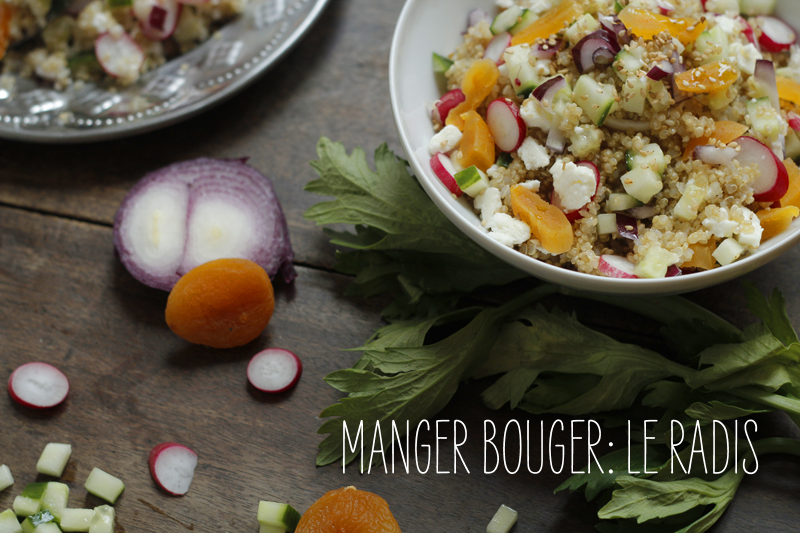
Only three Eat&Move recipes to go! When they will all be done I'd almost want to re-do them all to eat them first, and also to re-take their pictures and write the recipes on the pics to make a cute booklet that you could download and print and keep in your kitchen... I like imagining you behind your screen, and when you send me the pictures of your own creation, I can picture you slaving over your stove, your fingers recovered in eggs and flour looking on your computer for the rest of the recipe, and I keep that image of you in my head. Anyway, back to our topic and for the first recipe of the year, I thought we could keep going with our resolutions... I'm not gonna go to the Club Med Gym and kill a chocolate fondant right after, we'll see in february for the greediness, I offer that we end January greatly with a bikini friendly recipe, and we'll have the whole year to kill our paunch. I even did this crunchy, even crispy recipe, as a lunch for two muscled guys and I didn't hear the "Where is the meat?" question! Tell me you the nutrition specialists, is Quinoa starch or protein?

For this crunchy recipe you will need:
- - A bunch of radish
- - A handful of dried apricots
- - A celery
- - A cucumber
- - A red onion
- - 200 g of feta cheese
- - Coriander
- - Sesame
- - 200g of Quinoa !
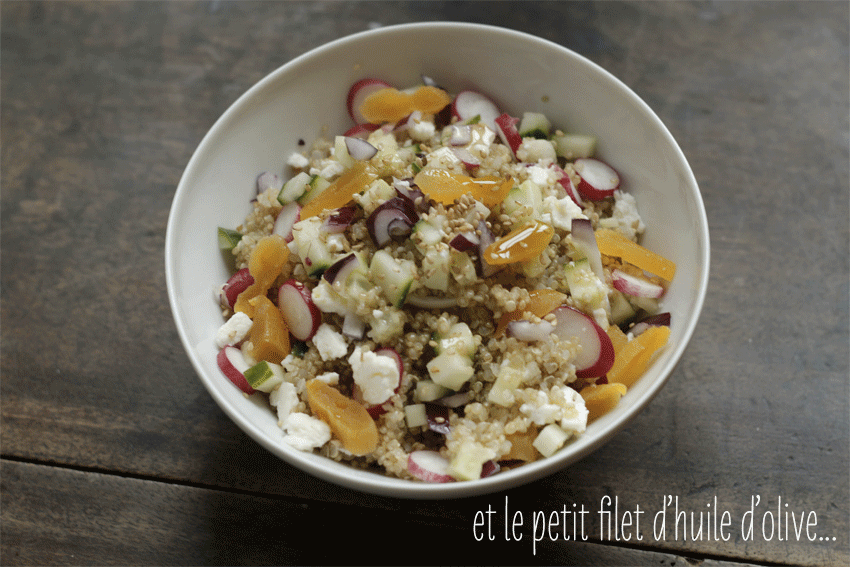
Start with boiling a large pan of salted water and when it's ready, put the Quinoa to cook for around 12 minutes (when the shell around each grain is transparent). Meanwhile, cut in small dices the cucumber, the red onion and the celery. Wash and cut the radishes with a mandolin. Cut the dried apricots lengthwise to make small lashes. Once the Quinoa cooked, strain it well and put it under cold water to stop the cooking, strain again and mix all the ingredients. Add salt and pepper as you wish and serve. Add chiseled coriander, a pinch of sesame and a trickle of olive oil... Enjoy !