


Wordpress blog EN
DIY PERFECTO
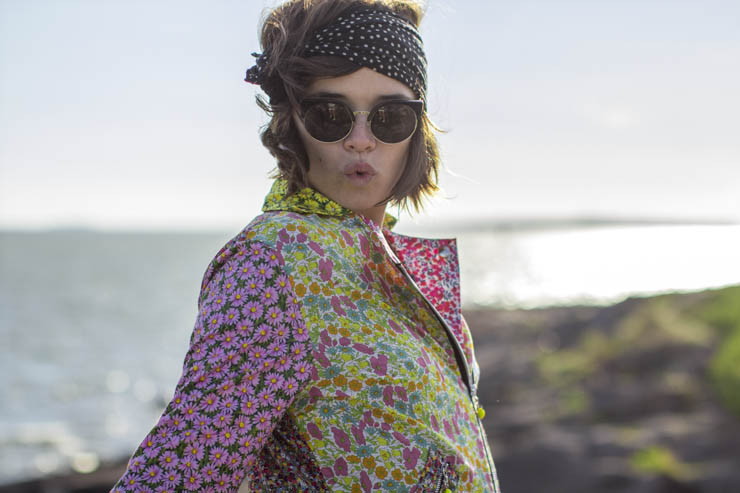
My little cats!
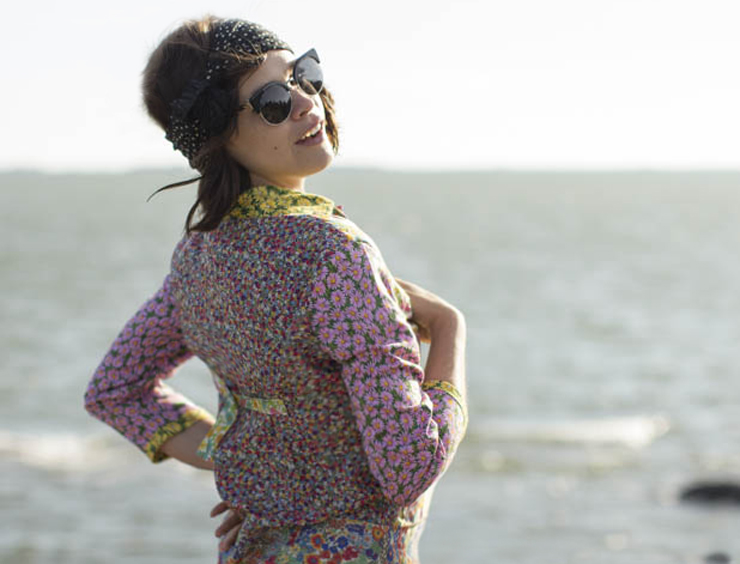
Yes it's DIY Wednesday! Here we go again we keep the rhythm going, I really want to get my fill of clothes lately! Until I made this post, it's been months since I didn't use my sewing machine! How I had missed it, what was I thinking about ?! And what a satisfaction once my work was done... I had forgotten the feeling of happiness that Makes my day... In order to tell you the story of this perfecto, you need to remember that a little bit more than a year ago I did 10 perfecto that I sold on Etsy with really crazy fabrics... Then I got dozens of emails asking me whether I was going to do the DIY of the perfectos, where did I find the template of mine etc... Firstly I didn't really want to post the DIY because it was long to make and also it was the beginning between you and me and I didn't want to scare you with such an ambitious sewing DIY. Ever since, there was this video with my sewing basics... So let's go and refresh your neurons before you start, then a few weeks ago I found this picture of a perfecto by Christopher Shannon and I think hell yeah I want one for myself as well... Here is the story, take your sewing machine out of the closet and of course look further than your computer screen and imagine your own polka-dots perfecto or in upholstery fabric etc... Have fun!
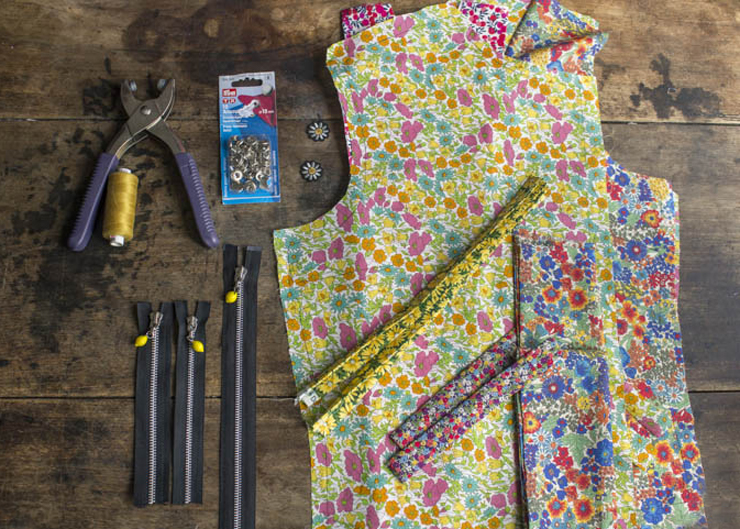
To make this DIY, you will need:
- To download the pattern HEREI made it with A4 paper sheets so your job is to print, assemble and cut them!
- - 3 zippers: one of 45 cm and two of 15 cm,
- - A sewing machine, obviously,
- - Your iron, warm and ready,
- - Iron-on interfacing to rigidify the perf's facing,
- - Press-studs and pliers to fix them,
- - A little slide buckle,
- - Fabric of course, about 1,5 m for a 1,4 m width,
- - And a little bit of patience, take your time...
`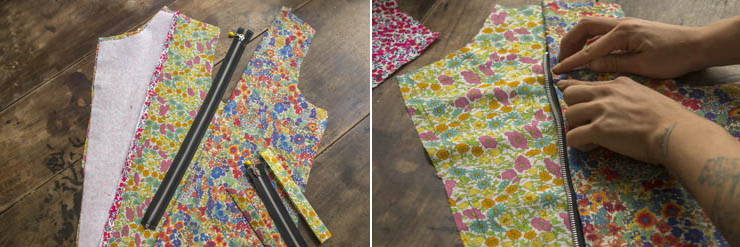
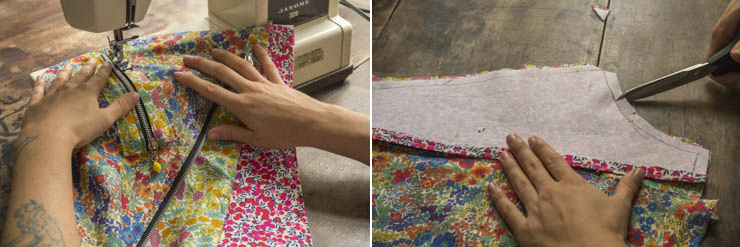
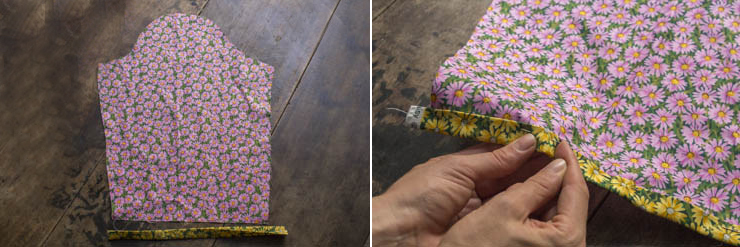
We will start with the right side. Of course before anything starts you have to transfer the pattern onto your fabric (on the INSIDE) and cut it by leaving 1cm around your outline (the sewing margin)! Take all the necessary parts for the right side (see pattern) and put the interfacing on the facing. Put the two 'right' sides A + B (of the fabric) of the right side (of the perfecto) on top of each other and make a basic hem on part B (use your iron to help you). It's here that you are going to sew the first part of your zipper, the "male" part the one with the pull. Put the zipper 5 cm above the bottom of the "right" side (of the fabric), pin, sew with your machine and iron.
Then put your first false pocket, take two strips of fabric and carefully fold them in order not to have any raw seams (use your iron to help you). Pin the strips on the front next to the zipper to create your false pocket. Now let's get to the C facing. You have to pin the "right" side against the "right" side until the notch shown on the pattern, it is important for the rest (it's the location of the collar).
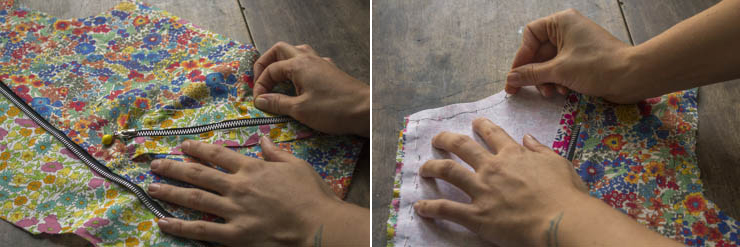
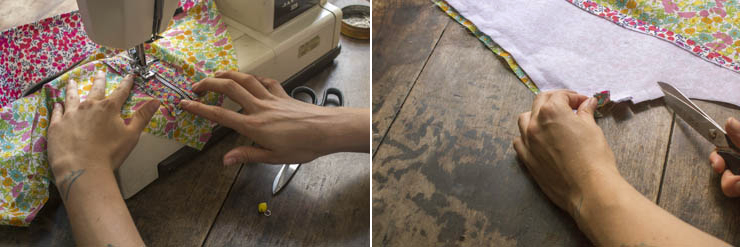
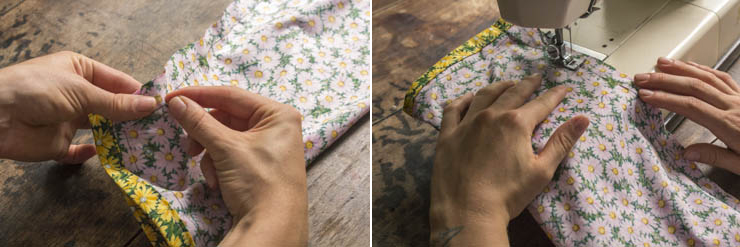
Sew the pockets and the facing that you'd previously pinned, then clip the collar and clear the facing and front angle.
Slide and gently turn the C facing and the A front over, iron to flatten the seam. Then take pins to make the breast dart. Sew with your machine and iron. The right side of the perfecto is done...
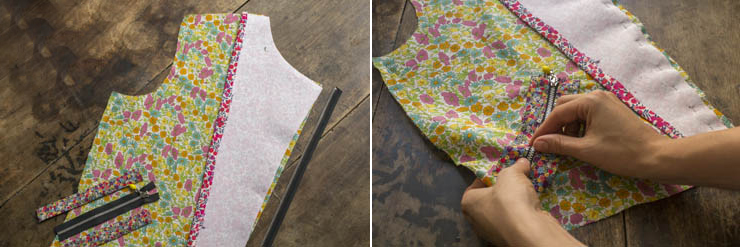
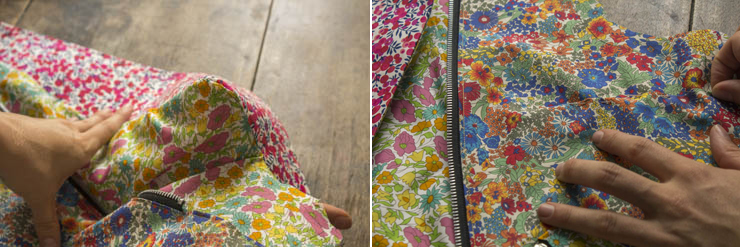
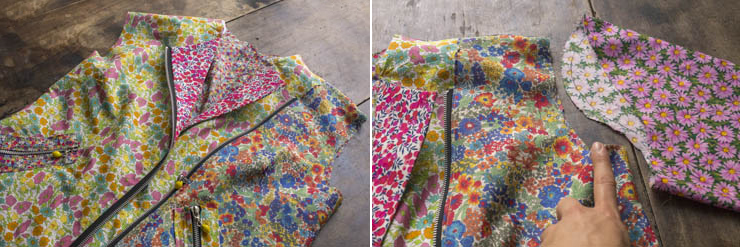
Let's get to the left side... Start to pin the left A' front and the C' facing by sandwiching the other part of the zipper, the top of the zipper must lean again the bottom of the collar as on the first picture. Pin the false pocket like on the right side of the perfecto.
Sew the lot with the machine, clip, slide and iron just like the other side, you're starting to be real little dressmakers!
Let's get to the sleeves, it's very easy, take two strips of fabric and preform them as slanted strips, it's about making a pretty completion at the bottom of the sleeve, pin and sew with your machine.
Then pin the rest of the sleeve "right" side against "right" side in order to make a tube. I'd advise those of you that don't have any serger at home to sew a first time with a regular stitch and a second time using a zig zag stitch.
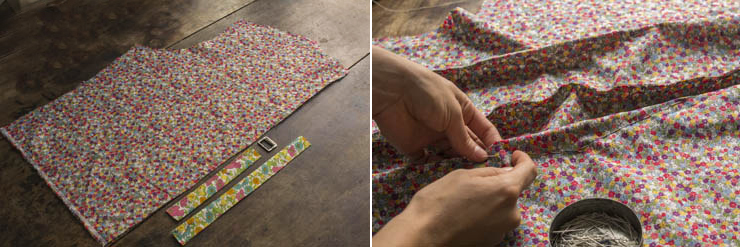
Let's now get to the back, it's very easy, first assemble both parts D and D' of the back and sew an open seam (with the help of your iron). Then pin the back darts and sew them with the machine, don't forget to iron well afterwards.
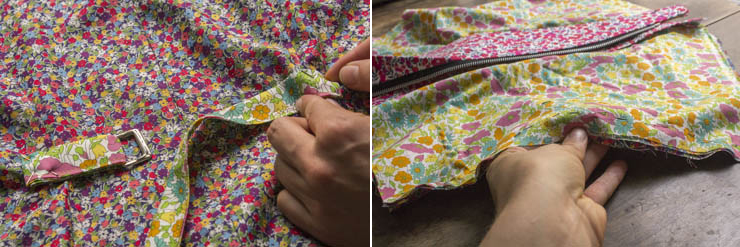
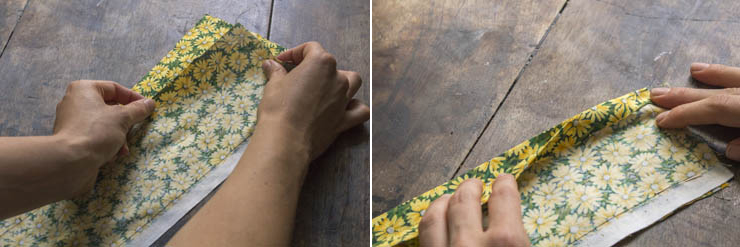
As shown on the pattern's explanations, draw two strips into the fabric that you will preform like slanted strips and sew to obtain a very clean ribbon of fabric. Put the slide buckle into the first ribbon and make a loop to prevent the buckle to ever fall. Pin this little martingale in the middle of the back or a little bit lower it's up to you to decide where you want your perf' to be taken in, rather at the waist? On the hips? Sew it with the machine by making a cross with the seams. You now have your back, both of your front and sleeves... Start pinning together the back and the fronts, "right" side against "right" side.
Sew and double it with a zig zag stitch. Then thoroughly flatten the seams with the iron. Let's now get to the sleeves, it is starting to look like a perfecto...
Now pin the sleeves and the body of the perfecto together, if you've worked well so far the armholes' circumference will perfectly fit the sleeves. Sew ad double with a zig zag stitch, then iron... It will become an automatic reflex you'll see.
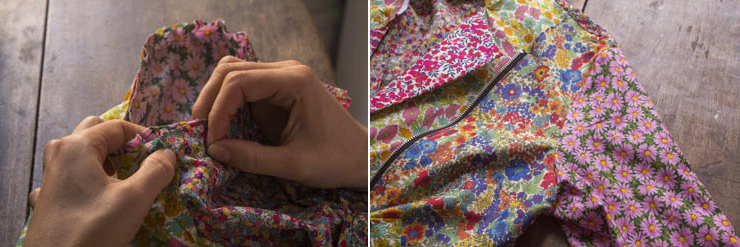
Now let's get to the collar, with your iron make a little turnover as on the picture and pin your collar "right" side against "right" side, sew it, clear the angles and slide on the "right" side.
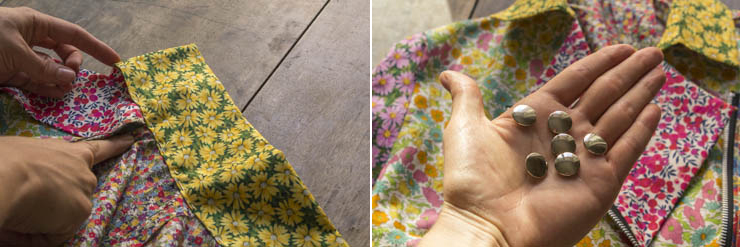
Then pin the collar on the perfecto, the notches on the pattern will work as points of reference, they match with the shoulder seams of the perfecto. Carefully sew the collar with your machine using a pin tuck . Then it's the finishing touch... The press-studs!
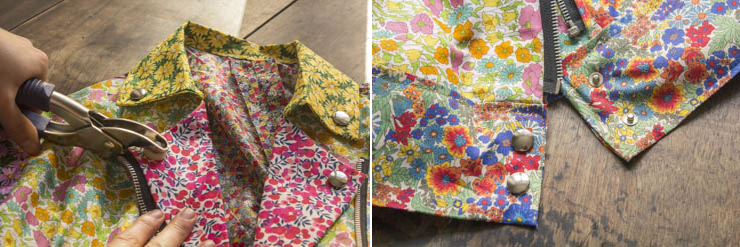
It really is easy, take an "Anorak" kit and follow the instructions and everything will be fine. I only put the "female" part (the smooth button) because here the press-studs are only decorative but feel free to put the other side. Oh and also, don't forget to sew the belt all around the bottom of your perfecto to finish your jacket (you have the instruction with the pattern's explanations!).
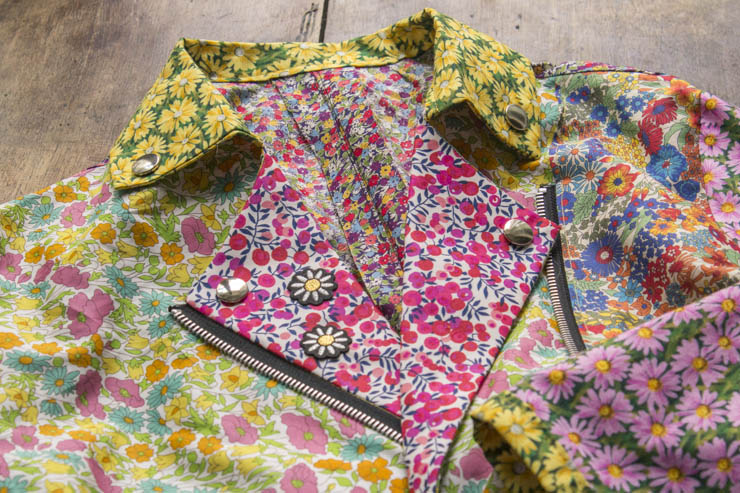
And TA-DA! The little flowers are from Macon et Lesquoyso adorable!
[:]
CHERRY ME
Happy Monday honeys!
I hope you're doing well... I'm delighted to tell you that I am back! I'M BACK! And also I'm very happy to come back with these cherry pictures, that make me feel good (I'm not getting any better, I know...). I told myself, preparing this post, that it made me really happy to take pictures of what I was experimenting in my tiny kitchen... Besides, I have to show you the 3 square meters of my kitchen that I'm using as a "laboratory", a tight space, I'd need a very wide angle to take a picture of it, I feel like I'm spending my time cleaning this kitchen, anyway... Bottom line, I want to say i'm happy to bake things and to take pictures of them.
And to say it all, I think that imagining the settings, make my little sets, my little lemonade after all, with my recipes, well it makes my day much more than eating them.
I think it comes from the fact that I taste the recipe during all its different steps and at the end I'd rather treat (at least I try) the others. Just like with the gifts. I'm completely hysterical and impatient to see my kin discover the presents I made for them. Bottom line is that sharing, and nourishing oneself with beautiful things is a hell of a 'real' nourishment...

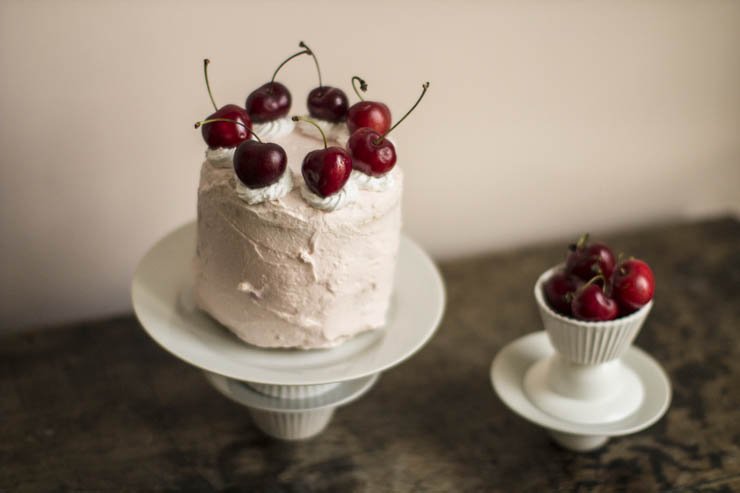
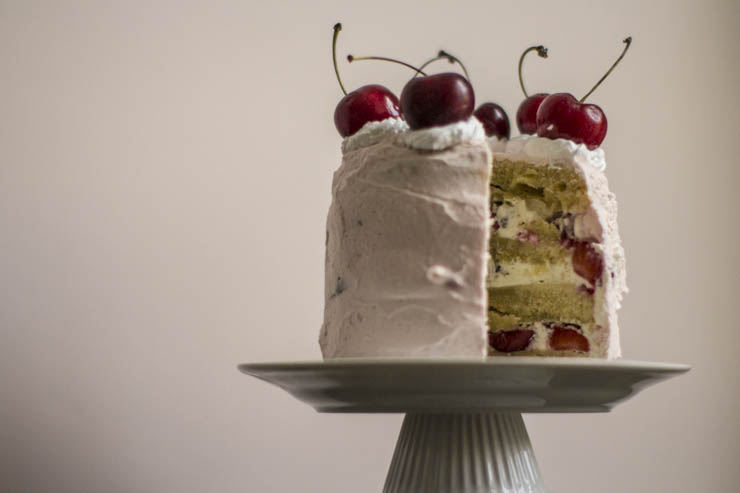
I wanted to experiment a new sponge cake recipe, lighter and more ethereal. I found this one in Le Petit Larousse Pâtissiera good basic just like a good with t-shirt. You'll need, for two little retractable molds:
- 140 g of flour,
- 4 eggs,
- 140 g of superfine sugar,
- 40 g of butter.

To start with, find a bowl able to go above a bain-marie. Put the eggs one by one. Little by little pour the sugar, mixing a little bit. Put your bowl above a pan with simmering water and energetically start beating.
Beat until the mixing gets thicker. Then take the bowl out of the bain-marie and keep beating with your electric beater until the mixing gets cooler.
While the butter is melting, sieve the flour and pour it over your mixing, gently add the lukewarm butter and mix the lot with a spatula. Lift the dough but do not mix too much. Pour the mixing into both molds and bake in your previously heated oven at 180°C for about 25 minutes. But control the baking after 20 minutes with the tip of a knife.
For the decoration and the stuffing, you will need:
- 15 cl of water,
- 4 cl of rose sirup,
- Beautiful morello cherries, strawberries and raspberries,
- 30 cl of very cold whipped cream,
- 15 g of powdered sugar,
- A little bit of pink food coloring (optional).
Once your sponge cake is cooked, cold and out of its molds, take a large knife and cut your first cake in order to have two disks. Start again with your second cake.
In a small bowl mix the rose sirup and the water, and with a silicone brush coat the cakes with rose sirup. Save.
Let's now get down to firmly whipping up the Chantilly: as soon as the cream gets thicker, add the powdered sugar little by little. Take another mixing bowl and transfer half of your Chantilly into it, then put a few drops of food coloring.
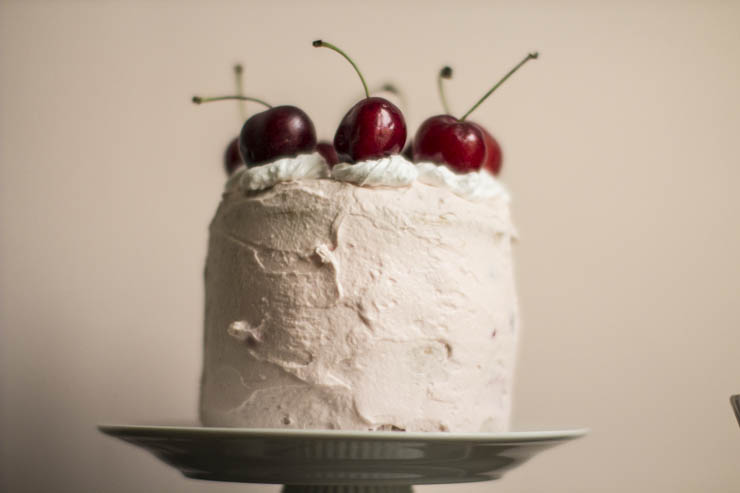
With your white Chantilly (store the pink one in the fridge in the meantime), you're going to build your cake, it will be used as a binder - a bit like cement - between the several stratum of your sponge cake. Take your first disk, generously spread the Chantilly and homogeneously add a handful of berries. Put the second disk on top and repeat the operation, you're "building the stories" of your cake. Try to retain some white Chantilly for the final decoration.
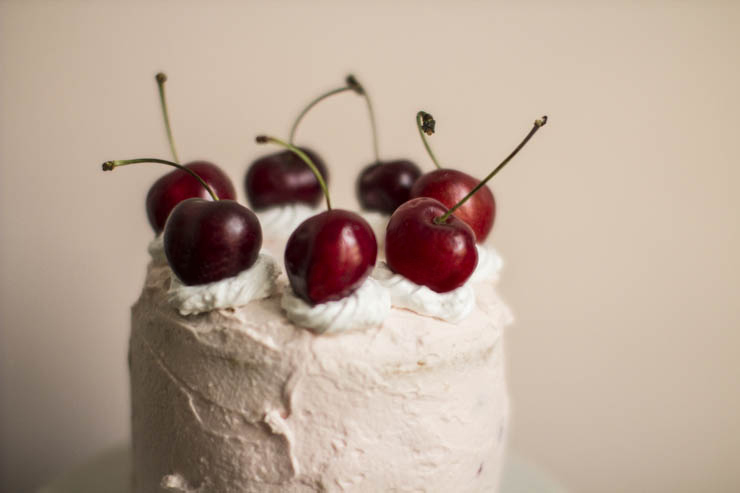
Next step is the "coating" or the "rendering", I'll let you choose (and yes I'm baking as if I was working in the construction industry, it tones down everything). Take your spatula and coat your whole cake with the colored Chantilly, it has to be very firm. Feel free to add a second layer to get an unvarying frosting. Put the white Chantilly you have left into a pastry bag and make little peaks all around the top of your cake. Add beautiful morello cherries on your white domes and enjoy!
HAPPY FRIDAY #45

Happy Friday my chestnuts!
I wish you a wonderful beginning of weekend and a nice trip for most of you, I feel like all my friends are living Paris. But I like these empty streets... The atmosphere is quite weird, a bit like the calm before the storm, or the end of the world, no less. A pre-catastrophe atmosphere that I like, I feel like I own the town all by myself.
Anyway, for those of you who stay faithful to my little site (I saw yesterday that you were numerous to come around here, thank you) I wanted to tell you a story... A long long time ago, I posted a happy friday, this one (when I look at the pictures again it makes me smile how we are changing...), on this look I drew a satchel, saying that I'm looking for the perfect bag... And a few days later, the delicious Vanessa from Trumpet by Meister contacts me and tells me that she drew a satchel that I might like, and offers me to send it to me from her creation studio in India. I'm only telling you this anecdote because I feel like it was really crazy to make this blog. All the connexions, the encounters, and to express one's feelings and to see them getting real... I sometimes think that this little cyber space is like the Genie's lamp.
Next time I'll draw a huge ring or maybe bullions I don't know... I wish you a wonderful weekend, by the way I'll need you during the next few days, stay around!

Today I'm wearing a Trumpet by Meister satchel, a much loved incredibly loose silk dress from Asos... My H&M x Marni necklace that you've seen a hundred times... And home-made and tireless bikers low-boots by Sendra. And a vintage hat bargained last year in New York, but you can find an ersatz like this one...
Great address Jules & Shim + a little DIY[:]
My little cats...
I'm stuck, I dabble in coming to this blog, but I think I underestimated the length of my holidays: one week vs the furiously crazy year I've just spent was definitely not enough! So I'm going at my own pace, I listen to myself a lot, I have things ready for you especially the famous DIY I bet you'll like it! But for now, I think I need to take refuge in the summer and its softness and calmness, to start finding the energy to create again, and to boost my willingness of doing! I can feel that September will be CRAZY, even completely mad regarding logistics and timetables but you know what, I love when my life is going at 2000 an hour, simply not today. Ahah I need to rest and to nourish myself with beautiful things. So I'm still there for those of you still at work, and for the internet junkies who are paying a visit from their phone while laying on the beach (DROP THIS PHONE)... I realize as I write that it's been a long time since I wrote to you and it feels really great! So don't panic, I'm not putting pressure on myself I have nice things for you, I'll be back really soon...
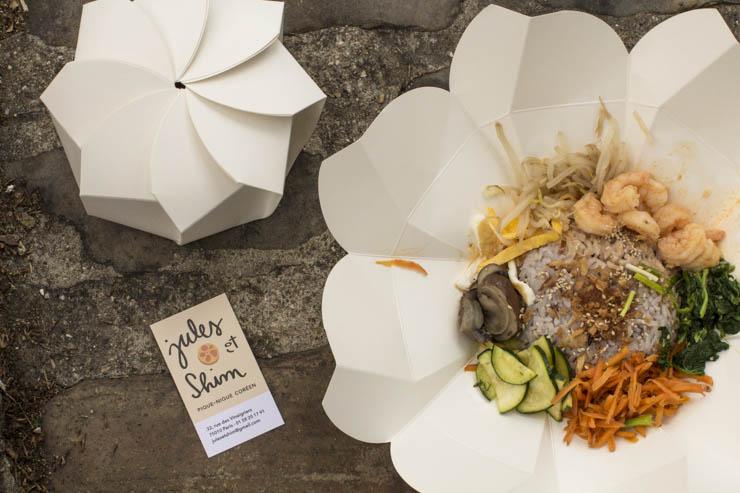
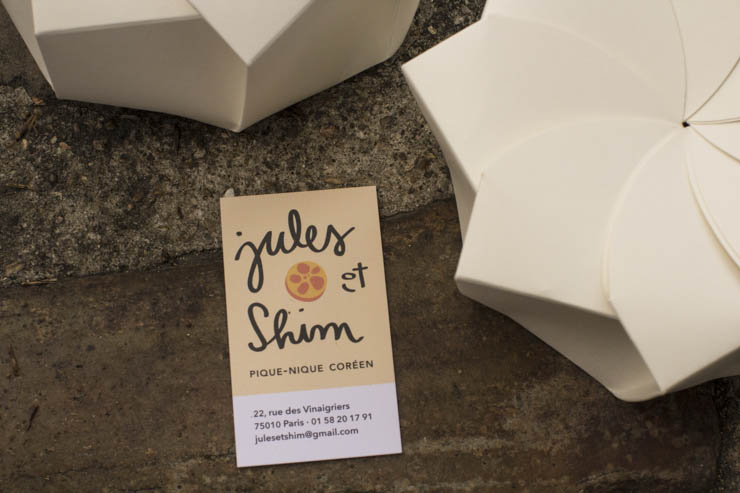
Anyway, today I want to talk to you about a nice address I randomly found in the neighborhood the other day, it kind of became my canteen, it's healthy, it's good and it's pretty who could ask for more? Well, and the price, of course, isn't expensive at all (yes it's possible): "Jules & Shim", the korean picnic - even the name I find it awesome. It's very close to the Canal, at the 22nd rue des Vinaigriers, 75010 Paris. I'd advise to order take away to eat your Bibimbap by the canal. It's atypical Korean dish: a mixing of rice, meat, fish or the vegan version, with a hint of pepper, you mix everything and you enjoy it with a large spoon...It's healthy and fresh and I could eat it all the time lately, I'm sure you'll love it. I tested for you the cold cucumber soup, awesome, and the matcha/strawberry cake, amazing... The Bibimbap starts at 8,50€, let's go!
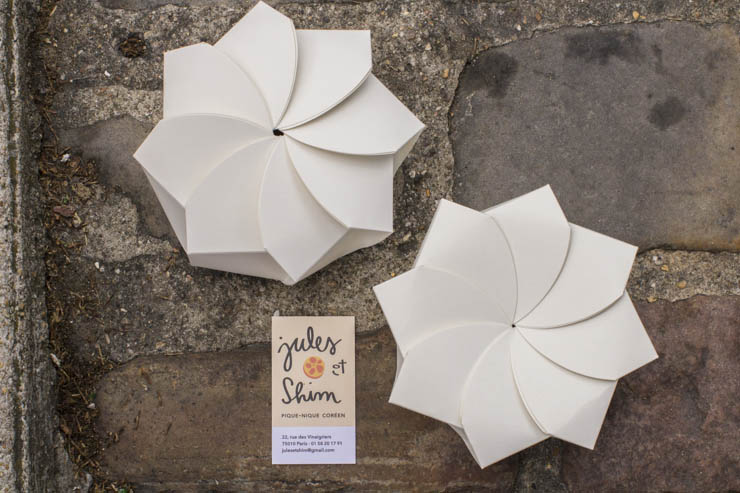
And of course I fell in love with this amazing lunch box, I took it, cleaned it, scanned it and vectorized it and here is the template for a A4 sheet. A lot smaller than the original one, you can use it as a travel box to store your jewelry during your holidays... To make this express DIY, you will need:
- To download the template here,
- A pair of scissors,
- A steel rule,
- A blunt scalpel.
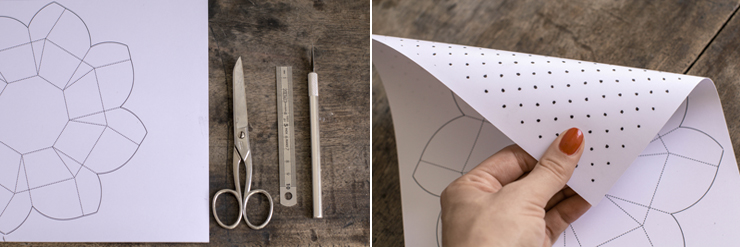
To start with, print the template on Bristol paper, and put the sheet back into your printer to print the motif of your choice on the back of your sheet.
Then, with your scissors cut along the black lines, inside the black lines even. You now have a sort of stylized flower, printed on both sides.
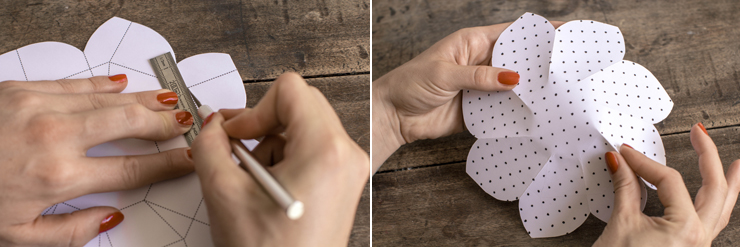
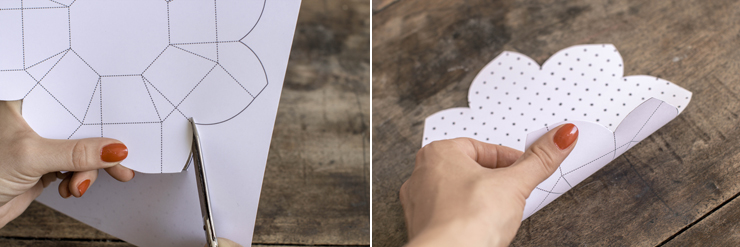
With your steel rule, and the blunt scalpel, redraw all the doted straight lines. Here I'd advise a blunt scalpel because you'd risk to run through the paper with a new one whereas we only want to mark the ridges. Then on the side with the motif, pinch the ridges with your fingers.
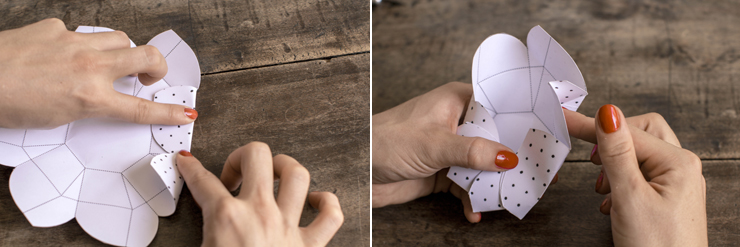
Keep marking all the ridges by slightly pushing with your finger. Once all the ridges folded, start forming the box, you'll see it'll work by itself, start assembling all the "petals" towards the center and fold the angles as shown in the second picture.
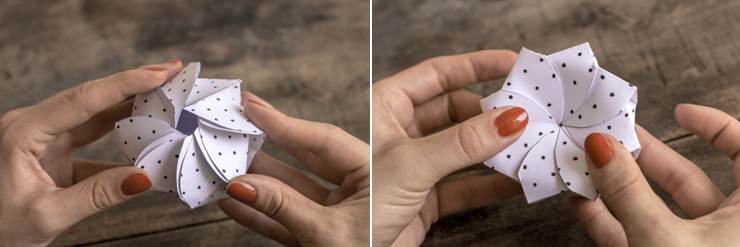
And TA-DA! Have fun making them of different shapes, sizes and colors, if you lack ideas to wrap your presents... Be assured that you'll see this little box often around here.
Edit: I just got an email from the creators of this box: Aphinitea. I am truly sorry that I didn't know their website before, so I withdraw the template from this post, I hope you'll understand. If you ever want to have such a beautiful box you can still go to Jules and Shim, or order them on Aphinitea's website!
[:]CHEESE ICE CREAM
Happy Monday my cupcakes,
I was caught by surprise when I came back from my holidays... So much work, things to deal with, people to meet and so on... Crazy July! And to say that I thought it would be quiet, not at all! But it's all good, I'm home, fresh and ready to set off again. I love the expression "you have to strike while the iron is hot", I relate to it... I hope you're enjoying your holidays and making something worthy of them out of your fingers, I'm preparing some I-have-time-I'm-on-holidays DIYs and if you get me right it means some ambitious DIYs :-) But today I'm here to treat your tastebuds...
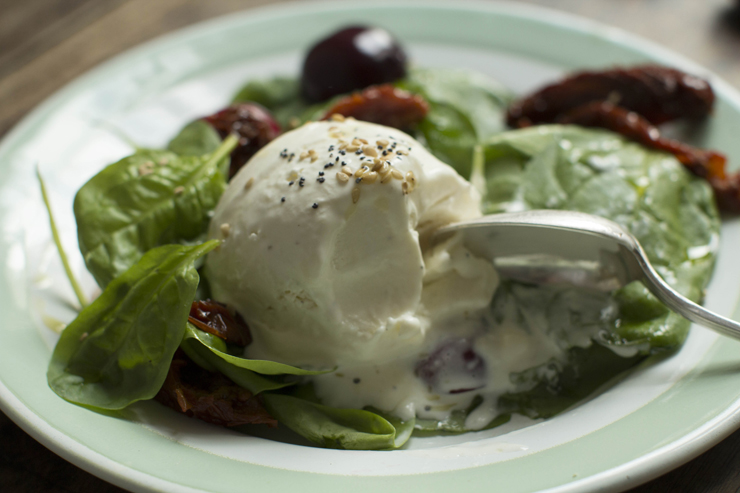
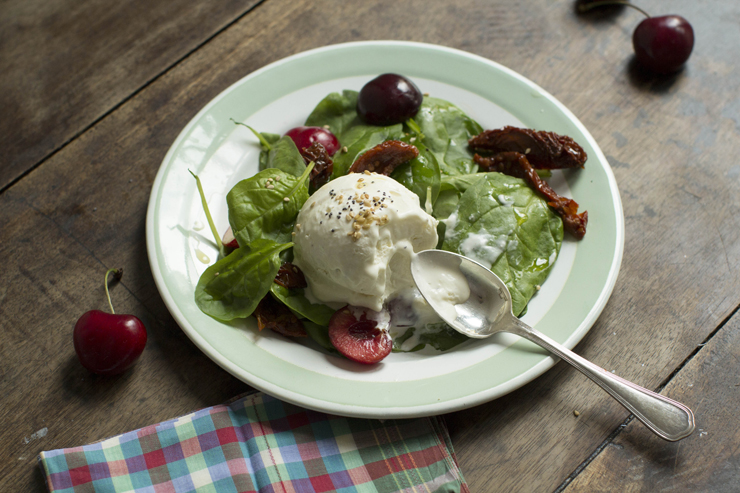
So in keeping with the iced and refreshing food, here is a stunning little recipe of a goat cheese ice cream, that you can serve as a starter or, why not, for desert... The cheese addict living with me asks for more...
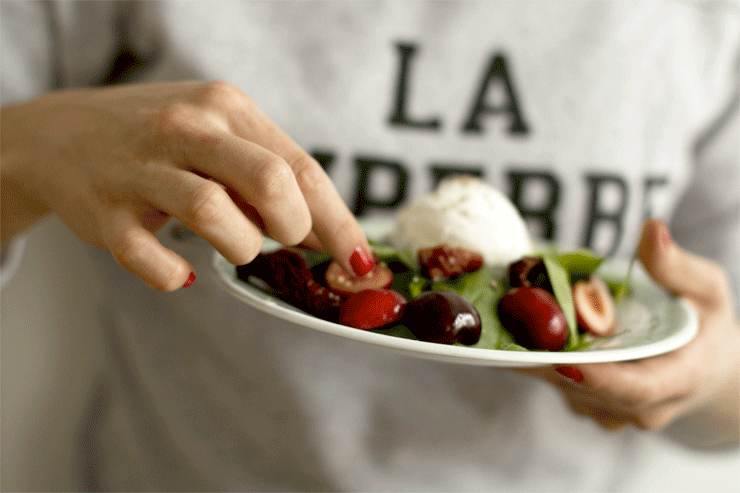
To make this recipe, you will need (for two people):
- 4 handful of baby spinach,
- 50 g of morello cherries,
- 1 little jar of dried tomatoes,
- 125 g of goat cheese or ricotta,
- 5 cl of whipped cream,
- 5 cl of water,
- 10 g of sugar,
- 2 tablespoons of lemon juice.
To start with, in a pan bring the water and sugar to boil. Once the mixing is boiling, take it off of the stove and pour it into your blender, adding the goat cheese and the cream. Mix for about 1 minute, your mixing has to be as smooth as possible. Let the mixing cool down in the fridge for about 1h. Then get your ice-cream maker, pour the mixing into it and let it work for 15/20 minutes. leave your ice-cream aside in the freezer.
Nothing could be simpler than plating-up: wash your baby spinach, put them in a bowl, halve the cherries and stone them, then add them to the baby spinach. And to finish with cut the dried tomatoes like stripes. Dress as you like. As for my, I found the perfect mix: hot chili sauce (one tablespoon) + olive oil (4 tablespoons) + strawberry vinegar (2 tablespoons) + 2 drops of soy sauce for the salt. Enjoy!
And a little booster shot: don't forget to participate to the vitaminwater contest by posting a picture of your fashion cake... You still have a little bit of time, the winner will spend the day in Paris so he/she and I will make his/her cake together, and the cake will be sold by a major brand! Be ambitious!
HAPPY FRIDAY #44
My little timber wolves,
I just came back from my week of holiday and it was SO great, so great because it has been centuries since we didn't have a NICE and WARM weather in July near Bordeaux for my nano holidays! Happiness... I come back on your comments from last week to thank you again, it really makes me want to keep going and make other series like this one. And the subject seems so adaptable, anyway... It is now impossible for me to put nail polish on without eating an ice cream... I come back to this idea of ice cream because I thought it was obvious that I talked to you about my job by showing you ice cream... Like it'd go hand in with my job... As if my job was a kind of treat, a candy that makes me want to get up in the morning... I find it quite cool even beautiful, even though I sometimes eat bitter sweets... It worths it a hundred times!
And to let go a little off this job stories, I'd like to tell you a last cute story. Last week my niece Malia, 10, asked me: Auntie, what actually is your job? It is hard to explain to a far-from-being-stupid child... And I found myself speechless, I wasn't going to tell her about set design or artistic direction...
I should have told her I was a Swiss Army knife... Happy Friday my kitties!
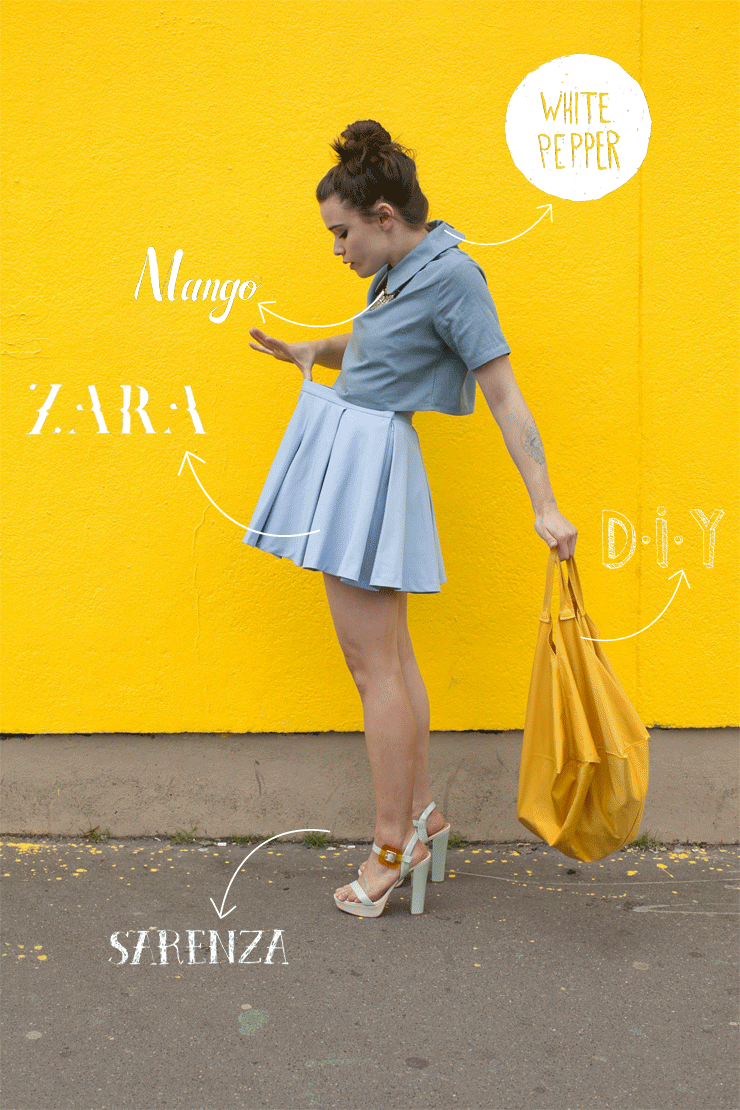
During this warm friday I'm wearing shoes found on Sarenzaa little Zara skirt from this season, a cropped blouse White Peppermy Mango necklace that you already know about... And my bag of love remember! Have a wonderful weekend!

Ice ice baby week #5
My little cats,
Today - a little later than the other days - is the last but not least manicure: glitter falls and stainless background... To carry on our working girl series... Yesterday I was talking about my doubts, today I'd like to talk about my desires. Don't worry, my doubts are not stopping me from living but I have to say that sometimes when I look at the "why I am at full speed all the time?" situation, my deduction is that I might be afraid that this hurly-burly of projects, adrenaline and novelties stops.
Anyhow I wanted to thank you for your comments I'm really truly happy to have such kind and cool readers as you!
Anyway, today as I was saying, I have millions of desires... But mostly I want to make more set design projects, windows, series of pictures like this one... But also I'dl like to design clothes again or, why not, be the artistic director of a clothes collection... It's true that it is my job in the first place... I have so much fun when I have confines or when I put myself some...
This is like my Santa's wish-list in the middle of July... But one day I realized that when I wrote my desires or my goals, it made them more tangible and it made me provide myself with the means of accessing them. You now know (almost) everything... See you tomorrow for my favorite picture!
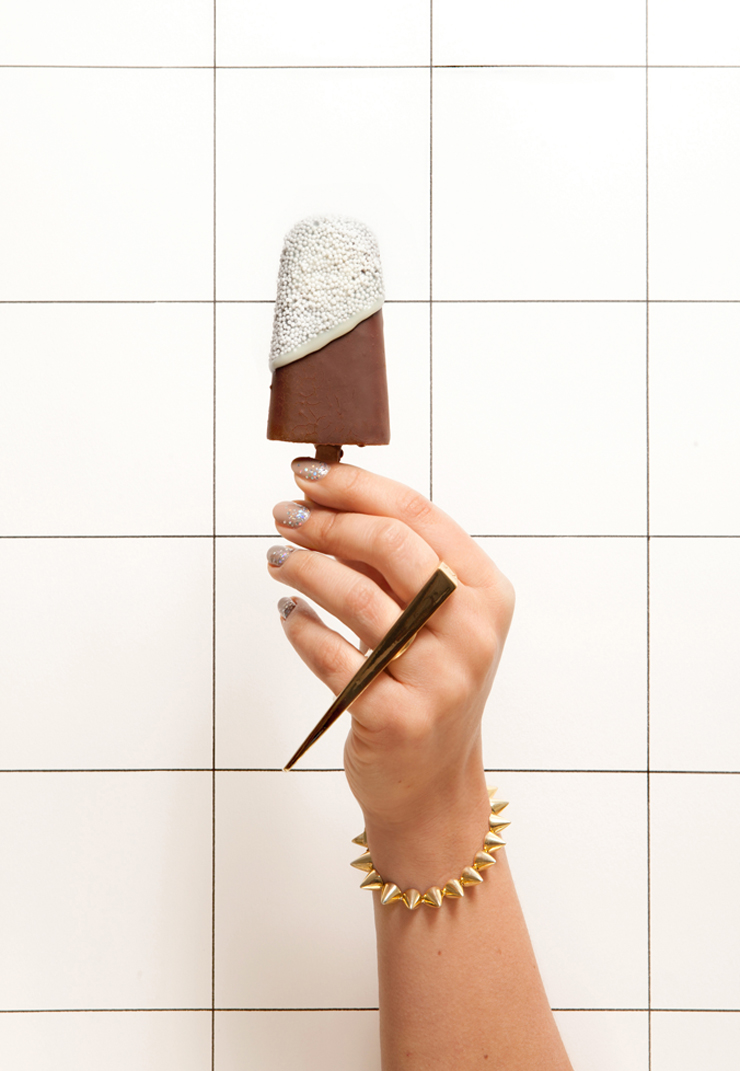
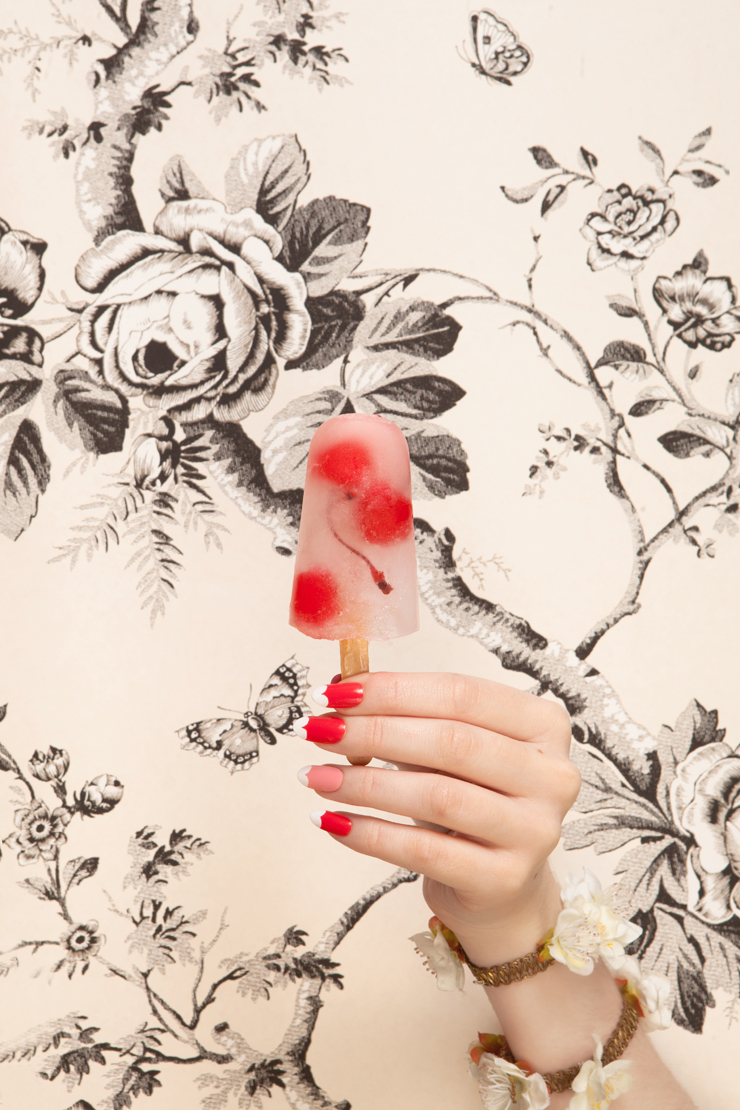
Photograph Camille de Laurens for Ma Récréation and Make My Lemonade. Eskimo Pie made by Lisa Gachet. Alexandre Vauthier Ring and Edie Borgo Bracelet at Le Bon Marché. On the nails: Capuccino nail polish from Kure Bazaar and a silver glitter lacquer at the base of the nails. Nail Art : Yumi Toyama and Sophie A.
Ice ice baby week #4
Happy thursday my chestnuts!
How days fly! I write volumes every day, it looks like I have a lot to say... In the series "live my life as a company boss" I would like to talk about my doubts.
Today, I work every day, yes every day... Because yes, when you have your company and your office at home well there is no saturday, sunday or even bank holiday... So I'm a little machine, but I love what I do, I'm one of those you get up very early in the morning because I liiike it and I feel like I'm about to do so many amazing things during the day: create, meet, blog, discover, learn. I love it! But my greatest fear is that everything stops as fast as it all started if I take a little break. So today I try to learn how to compartmentalize my timetable in order not to burn out. I try to let my computer go after a certain time, I try to take a little week of holiday (WITHOUT THE WIFI...). So it can seem crazy but my greatest anxiety today is to stop working and let myself be.
There are many more things that I'd like to learn such as... Patience. Okay I'm patient enough to sew hundreds of sequins on a shirt but, I was still talking about it yesterday, I have zero patience regarding my projects, planning a long-term project is a torture to me, for instance the book took a year and it was very frustrating for a project-bulimic like me. I want to do everything now, and I mean now...
Okay so today I shared my doubts... I wanted to thank you for your awesome comments, it is truly amazing to read your positive feedback about what I'm telling you and about this project with Lili that I loved doing... If you want to find the black sesame ice cream recipe, rendez-vous on Lili's article... Personally, I think this manicure is my favorite of the week!

Photograph Camille de Laurens for Ma Récréation and Make My Lemonade. Sesame ice cream made by Lisa Gachet. H&M SweatshirtNixon Watch. On the nails: Rose Milk and Smokey (on the edges) nail polishes from Kure Bazaar. Nail Art : Yumi Toyama and Sophie A.
Ice ice baby week #3
Hello my little cats!
I am delighted about such a nice weather, I was worried to fall through with my Ice Ice baby or Nice cream week... We have a blast with this sublime weather! I have to make a weather forecast recap because it's been almost a week with such a sublime weather and it is an important fact... My skirts are getting shorter and my blouse transparenter (yes yes), if it keeps going I might do a fan DIY very soon... (ha ha no I'm kidding, please remember and store up the heat for next winter and we'll talk again about it...)
Today to keep up with this week, I tell you how it works inside my head... I wanted to talk about inspirations. How I develop a project and how it starts... You'll see that I don't have any miracle recipe but my two safeties are lists and mood boards...
Lists because it is my #1 professional satisfaction to do things to then be able to cross them off my list... Happiness isn't so complicated... And mood boards, the craziest time was when I was at school. There was internet of course but no Pinterest of Tumblr, and my visual researches were only on Flickr, Google images and even in very very ancient search engines: BOOKS. Yes, yes, I photocopied everything. Today I think that if I were in school right now, my inspiration boards would be much richer and more attractive...
So why "attractive" ? Because at the beginning of a project, to support your ideas at best when you lack words or you cannot express the ideas inside your head... Do it with images. I don't know who used to say "a little sketch is worth more than a long speech"... Well it is the same with the mood boards and I: when I cannot clearly express what's in my head and I have to sell the idea to a client, in order for him to find my idea "sexy" and attractive there is nothing more talking than beautiful images.
It happened to me quite a few times to explain a project I had in mind, that was crystal clear in my head but nobody in the audience was seeing my point. And mood boards were my salvation to stop looking like a loony.
So I don't care that this image is from another ad campaign or another photo series. Here we are talking about inspiration, escape, and you have to feed your brain to make it understand a concept and digest it in order for YOUR IDEA to come up. It is obvious that we don't want to copy/paste something else but you have to free yourself from the "we can't do it because it has already been done" because if we start thinking that way, we don't do anything. So yes, today this image is very inspired from the Kinfolk magazine that I love but it is "re-interpreted" in order to match our week intention: nail art & ice cream. Moreover I think that if you cite your sources and you're transparent about your approach, at least regarding the images, people can only thank you.
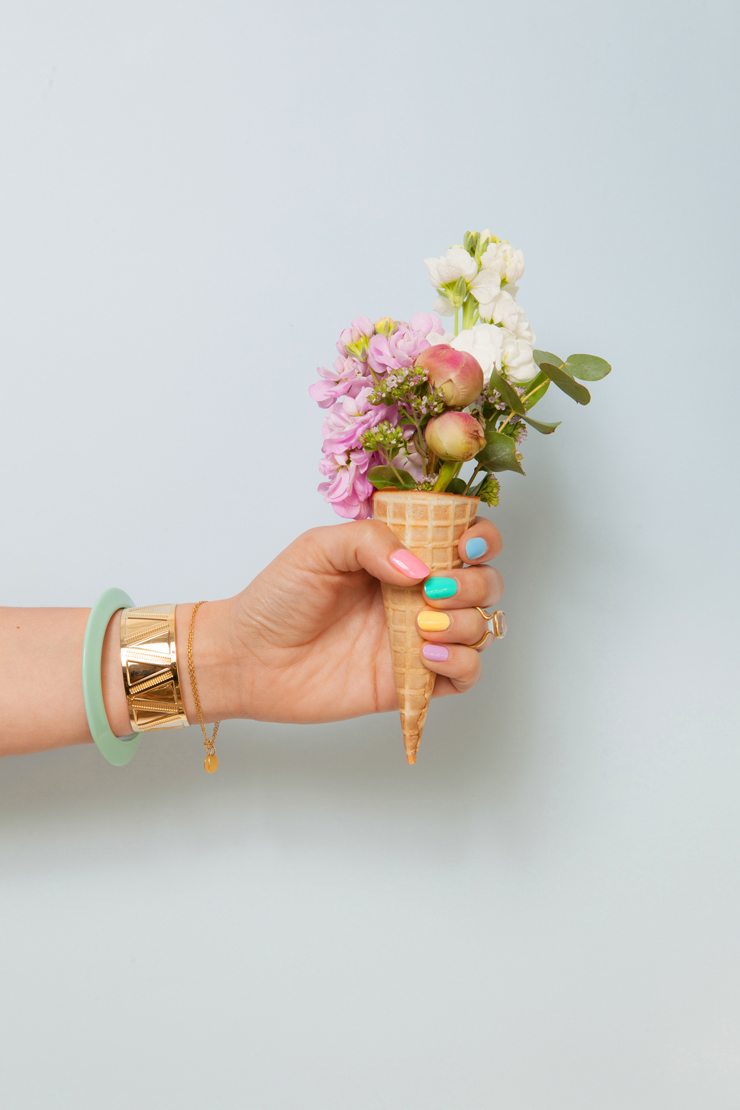
Photograph Camille de Laurens for Ma Récréation and Make My Lemonade. Flowers ice cream inspired by the Kinfolk magazine. Vintage ring Marie Hélène de Taillac, Golden chain around the wrist and medals Marie Hélène de Taillac, Golden bracelet Chic Alors, turquoise bracelet New Look. On the nails: Fuji (mauve), Sakura (pink), Frenchie (blue) Kerria (yellow), Caicos (green) nail polishes from Kure Bazaar. Nail Art : Yumi Toyama and Sophie A. Model : Lili Barbery-Coulon :)
Ice ice baby week #2
My little cats,
First of all, thank you for all your feedbacks and comments, they are so sweet, I love reading your first cosmetic emotions, it really is a pleasure to see you remember.
During this week I wanted to tell you a little but about my work, my job, the best job on earth to me. The more I think about it, the more I realize that showing you a typical day is extremely complicated... Because every day brings on its daily dose of meeting and surprises. What I love the most is that I have to reinvent my job every single day.
So how does it go... At the beginning I have a 'fashion industry and environment' stylist training, I've probably said it already but I have a BTS and a Licence from Duperré. This 'fashion industry and environment' particle is the most important to me because, okay I know how to design clothes, jewelry, accessorizes etc.. But my training was complete because on top of knowing how to do that, I was taught how to manage a business, how to imagine the setting in which we'd like to see our creations sold, and also how to think about details, from the tag on the clothes to the newsletter we could send to our future customers. Even if all that was quite hazy to me at the time. Today I truly realize everything that was provided to me. We are not trained to be only stylist but really some kind of swiss army knives. Because in the real life stylist positions are not easy to find, you need to have experience etc.. So in the mean time, you can cut your teeth within other areas as much rewarding and complementary even.
And fortunately there are lots of possibilities for that kind of job in this environment. You can be in charge of the supplies (not the rubbers and pencils for the whole building but more something about the orienting the choice of the designer toward a fabric rather than another etc...), you can be a collection coordinator (the fashion conductor that coordinates the work of the stylists team...), you can have a more technical position such as the person in charge of all the embroideries (conceiving all the drawings and offering new techniques to the designers), the graphic designers (who are in charge of imagining the prints and other serigraphs on the clothes) and there are so many more... And you have to keep in mind that nothing is still, I have as an example my first boss (in a parisian fashion house) trained as a stylist in a great belgian school, who started as a salesman and rose to the top by being with the supplies team then with the one that buys the fabrics until he became the collections director (still in the same house). Well there is no secret, you need dedication and it's important not to denigrate or neglect the other positions that might open you a few doors. But you need to always keep in mind your first dream and never let it go.
Today I don't have (anymore) my own brand (but I'll come back to that later...), I don't have a "boss" anymore, I'm my own boss... It isn't easy, I'm tyrannic with myself but I try to call human resources as little as possible. Anyway today and thanks to the network from the blog, I was able to start my company. So what do I have to offer? Concretely, what do I do ?
I do some set design. What is the set design? Well it's a setting, a window, a series of photographs in a magazine... It's everything you can find around a product to feature it.
I do free lance stylist mission for brands. From the sketch to the technical sheet, it is the basis of my training.
I do Artistic Direction, I manage a global project, I put in place the teams to realize it. I give the general direction of the project and I try to find the best people to realize all these ideas.
Actually I have a lot of fun and I love my job, even though my boss is very demanding...
Photograph Camille de Laurens for Ma Récréation and Make My Lemonade. Nail polishes Rouge Flore and Macaron by Kure Bazaar. Cherry blossom bracelet Liberty Is My Religion. Wallpaper by Ralph Lauren. Esquimo Pie realized by Lisa Gachet. Manicure Yumi Toyama and Sophie A.
Ice ice baby week #1
Happy sunny Monday my kittens!
I have so much fun lately, special weeks are following on one another! And once doesn't make it a habit, this week is once again a collaboration with somebody I like a lot: Lili! I certainly have to make her portrait through my "the good people" section and I might even do a special week, to be continued... Lili is a heck of a journalist, in charge of the beauty section in an amazing magazine, Le M du Monde... I meet her via the blog, one more wonderful meeting thanks to this little cyberspace...
A year ago, she came to my place in order for me to make a recipe for her blog "Ma récréation". If you missed her websiteit's time to catch up... It was a sweet meeting that soon became a beautiful friendship, kept up with lunch and dinner with the one I don't need to introduce anymore, Mai... The dream team.
The genesis of this "ice ice baby" special week go back to one of these famous lunch at Toraya about 2 months ago if I remember well... When desert came in, a sort of splendid mochis, I talk about the 200 ideas coming out of my brain every day. I tell her that since the fashion cakes' set for Glamour magazine, I really want to start working again on the association cook/fashion and even on cook/beauty... I explain my desire of "nail art" and matching ice creams, but let me be clear not the nail art that makes you blind, no something smart... Anyway I had offered this idea to a magazine but I didn't get an answer soon enough (the wrapping up of a magazine is really early you know). So I thought that offering a colorful set about nail art and ice cream for September or october would be missing the point completely...
But never mind I still really want to make this set and I tell this to Lili, who smiles again and again, who enjoys it behind her smoking tea and who gives me a notebook with an project of set with eskimo pies and manicures... Okay it was crazy we say never mind, let's do it together for our respective websites. And here we are.
During this week I will give you one picture a day along with the trade secret of a set like this one... And it will be a time where I tell you a little bit about my work... And my days.
Warm kisses.

Photograph Camille de Laurens for My Recreation and Make My Lemonade. Lemon sorbet made with Seb's Gelato machine. Ice Swatch Gold and Ela Stone ring from Le Bon Marché. On the nails: Kerria nail polish from Kure Bazaar. Wallpaper made with cut paper by Lisa Gachet. Nail Art : Yumi Toyama and Sophie A. Model : Djanet Grevet
Ludovic's playlist
To end the week on a high note in this burning sun... I'm giving you a little musical surprise... Many of you ask me what am I listening to when I make things... So I'm working on it, I even thought about making a playlist every month, starting soon.
I need to tell you a cute little story... Every time I see my brother he asks me to send him new playlists. It is quite funny because when I go to his place, it's always my playlists that are tuned. It makes me smile to listen to them again, I can totally picture the spirit I was in when I made them, sometimes euphoric, sometimes serious, sometimes citizen of the world, sometimes completely depressed... Ahahah but this was before I start to make lemonade when things weren't good!
And then I stopped making them because I don't have time to look for new things anymore, and I became one of these people that listen to their friends' iTunes, always ready to use the Shazam app though... And let's say I have a lover with a huge dj set into his phone. And at home he spoon-feeds me music-wise therefore I don't do the effort to make my own researches. I let myself drift away but it's done now, I want to make new playlists not necessarily to make you discover new very refined things but to share with you what makes me happy...
Anyway, enough with my life... I leave it to Ludovic's playlist, he made it with care just like the recipe actually. Just to make this special week experience complete, here is food for your ears...
I'm truly delighted about spending this week with you and him... I'm sure you read this book from Anna Gavalda: Hunting and Gathering. I feel like it summarizes well what's happening lately... Collaborating with new people and their share of creativity to always renew yourself.
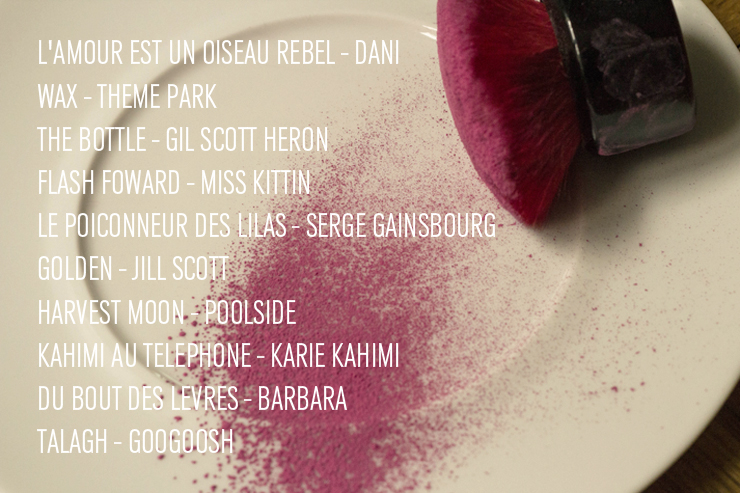
Love is a rebellious bird - DANI, Wax - THEME PARK, the bottle - GIL SCOTT HERON, Flash forward - MISS KITTIN, le poinçonneur des lilas - SERGE GAINSBOURG, golden - JILL SCOTT, Harvest moon - POOLSIDE, Kahimi on the phone - KARIE KAHIMI, From the lips - BARBARA, Talaq - GOOGOOSH and bonus tracks: If i tell you i love you - Melody Gardot.