


MERCI LES CHATONS DIY
Happy Wednesday, darlings,
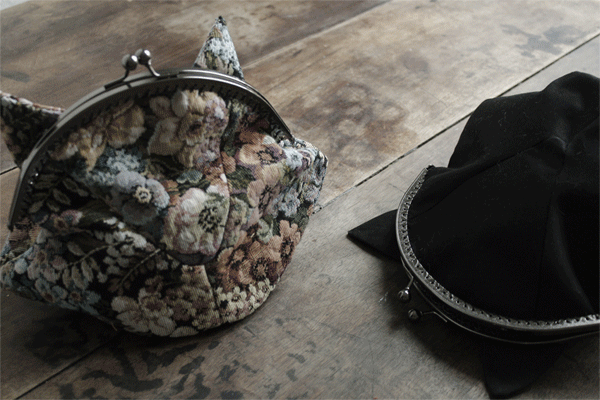
I know I'm going to make some happy people today, I was telling you on Saturday about the famous Etsy contest last Christmas and following this articleand especially this image in my inspiration board, I literally received hysterical emails about Chat bag, No one could live without knowing where it came from? Well, after hours of research, I finally found the source (sorry, I don't have the computer link anymore... mea culpa) but this bag came from a Japanese site, it also came in pale pink and, worst of all, it had been sold out for months. No problem, I'm going to make you a DIY, or even better, a Merci DIY, because yes, tradition dictates that for every 1000 likes on the facebook page, I'm going to make you a little contest to simply say "thank you".
So to say Thank you, my little cats, I'm offering you the chance to win a little black kitten kit or a floral tapestry kit, and it's up to you to tell me in a comment which one you like best and ask me a question, any question that's on your mind! Because I'm trying to create a little "Frequently Asked Questions" (F.A.Q.) section to be published after the site presentation! Many hugs and thanks again! I'll draw the winner at midnight on Friday, and publish her name at the end of this article.

To make this DIY, you'll need:
- -Download the pattern HERE,
- - Parts of the kit cut from thick canvas,
- - a purse clip purchased from Moline mercerie at Marché St Pierre,
- - a curved needle, a classic needle and cord thread,
- - pins,
- - and a pair of scissors.

To begin, pin the 3 parts of the front, the snout we'll call it... fig. 2. Then machine-stitch fig. 3, then sew each curve fig.4. Using your iron, open all seams fig.5. Peel the back and muzzle/front, then stitch fig.6. Clip the corners of the sides fig.7, then open the seams with the iron and grab the bottom of the bag for the next step.

Peel off the bottom of the bag with the fronts/snouts and backs fig.1 & 2. Machine-stitch the bottom of the bag, then notch the entire contour at approximately 1.5 cm intervals fig.3. Open the seams with the iron - you're getting the hang of it... and slide the bag right side out fig.4. Engage the clasp with the fabric fig.5 the metal should sandwich the fabric and using the curved needle and cord start sewing the clasp to the bag fig.6.

And here are the final steps - you've seen how easy it was to make this little kit. For the ears, pin the front and back of the ears right sides together fig.1, then stitch and release the tip of the ear fig.2. Slide the ears into place fig.3, using a pin to tuck the clean edges of the ear base into the ear, and secure the front and back with the famous pin fig 4. Place the ears on the back of your kit and to sew them on, open the kit fig. 5&6. Using the classic needle and cord, attach the ears to the back of your kit fig.7 and TA-DA fig.8! A little extra that will make all the difference, you can repeat all these operations, except for the ears, to make a lining for this kit... But if you want your kit to become a bag, there's nothing to stop you sewing 2 rings behind the ears to attach a shoulder strap with snap hooks. And last but not least, I recommend that you choose a fabric thick enough to hold your kit together, or else don't hesitate to termo-glue your fabric with thick canvas! To your scissors!

The winner of the contest is: Lullaby, she has already been notified by email, she will soon receive the tapestry kit! Lots of kisses and I will answer all your questions very soon! Many kisses