


DIY Turban
Here's a little sewing DIY, to learn how to make our turban. It's not just a scarf tied twice, but a real turban, with nice even pleats and a base like a hat, so there's no risk of it coming undone. This do it yourself project had been on our minds for... a long, long time. But as always, we lacked the right occasion, the right theme, to present it to you. We took a vintage pattern from the '40s, reworked it and graded it into 3 sizes to fit all heads! A little tip: if you find that it's too big, don't hesitate to tighten it on the back of the head as a last step.
To make this turban, you'll need..:
- 1 m of 140cm wide fabric,
- 1 m fine mesh fusible webbing (if your fabric is a little soft),
- the pattern to download here (printable on A4 and US Letter),
- a sewing machine, thread and needle,
- scissors,
- ruler and tailor's chalk,
- an empty bucket or flowerpot (or a head), you'll soon see why.
To begin, cut all the pieces according to the instructions, heat-seal if necessary, and edge-fabricate if the fabric frays too much. Start with the base. Pin the center fronts right sides together and stitch at 1cm.

Then pin the center backs, stitching at 1cm. Iron, opening the seam.

Take the base round. Pin it to the base, right sides together. Don't hesitate to pull the fabric a little so that everything coincides.

Stitch at 1cm (take your time). Leave to one side. Take the bias and pin the free edges, right sides together and stitch at 1cm.

Press the seam open. Place the bias on the free edge of the turban base. Pin right sides together, making the bias seam coincide with the center front of the turban.

Stitch at 1 cm and press to flatten the seam. Turn the turban over. Leave it aside, we'll move on to the folds. If you've forgotten to notch your pattern, now's your chance!

Place your pattern on the draped parts of the turban. Using chalk, mark the notches and draw a straight line across the width, connecting the notches from edge to edge.

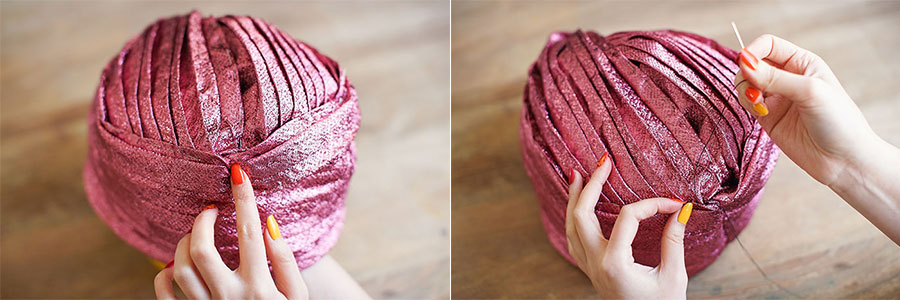
Pin the folds one by one, overlapping each notch with the next to create a flat fold. Stitch 0.5cm from the edge of the fabric (at fingernail level in the photo, bottom left) all the way along. Do the same for each fold (yes, it's long). Take your time and if in doubt, look at the information on the pattern. You can hold each fold in place with pins (photo bottom right).

Iron your drape well, exceptionally you can iron over the pins. Just be careful not to rub the soleplate of the iron over them, and wait until the fabric is completely cool before removing them. Follow the same steps for the 2nd drape. Take your base and place it on a head, a bucket (or a flower pot as we did at the office).

Start with the middle back. Pin one of the drapes, leaving 1cm over the mid-back line. Be careful, the folds must face downwards. Pin the bottom of the drape to the bias.

When you reach the middle front of the turban, stop pinning. Take a needle and thread, and thread the needle through the drape so that you can gather it.

Pull the thread through and the drape will pucker. Tie a knot to keep it that way. Take the 2nd drape and pin it to the middle back, tucking 1cm inside.

As with the 1st drape, pin the bottom to the bias until you reach the center front. When all is pinned, take up your needle and, using an invisible hand stitch, hold the bottom of the drape to the bias. Remove the pins as you go. Do the same for the other side.

Once both drapes are securely sewn to the bias, you can make a "knot" on the front. Take the two drapes and make a "knot" as shown in the two photos below.

Secure with pins. The front of the turban should look like the photo at bottom left. Hold in place.

Tuck the free edge of the drape under the center back. Take care to position the pleats correctly.

Your turban will have a sort of opening at the top of the "head", revealing the base of the turban. Close this opening by superimposing one drape over the other. Pin in place.

The back of the turban should be neat, with no loose edges. Wherever you've pinned, hold in place with a hand stitch. Try on your turban; if it's too big, tighten on the mid-back line.
Re-check that each fold is nicely placed. And Ta-Da!
Now it's your turn! Choose a simple, printed or exuberant fabric (but one that marks the pleats well), and you'll have the elegance of Simone de Beauvoir in a flash, or be able to play the diva at a theme party! Don't forget to share your creations with the hashtag #DIYMakeMyLemonade on social networks!
