


DIY macramé shelf

Happy Wednesday, otters!
We're starting the week by stretching our ten fingers with this DIY macramé shelf! Yes, as you may have seen in the Lemonade Shop, we've developed a passion for macramé, thanks in particular to Phildar, which sells this pretty chalk-colored cord. So we scoured the DIYs and videos and adopted the technique! In fact, as you'll see, macramé is very simple, and once you've mastered the basic knots, the sky's the limit! Back in October, we brought you macramé hanging workshops, but today we've decided to take things a step further with this macramé shelf! Arm yourself with a little patience, I guarantee the result will be well worth the effort!
For this DIY you'll need :
- 2x 10m of unbleached cord (in this case from Phildar),
- drawing pliers to make your work easier,
- a pair of scissors,
- scotch tape,
- two 60 x 20cm wooden boards,
- a drill,
- paint of your choice.
First, drill holes in the 4 ends of your boards and paint them in the color of your choice! Next, cut 8 large strands 10m long. Separate them into groups of 4 strands and fold them in half (with the help of a kind soul if you ever get a little tangled). At the fold, place your drawing clip and hang your loop on the wall, or on a radiator knob - that works just as well!
Start with a large join knot (see diagram below). Now separate your 8 strands into two groups of 4. We'll start with "flat" knots (see diagram below), one loop on the left, one loop on the right! Then, if you want to change the type of knot, you can leave a space, and again use your drawing pliers to stabilize your strands and get going! Now for the "twisted" knots, easy as pie!
Do the same with your second group. Now we're going to fix the first shelf: take some scotch tape and stick the ends of your strands together to facilitate insertion into the holes in your board! Slide your board onto your macramé, and place clips underneath to hold it in place. Tie a knot under each hole in the board to secure it, remove your clamps and slide your knots under the board! And there you have it!


Continue with the knots of your choice and slide the second shelf in using the same principles! To finish off, you can make knots about ten centimetres long, join them together with a joiner knot and cut off the excess thread! And Ta-Da!

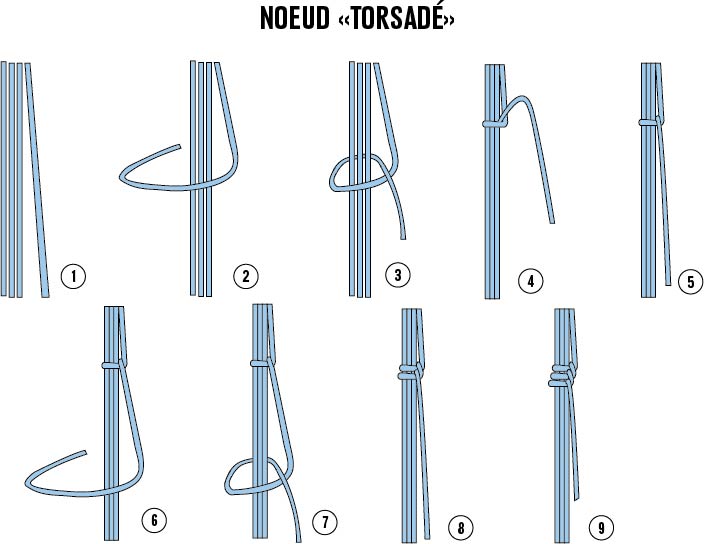
To make the knot, simply take an extra piece of string, make a loop and place it over your strands. With the right end of your loop, pass behind your strands, return to the top and do this as many times as you like. Finally, pass your end through your initial loop, take the second end of the loop and tighten!

To make the overhand knot: separate the left and right strands. Starting with the right, take your strand, pass it over the two central strands, pass it behind, exit into the loop and tighten. Do the same, but using the left-hand strand. That's it for the overhand knot - just alternate left and right!
The "twisted" knot is the simplest: take the right (or left, as you like) strand, go over the other three, then behind them, come out in the loop and tighten. Continue in this way, always taking the same strand and always tying the same knot. You'll see, it's magic - it turns all by itself!

I wish you a wonderful week and hope to see you soon for new adventures! Many thanks to Phildar for accompanying us on these macrameque adventures!