Wordpress blog EN
DIY FLUO

Happy Wednesday every body!
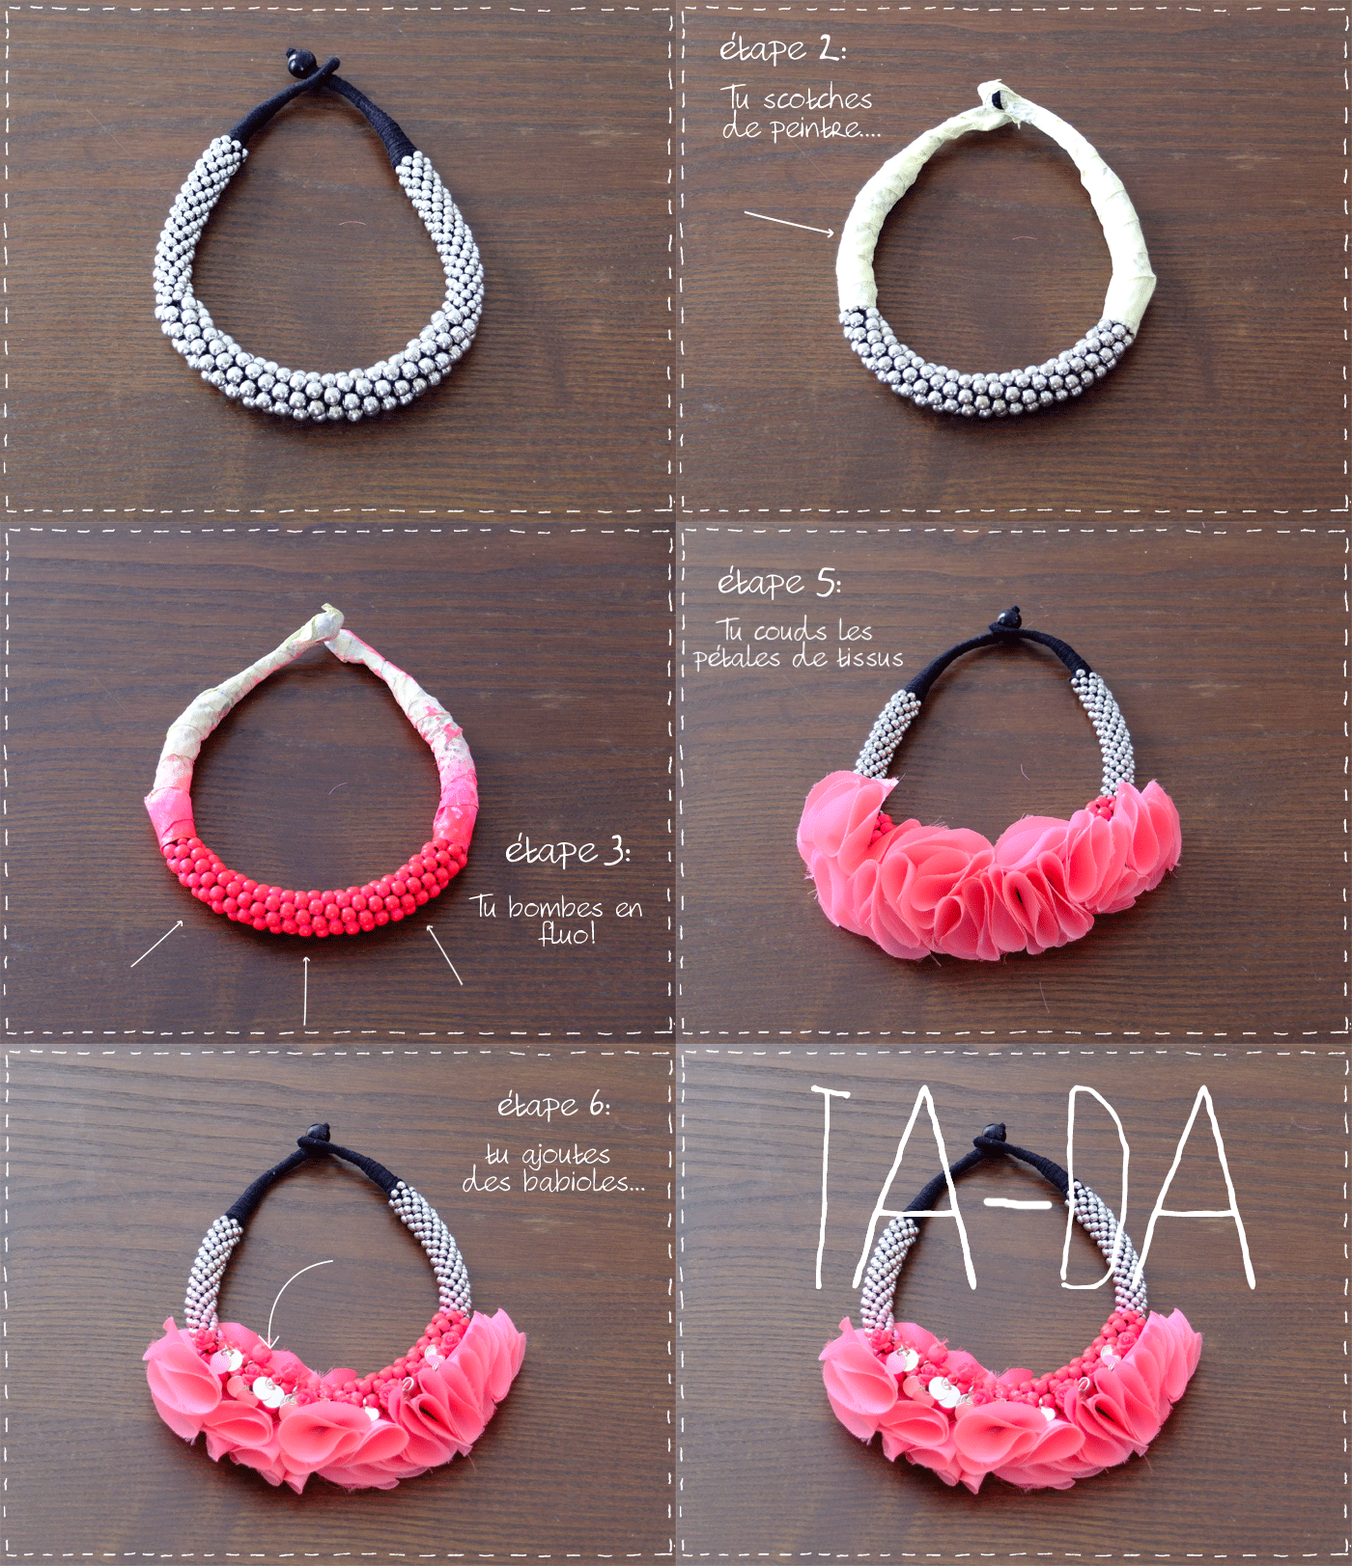
I'm so excited to show you this little DIY, I'm in creative form right now! I love hijacking a mass-market product such as H&M to make a UNIQUE necklace for you! As you may know, I'm not much of a trend follower, and all this pastel and neon stuff doesn't inspire much confidence in me... I prefer to pick and choose... As for water green, fluorescent pink isn't a question of fashion, but of a crush. For years I've been looking for fluorescent pink shoes, ribbon, crockery... I find that it sets off anything a little classic. But I confess, I like it as a touch (happy friday coming up will surely prove me wrong...) and not as a total look... yes I love this color but the prospect of looking like a stabilo leaves me perplexed. Even if I'm capable of the worst with prints, I'd still rather make you lose a tenth of an ounce with each eye than make you epileptic or worse, fluophobic...
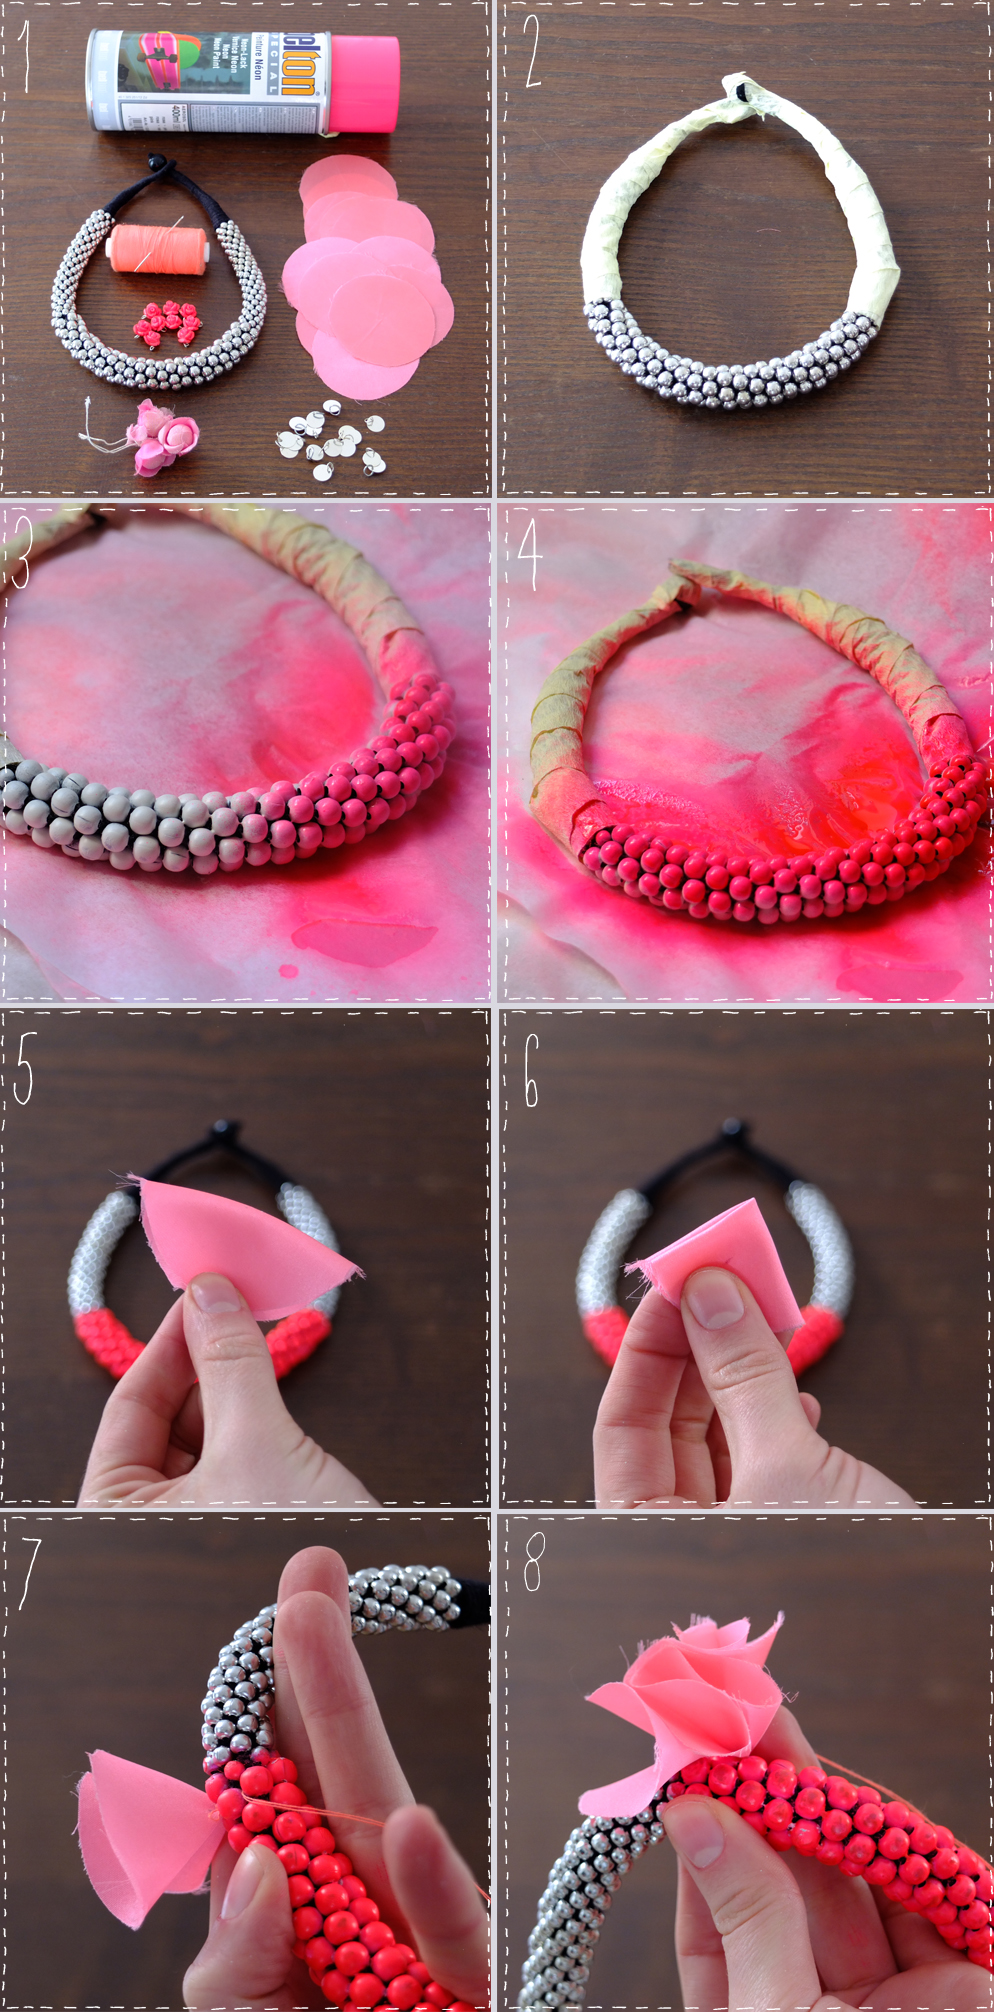 For this DIY, you'll need:
- -An h&m necklace,
- -A can of fluorescent pink, + a white one (optional)
- - 20 neon pink fabric circles (7 cm diameter),
- around twenty small rosebud-like pendants and metal parts
- - thread, needle and painter's tape.
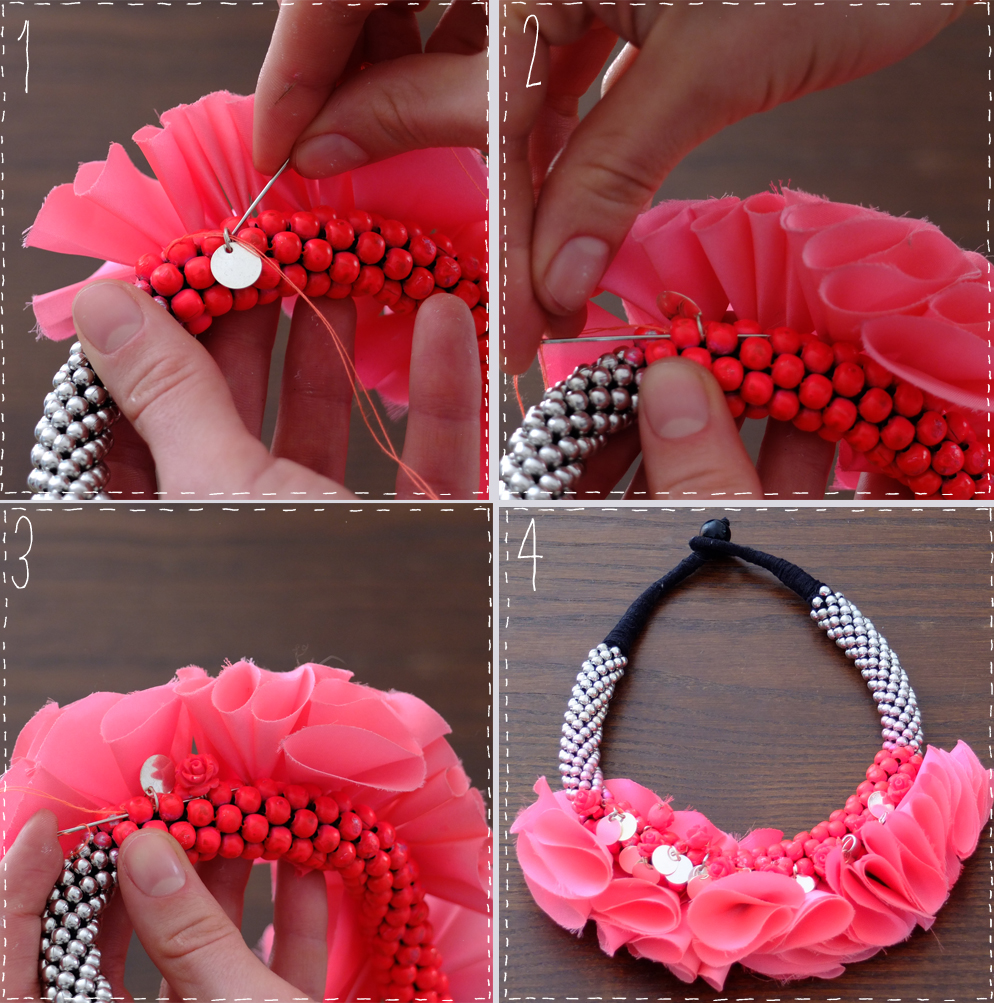
I could have stopped there, but I love these little charms.... as for the petals, fix the beginning of your thread in the center of the necklace with a simple seam ( fig.1). Then pass your needle through the pearls ( fig.2) and intersperse piècettes / roses / piècettes ... as in figure 3, finish as you started with a seam in the center of the necklace. And TADAM!!! (fig.4)
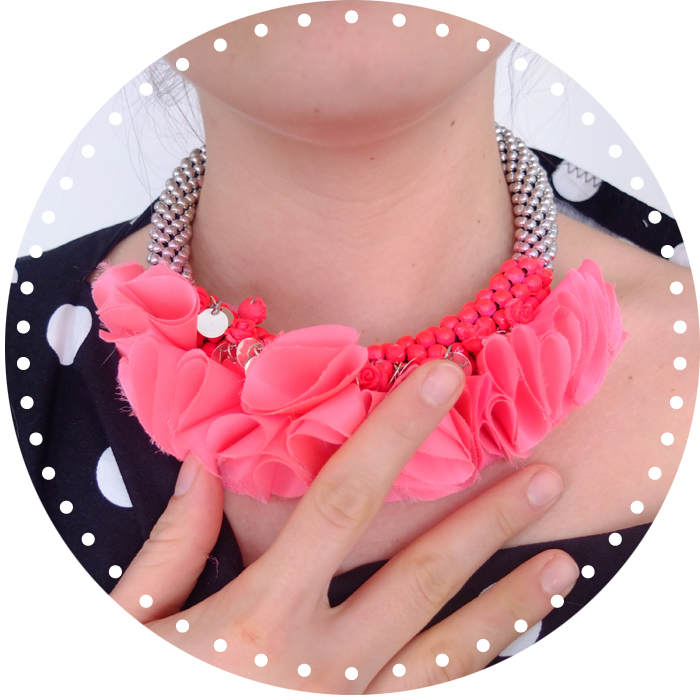
And to speed things up, here's a little gif to sum it all up...
WISH LIST NAGAWIKA
Happy Thursday yukis,
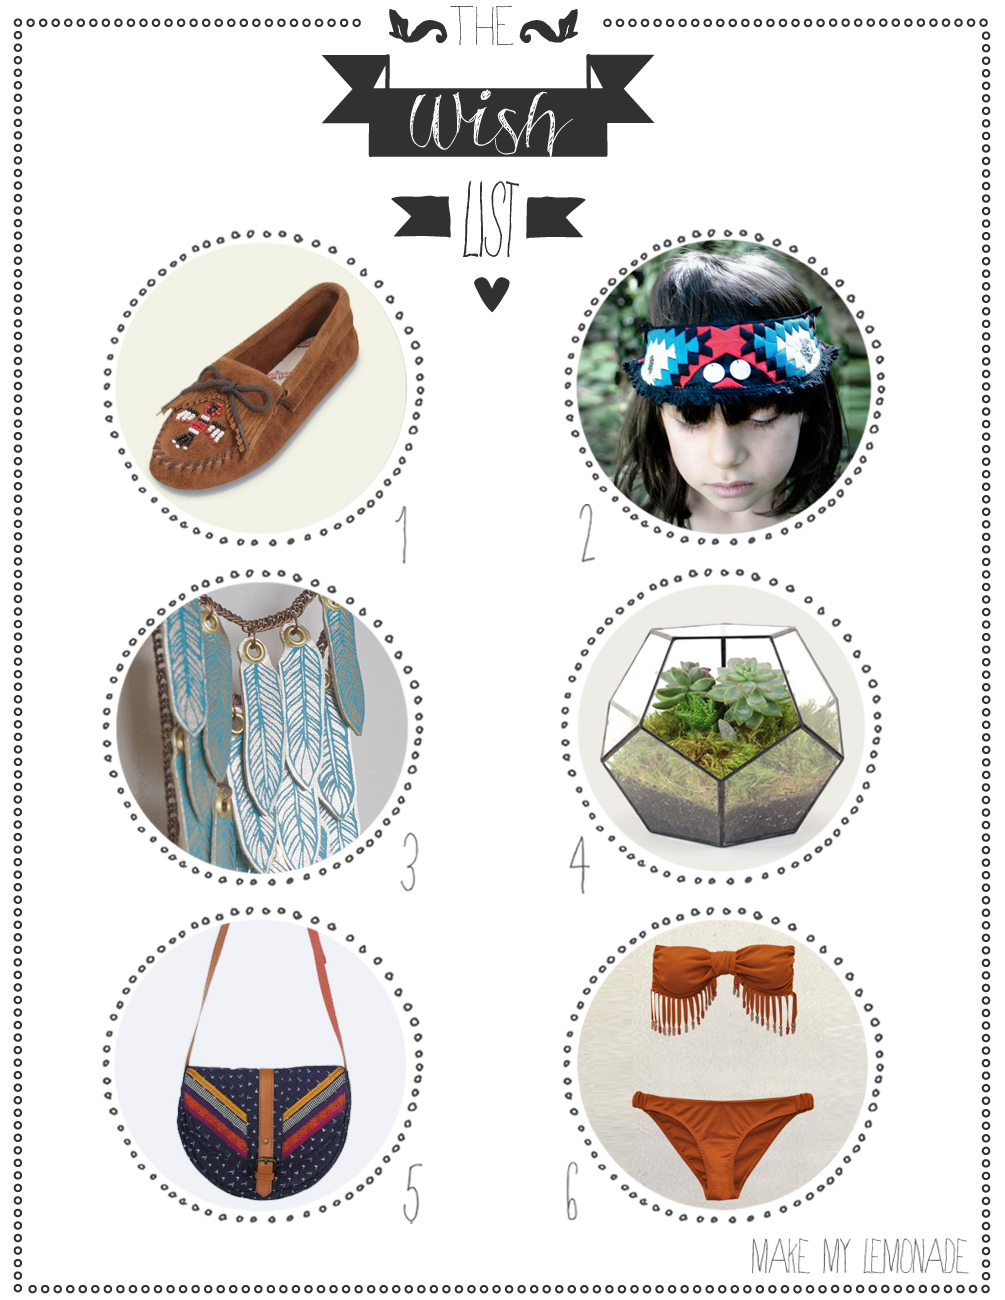
The perfectos are now on sale and it's such a relief, I promised you I'd have them by the 9th, so here they are! I like to self-defy, I feel much better, I'll be able to do my 10-hour nights again without it upsetting my little hands timming... I also wanted to say thank you again and again, but it's so good to say thank you, for all your little words and encouragement. As for the perfectos, that's it, 3 of them are gone... a little heartbreak, but I've got the recipe, I could make some more... Today I've put together a little Indian shopping list for you. I love this style so much, my lover once said to me: "if you buy barnyard boots I'll leave youI'm not talking to you anymore". Living with a tyrant of looks... I'm kidding, he just has trouble with fringed boots ( go figure...) I fall back on an apache head band from the wonderful Melle San or my absolute dream of Minnetonka ( he didn't say anything about fringed moccasins?) See you very, very soon... like tomorrow.
1# Loafers Minnetonka 85€, 2# head band de l'amour Melle San 45€, 3# Yuki body chain amulet Pagan Poetry 135€, 4# Terrarium de fou sur Old Faithful shop 160$, 5# Comforter bag Sessun 80 €, 6# Pocahontas swimsuit Valentine Gauthier 180€.
Girl's DIY
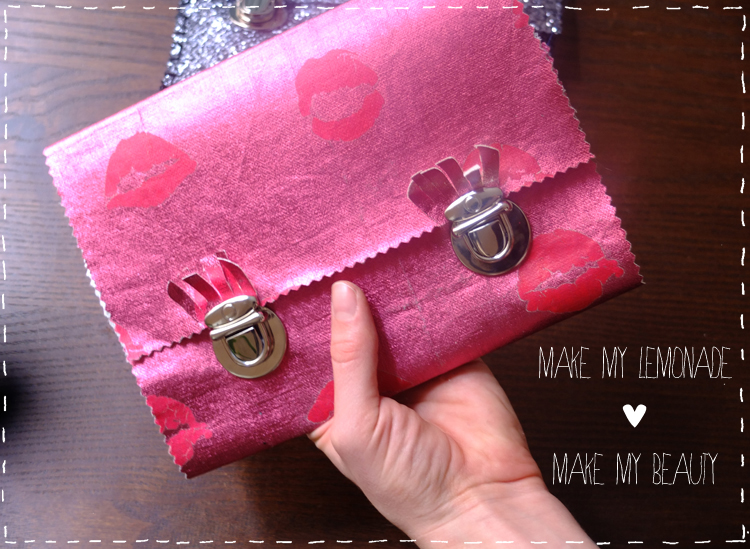
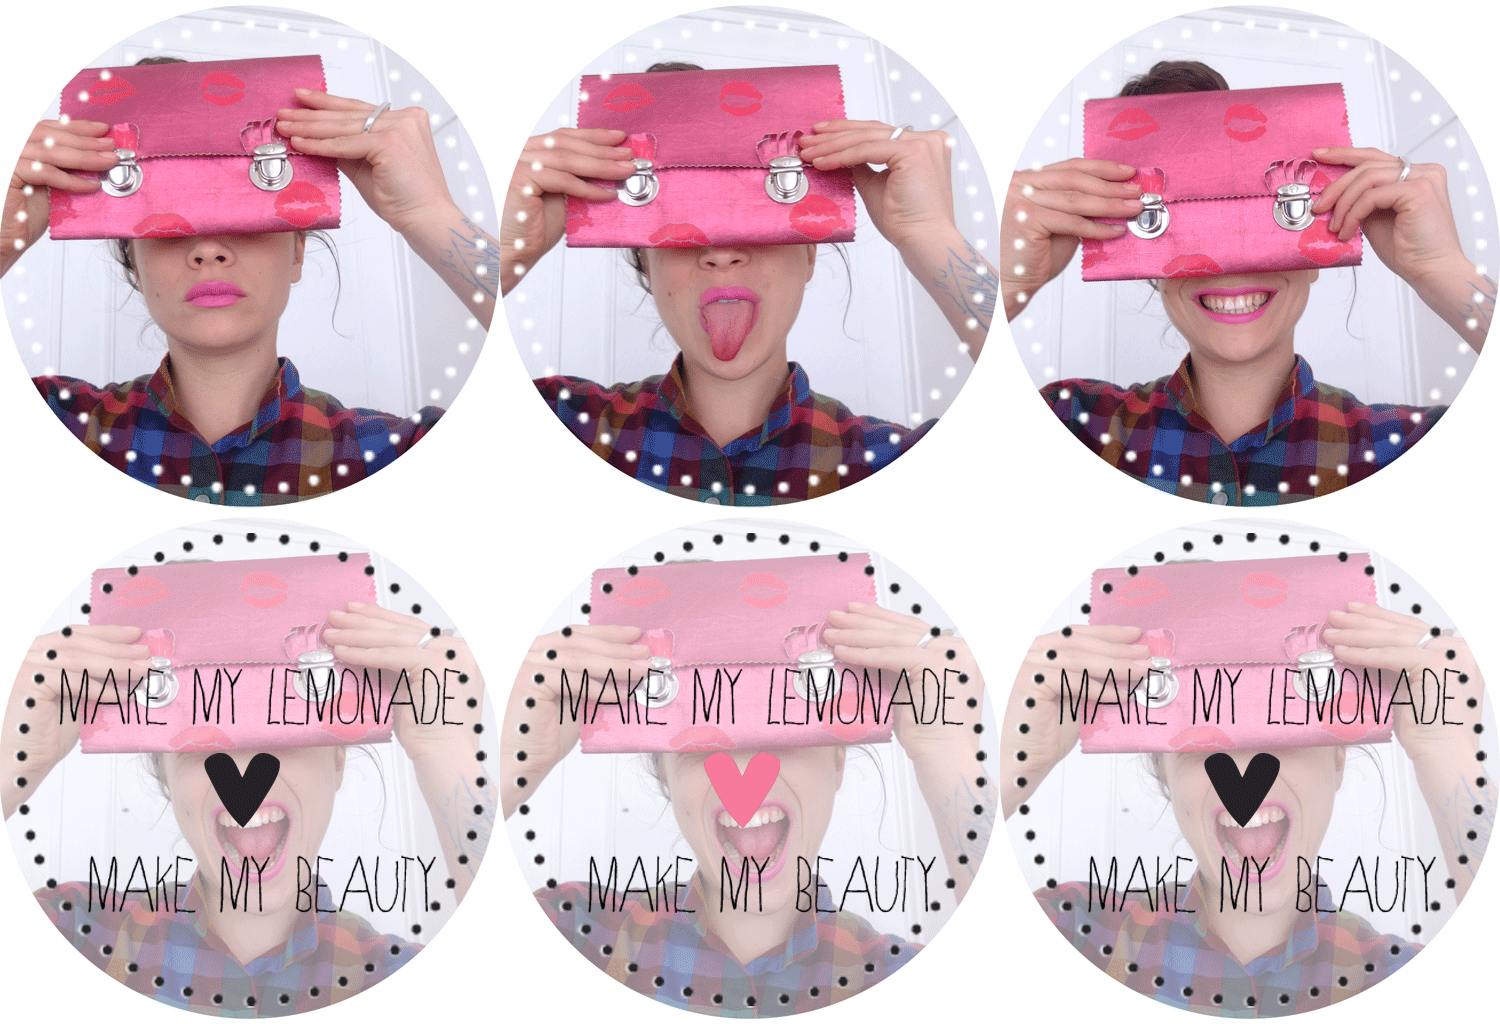
Today, a girls' DIY, yes, yes... With my Blog friends Make My BeautyDon't worry, you're not going to learn how to make your own cosmetics, a concept that's a little shaky for our taste! And when it comes to make-up, they're the pros, giving sound advice and telling you all about their products... I'm just a novice at this: bourgeois and gemey are my allies, while NARS and Kiehl's are their best friends...So without further ado, I present the DIY Make My Lemonde feature make-up bag. Make My Beauty! It's so easy, all you need is a bit of kit (and then some) and you're all set!
For this DIY, you'll need:- a thick glitter or denim material (iron-on),
- scissors,
- thick thread, and a large needle (like a leather needle),
- punch (optional),
- mini screwdriver (or tweezers),
- 2 binder loops at Fil 2000, 65 rue Réaumur, €3.90
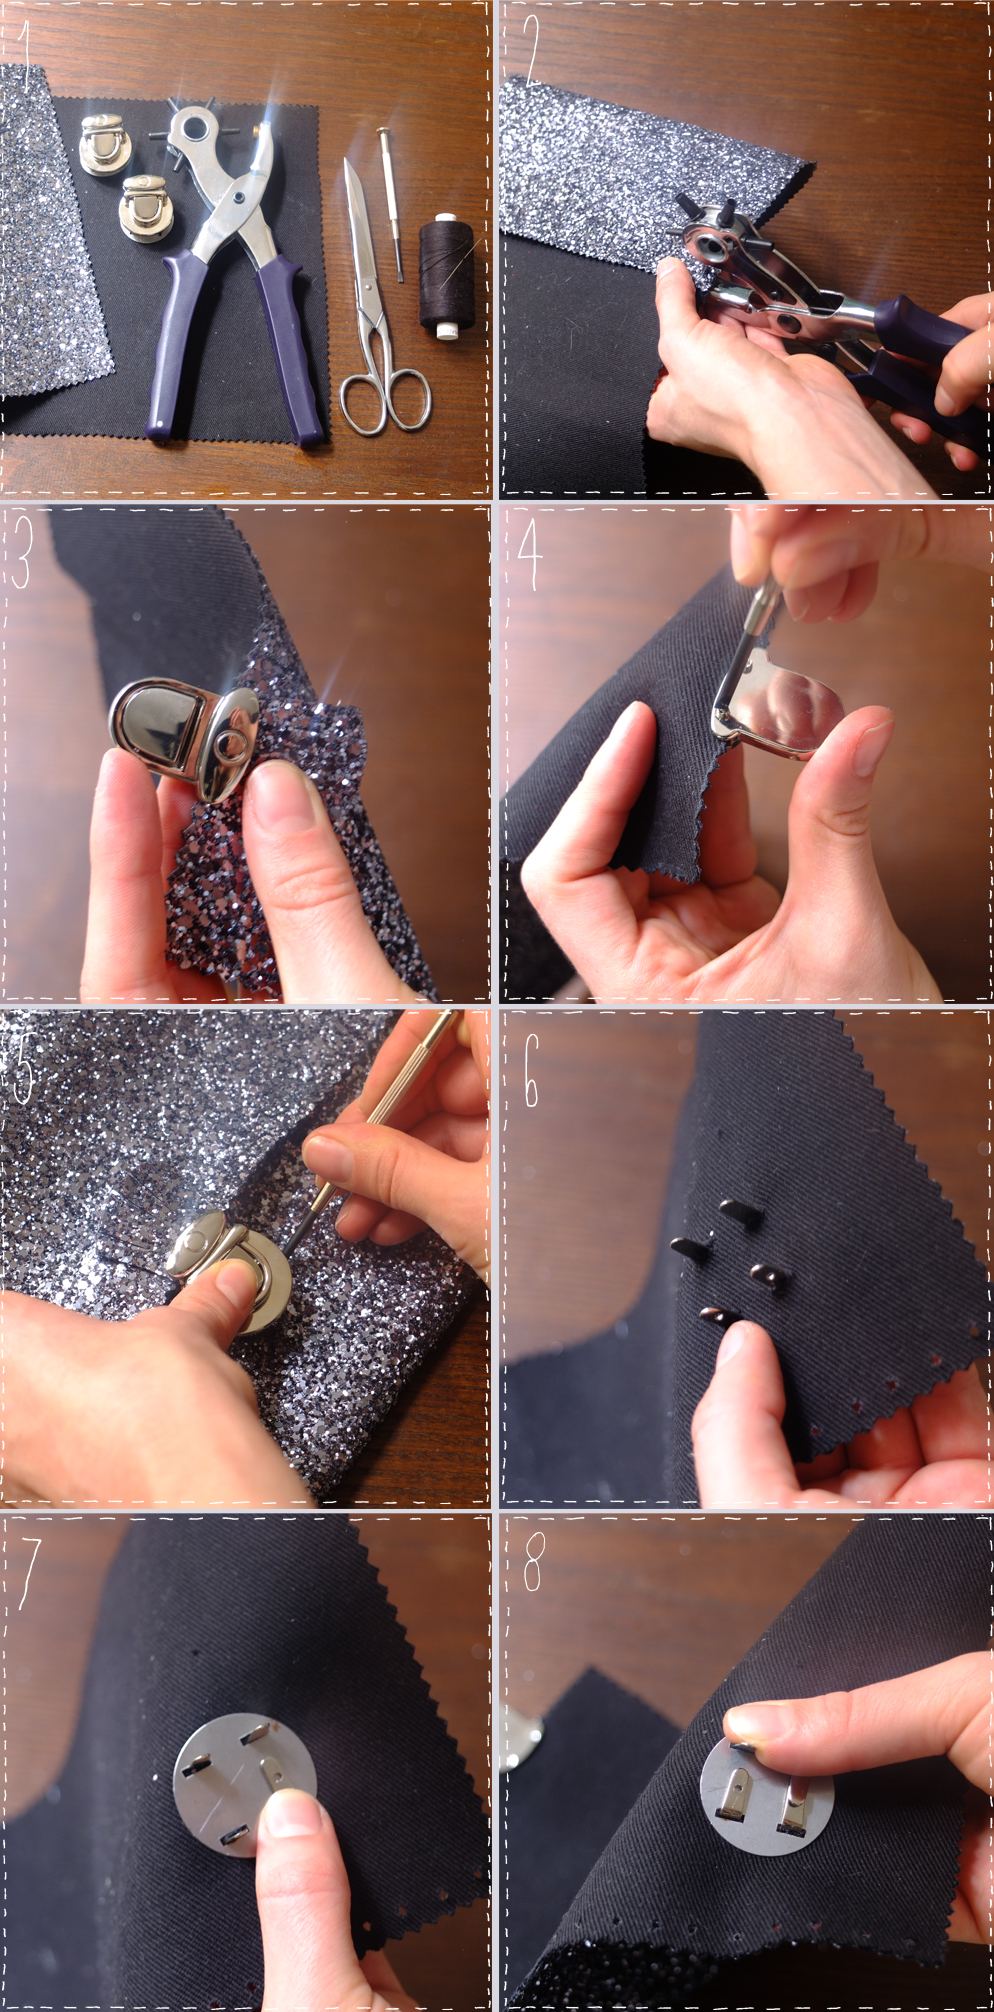 To begin, cut your fabric to the dimensions of the pattern using serrated scissors. For this DIY project, I recommend using a thick fabric that doesn't fray much, or if your fabric is a little too soft, heat-seal it. Fold this rectangle in 3 as shown on the pattern. Using the perforator, punch holes every 0.5 cm near the edge (2). This step is optional - you can sew directly with a leather needle if you're confident enough to make even stitches... Cut out your fringed decorations and position them in the loops with the front of the kit (the location is indicated on the pattern, 3). Hold the set firmly and turn it over to screw in the mini-screws using your small flathead screwdriver or tweezers... these work just as well (4). Together, using the chisel blade or a pointed object, cut the 8 slots drawn on the patterns (5). Next, place the die (6) on the circle with the holes and bend the branches sharply towards the center of the circle (7&8).
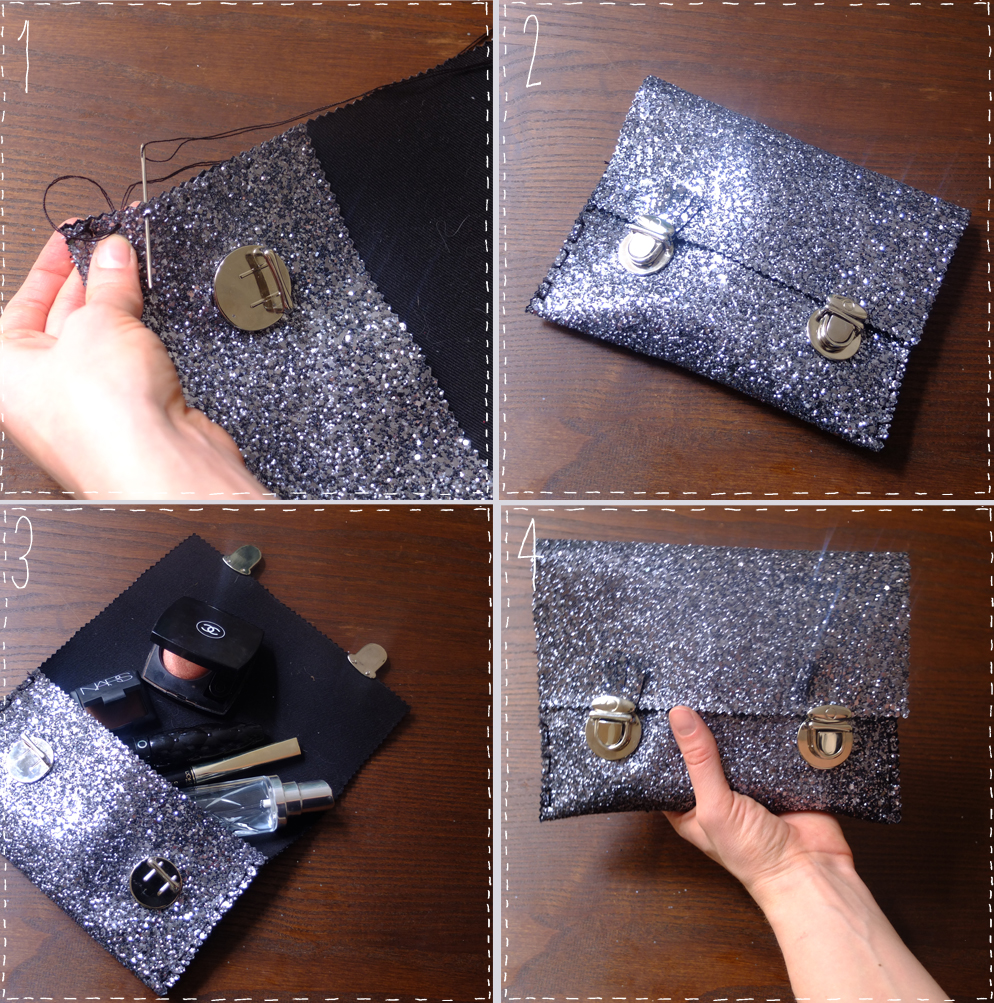
All that's left is to sew the perforated sides together with your thick thread (like cord)! Too easy, thanks to the pattern ... and it could be a great idea for Mother's Day, don't you think?
[:]Flowery Wish List + little tune-up
Hola people,
As you may have noticed, the "3 little cats" DIY has either disappeared or I've decided to remove it from the blog. For the simple reason that the designer from whom I drew so much inspiration asked me to, I hope you'll understand. Far be it from me to copy or plagiarize such and such artists, I think that "do it yourself" can be legitimate when it comes to "reproducing" products that are unaffordable for the most part, and not to sink the buiness of a small designer. My mistake was to find an image of the said creation on Pinterest without source (the limits of this beautiful tool) and not having found the source by searching on google, I thus allowed myself to make a DIY because I found the idea more than charming, I nevertheless developed a different pattern before I propose it to you. I hope you'll understand that I didn't want to get into a controversy or come across as a copycat. I'd like to keep this place fun and fresh, with no worries... don't worry, I've still got a thousand ideas of my own running through my head, see you soon guys!
lisa mea culpa.
and as a bonus, here's my Thursday flower wish list: I want sunshine, to roll around in the grass and make daisy crowns... BUT WHERE IS SPRING?
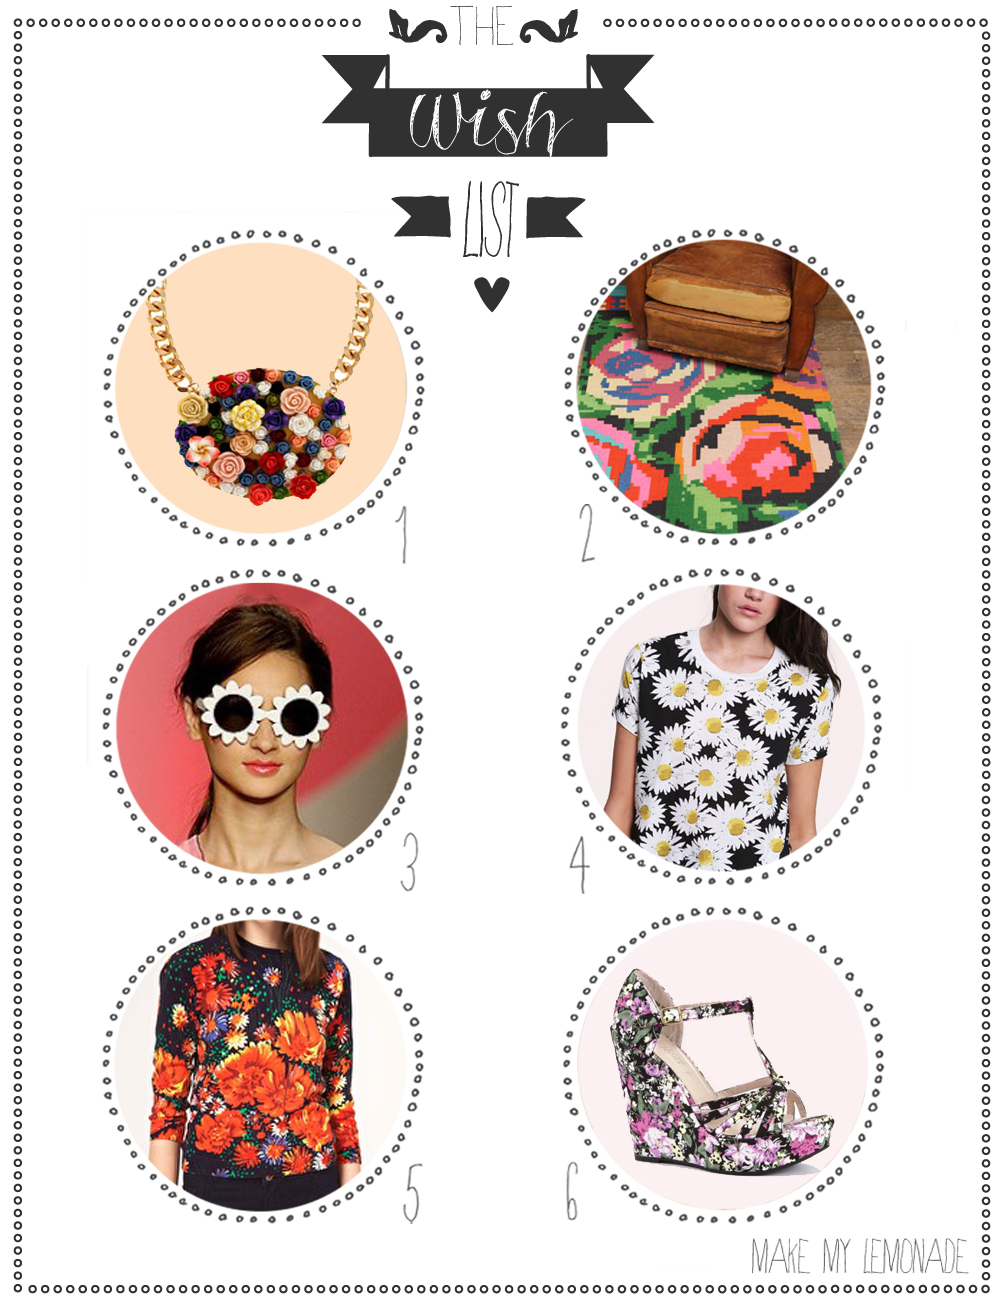 1. flower necklace asos33.33€, 2. digital flower rug UO 46€, 3. sunglasses sunglasses Love Moschino4. daisy T-shirt UO 37€, 5. flower print sweater asos 39.99 €, 6. floral Compensées New look 34,99€.
DIY hair... because you're worth it
Happy Monday everybody,
I hope you had a boooon weekend and that some of you are still at it... (no comments). In my weekend as a little Chinese perfecto maker, I took a break to prepare the following... And no cooking recipe on this Monday 30th. May April... By popular demand, I've made a little hair video of this famous chignon... I'd like you to know that I'm not really comfortable with all things beauty video and other "hello girls"so please bear with me, I've tried to do this "my way". I hope you enjoy it, but in the meantime I'm scared shitless. Mille Baci à très très vite...
Thank you Nelly de www.makemybeauty.com for her scrappable
Thursday's Wish List
Hello everyone,
Today's wish list is a little different, more homey and cocooning than usual, with a false Scandinavian air. Not Scandinavia in the sense of IKEA, but rather the Swedish and Norwegian art of living, the apology of noble materials and White as the one and only religion, all that, all that ... I'm not sure that the cloud sandals on Asos meet my selection criteria today, but you know I'm all about "reinterpretation".... I'm dying of love for this bunny mirror, and I'm not even talking about the facetized lunch box, how can I live without it? I strongly invite you to visit the e shop. Neëst which is a little nugget for cooking, decorating and good taste... I'll leave you to it and see you tomorrow for more futile and useless, but completely indispensable adventures...
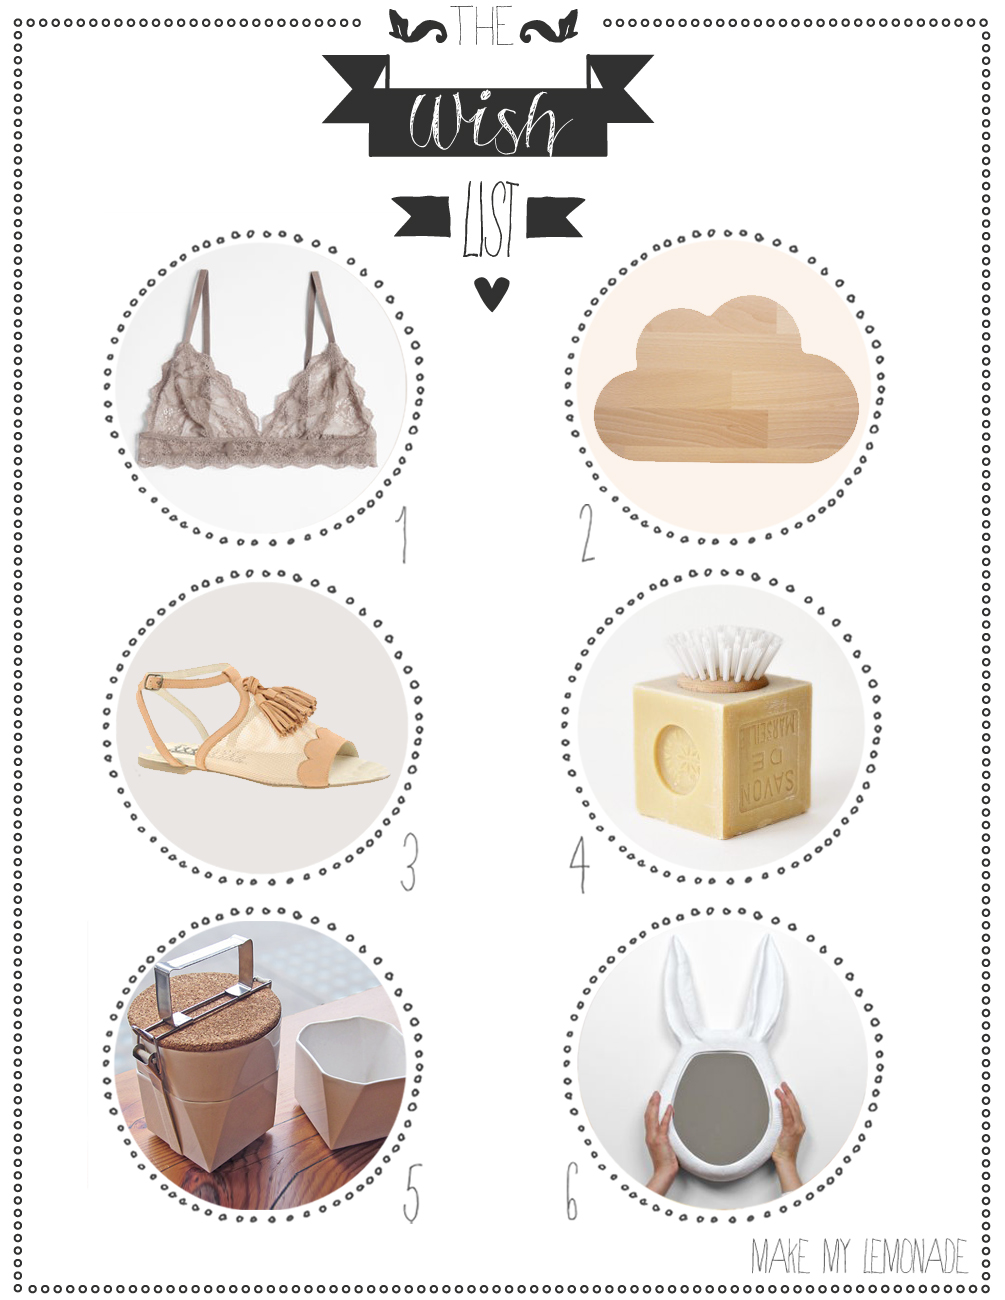
1. Triangles Oysho17, 99 €, 2. love cutting board Snüg19,90€, 3. sandals F-Troup Mesh for Asos126€, 4. soap brush Neëst 14.50€ 5. lunch box d'amour SinClaire design 65$, 6. crazy bunny mirror Household 275€ |
DIY the Studded Jacket...
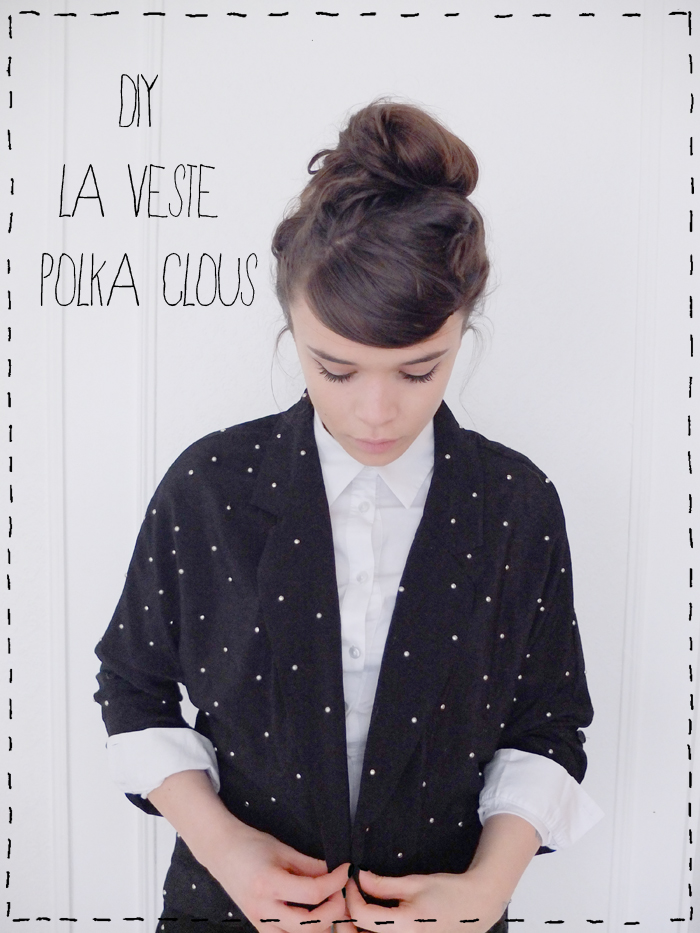
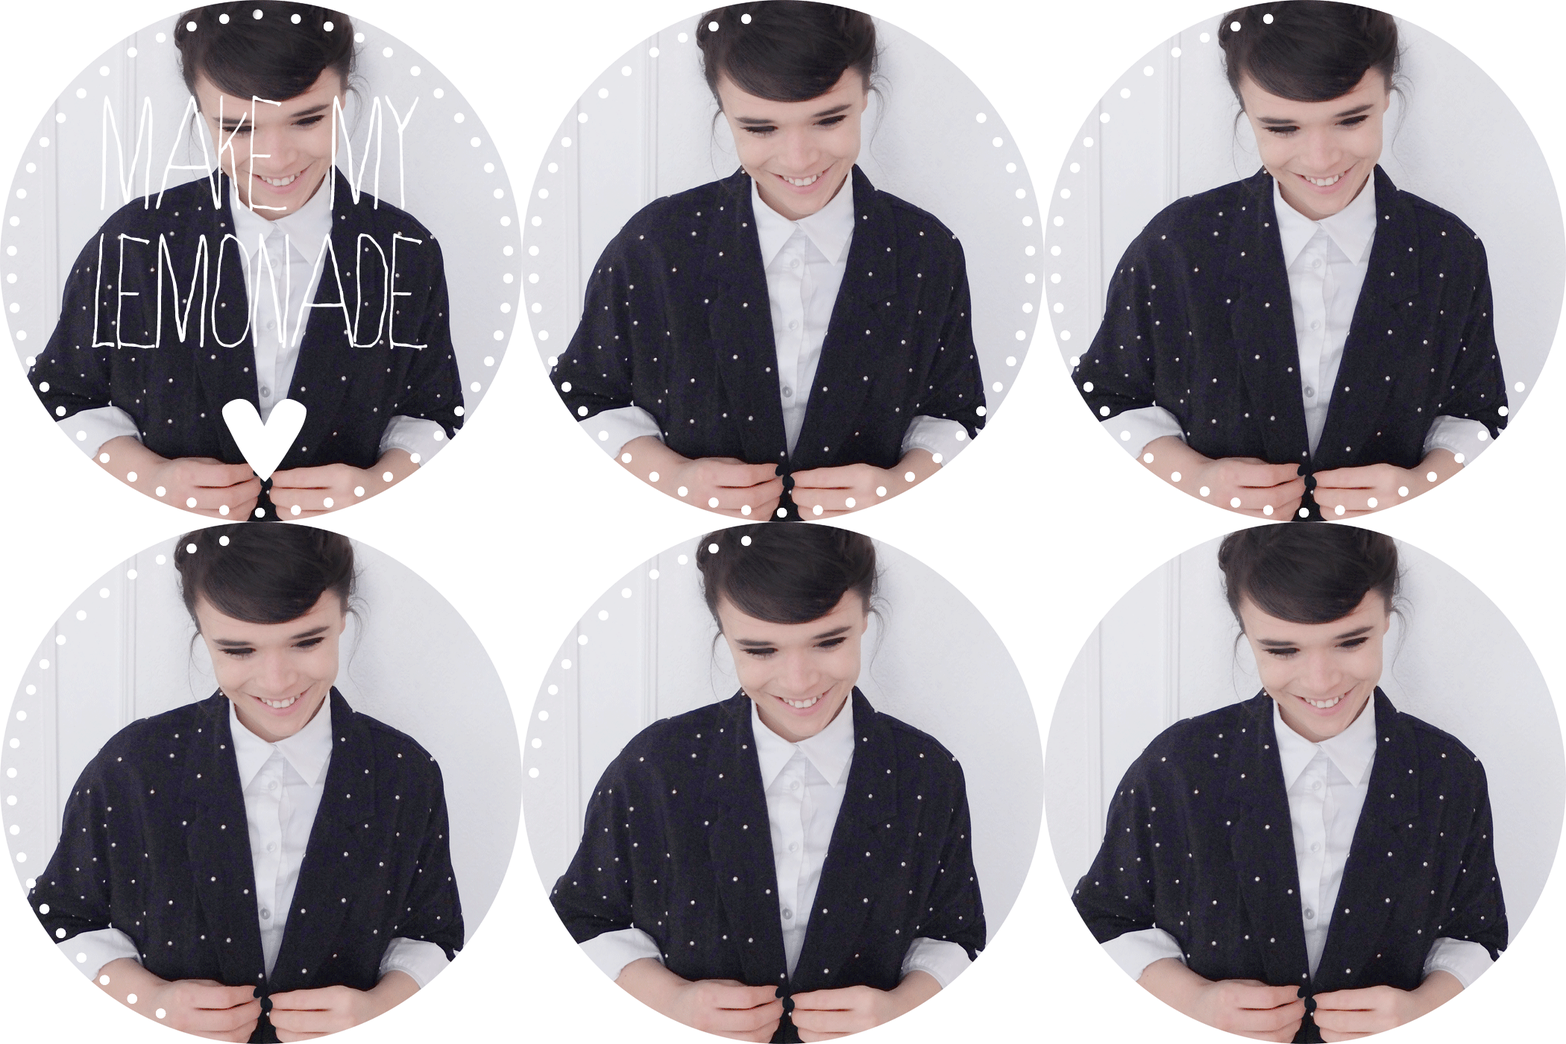
Hello in this photo, I look 14... but what you don't know is that I've had the same face since I was 14, today I just have more breasts (well... that's all relative) and less cheeks (although, it depends...).) In my line of DIYs for everyone, the studded or polka studded jacket (I'm going to give you a little slip on the polka dots, but that's okay...) is a super-easy DIY that I particularly like, because it really gave a twist to a jacket I'd hardly ever worn and was in danger of ending up in a dressing room... It's almost become my favorite jacket (I admit it), that little punk edge... but actually no, or that little galaxy edge, Milky Way revisited, makes me shudder with pleasure. Granted, it took a bit long, as I used around 250 studs, but patience always pays off, and what's more, I've got a secret address in Paris where you can buy lots of studs for next to nothing...
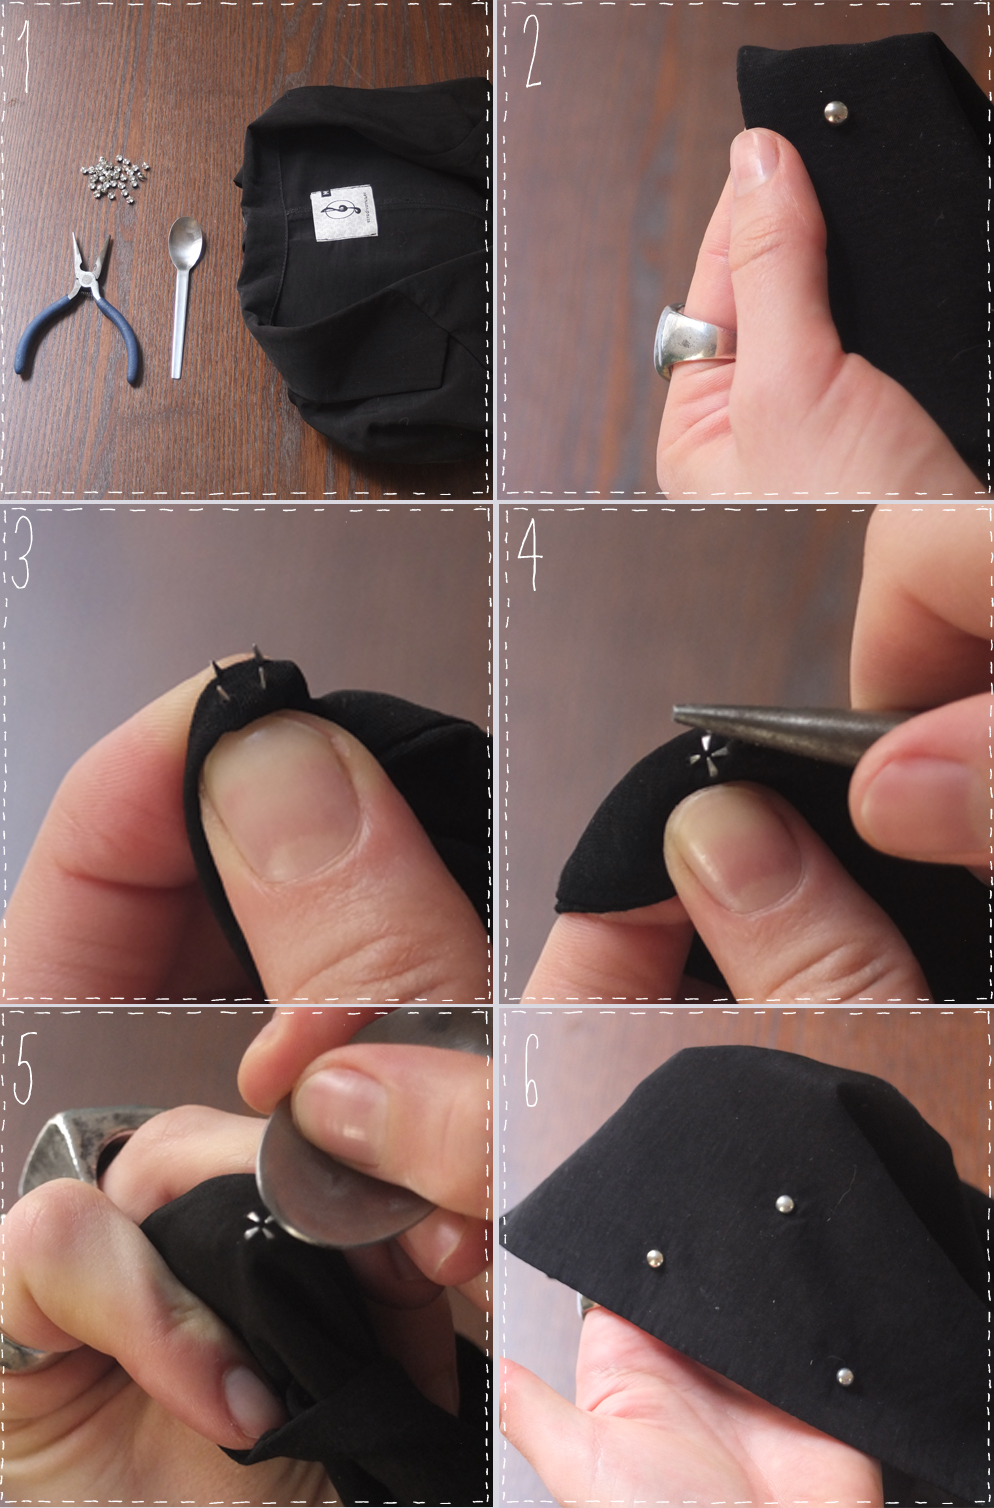 For this DIY you'll need:
- 1 end-of-career jacket or other garment to refresh,
- approximately 250 nails,
- 1 flat-nose pliers or a small walking spoon too.
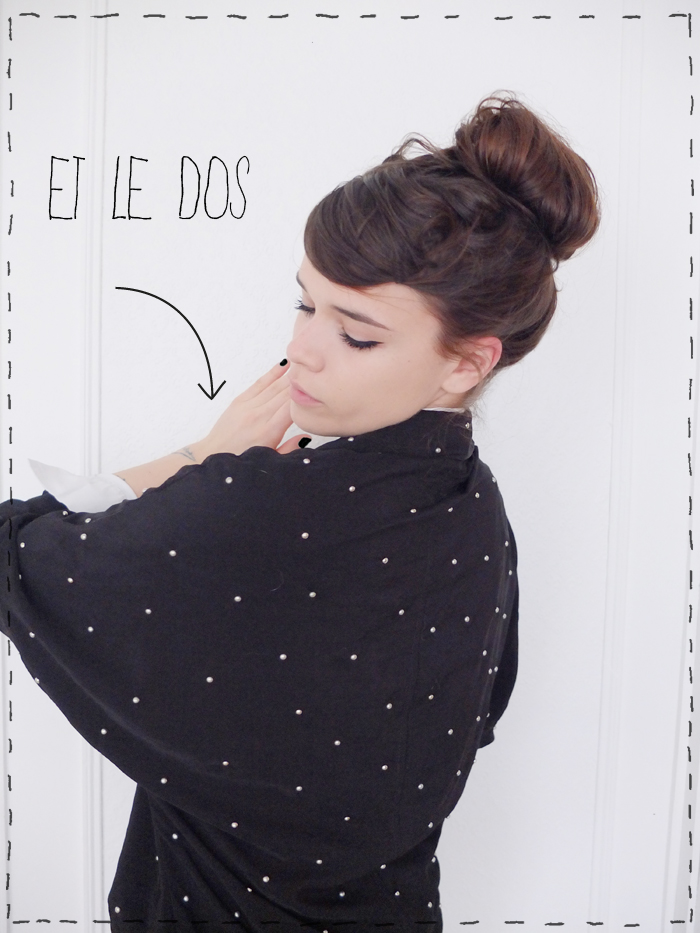
And here's my not-so-secret favorite address: fil 2000, a dingy haberdashery on the Réaumur Sébastopol metro station, an address I've frequented since my days at Duperré. The exact address is 65, rue Réaumur 75002. Paris. Telephone: 01 42 36 48 80. Please note that they are closed from 1pm on Saturdays... You'll find everything - it's always full - but don't be discouraged, they're fast and very friendly. The place must be at least 25 cm2 and every square centimeter is filled with fis, balls of yarn, ribbons, buttons and near the checkout they sell nails, the ones I've used are the smallest and cost €3.80 for 100... I know, it's a dream come true! Enjoy!
 [:]
[:]
Wish list mint!
Heeeeeyyyyyy
I'm just dropping in to make you salivate over these Mint items that make me fantasize... I'm going 2000 miles an hour between my 2 jobs, my personal projects, the blog, my friends and my lover. It's easy to wonder how I do it, because to top it all off, I doooooor a lot... I'm not complaining, I chose this situation. And I love it, I wouldn't be able to get ahead normally if I only had to tackle one project at a time, for me to be effective, I have to be overwhelmed, I love it and the urgency makes it worth it....
See you tomorrow!
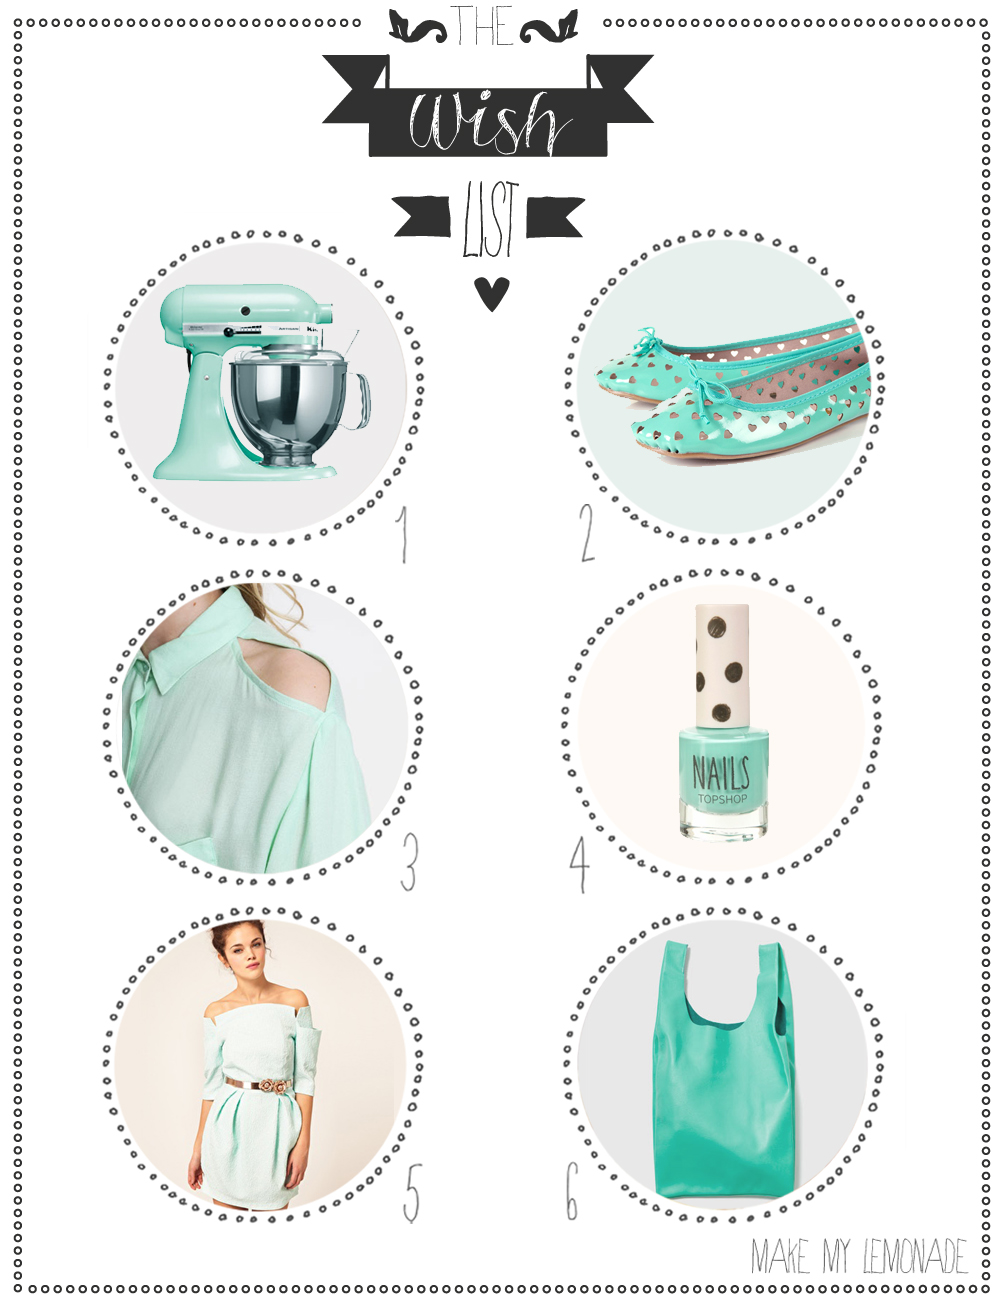
1. Kitchen Aid of my dreams, €608 Kitchen Aid2.ballerinas heart top shop 25 €, 3.blouse Silence + Noise on Urban Outfitters 55€, 4. nail polish Top Shop5.river island dress on asos 79€, Leather bag BAGGU 120€.
DIY MINT!
Happy Wednesday friends....
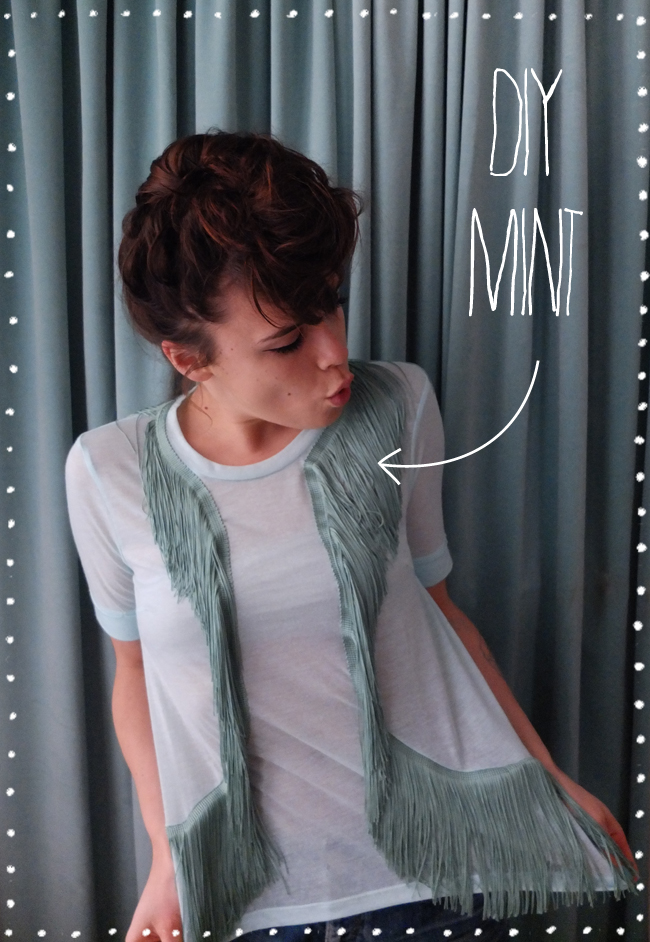
Today I'm sharing a super-easy DIY with you, but bangs are so cool, if I listened to myself I'd put them everywhere... These bangs are crazy, they can dress up a t-shirt in no time. You know those bangs on the bottom of your grandmother's sofa, yes yes, the ones you find in all the real haberdashers... But I prefer to think of it as Indian syndrome. Minnetonka or else Johnny Hallyday (for the fringed leather jacket look, eh?) not quite digested, more like Grandma's sofa.... Here I'm proposing just one fringed variation, but you're free to sew bangs on a long-sleeved t-shirt, along the sleeves or on the chest in the shape of a heart, or even horizontally to make a Charleston t-shirt and why not a revisited marinière... No limits, I tell you, just like the DIY pompom have fun!
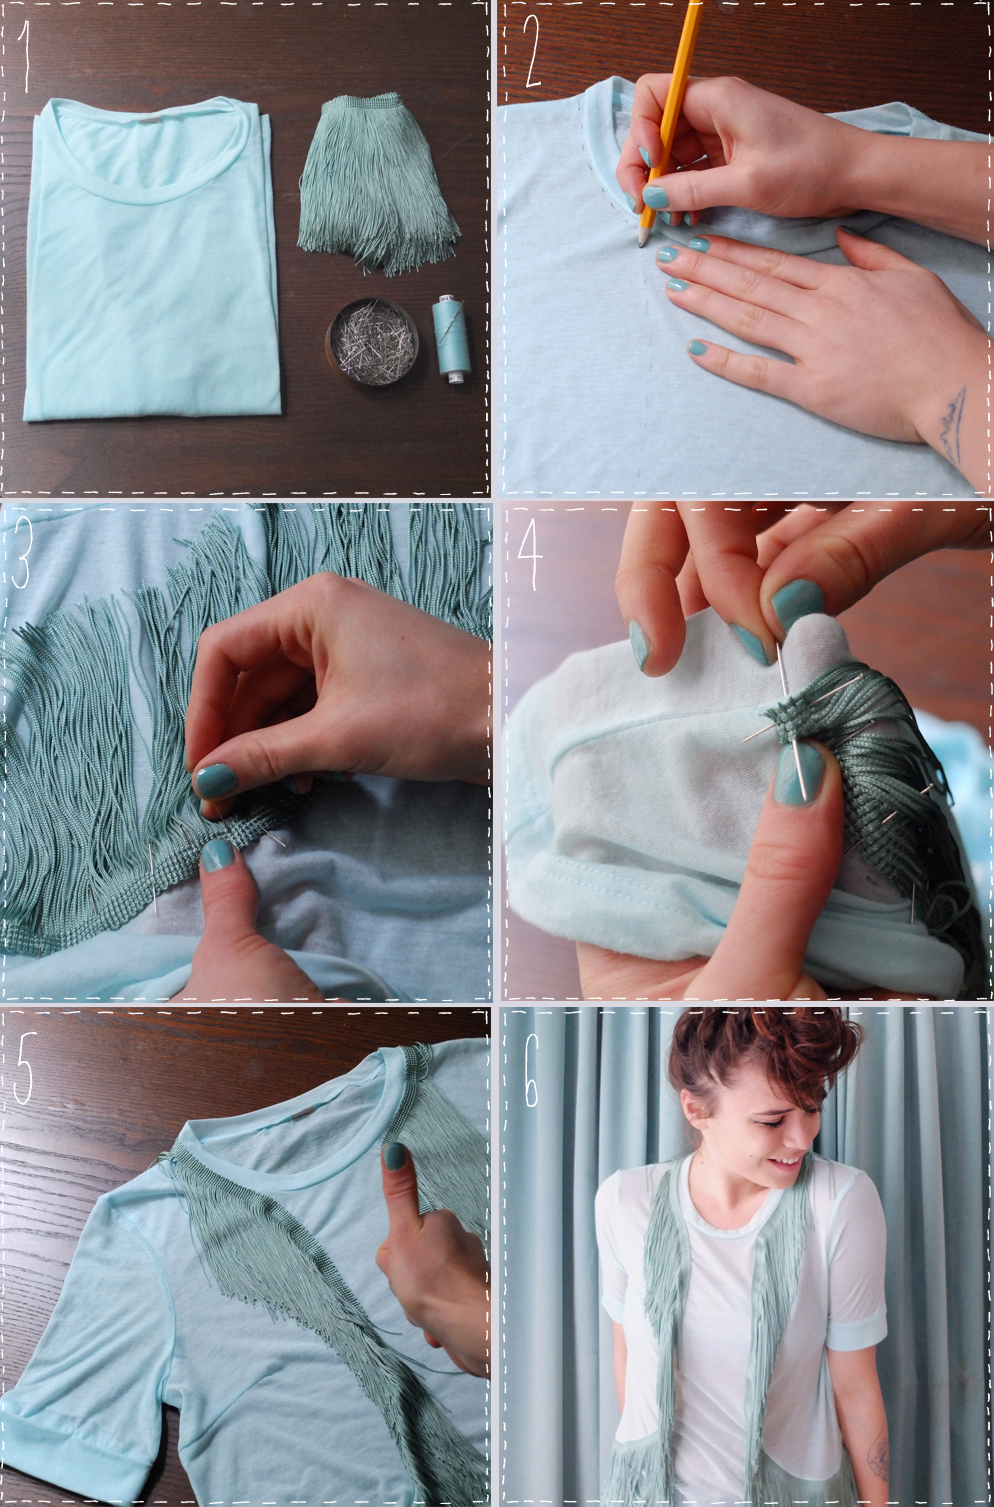 For this DIY, you need:
- 1 tshirt
- about 2 meters of fringe (but it's up to you)
- 1 box of pins
- Thread and needle
 To begin, mark out symmetrically where you want to sew your fringe (1). Then, before you start sewing, I recommend that you pin your strips of fringe to make sure you're on the right track, and try them out to see how they look (2). Then, using a needle and thread, attach the fringe strip (4). Okay, I'm lying, I didn't do it by hand but by machine, but I'm thinking of those of you who don't necessarily have a sewing machine... and TADAM (5&6), try it and twist!
 [:]
[:]
THE TROPICAL WISH LIST
Aloha,
I'm fed up with the dreary weather, shivering under my denim jacket and hated tights. So to combat this gloomy mood, no flower necklace, no straw skirt, but I've put together a little vitamin-packed wish list for you. Because if, like me, you're not lucky enough to be in California, shaking your booty and sipping your beer at the Coachella festival... or if you're not either, Garance Doré who's infinitely lucky to be in Miami by the pool, then come E-shopping with me... It's our way of taming the sun. The Indians called the sun by smoke signals... and I call it by my credit card. You've got to move with the times... See you tomorrow guys!
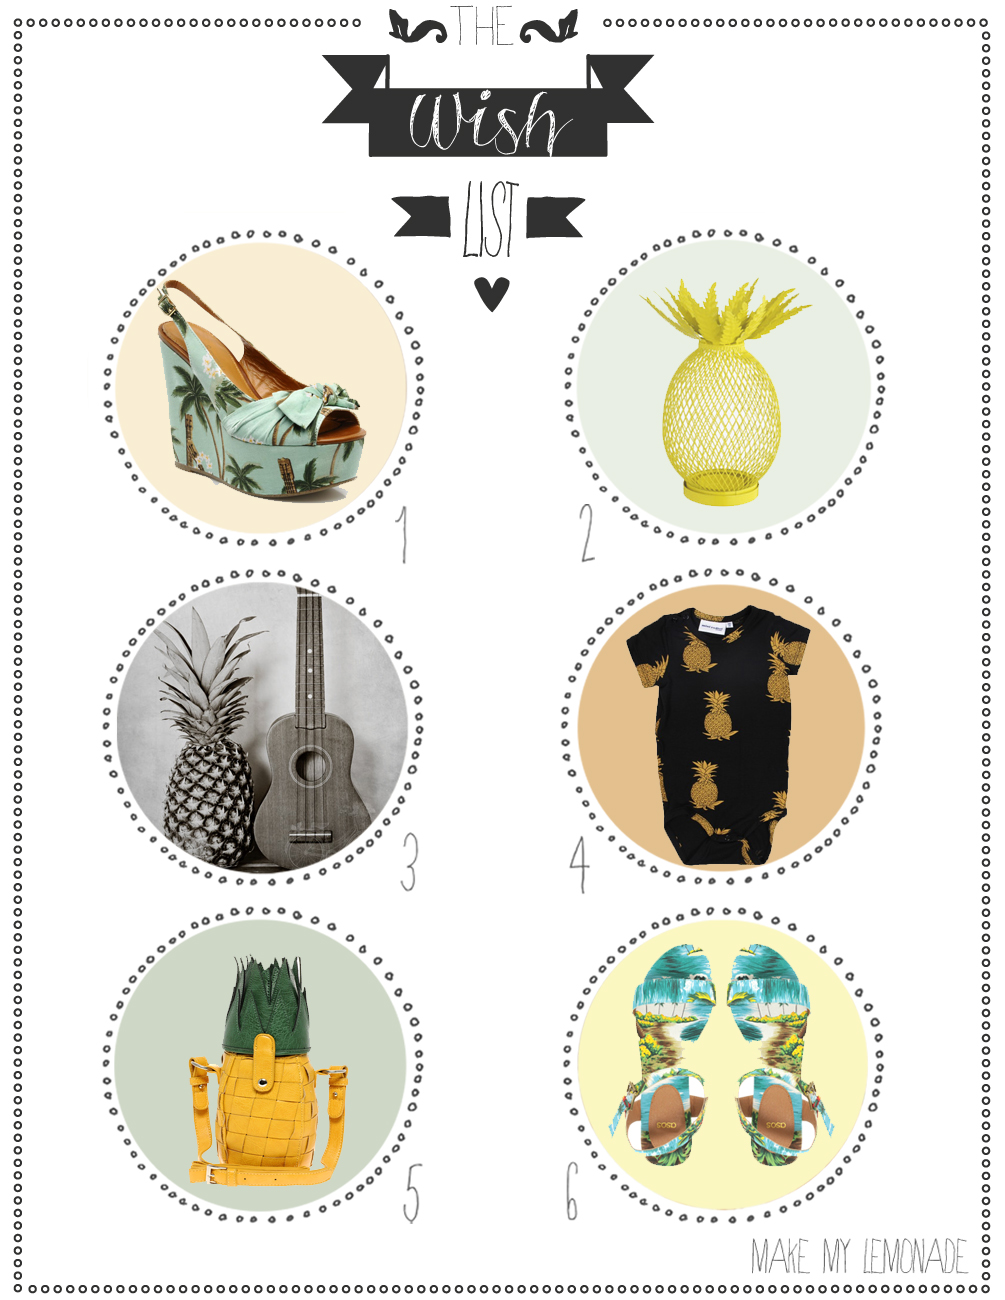
1. Palm wedge sandals Sarenza 149€, 2. Pineapple candle jar Habitat 9 euros, 3. black & white image of guitar and pineapple on Etsy 8$, 4. Body bobo thing on Little Hood 32€, 5. dingo pineapple bag Asos 39.56€, 6. flat Hawaiian sandals Asos 21,10€.
Easter DIY.... What's new!
I can't get started with a theme, otherwise I'm off and running and it's hard to stop me, which is what's happening with Easter, Easter snickers, lace bunny ears.... all well and good, I know... But it's also a great excuse, these lace bunny ears are an alternative "to the crisis" of a big brand model, Maison Michel.... because yes, I'm crazy about Maison Michel, the French milliner who needs no introduction, this house collaborates with the greatest, including Monsieur Karl, who shot the latest look book himself... its creations are crazy and sublime (yes, yes, it's really everything I love). But here's the rub, because yes, there is a rub, and it's often the case with things I love: the price, my little ladies, this bunny ears model costs a whopping $460. Well, yes, you understand, I'd have a hard time explaining to my banker why I absolutely need these bunny ears to live, "but yes, I assure you, I'm going to wear them every day to pay them off, you'll see....". So no, I've never bought any real Maison Michel creations, but one day, who knows.... You'll see a little DIY, "I'm doing just fine on my own, with my scissors and some wire" or I could also call it "the crisis? me, I don't know". Have fun and who knows, maybe you'll be able to put your ears to the office to get a raise....
 To make this rabbit ear head band, you need..:
- Download the pattern HERE
- Needle and thread
- Lace
- A covered headband if possible
- Strong wire
- 1 m bias.
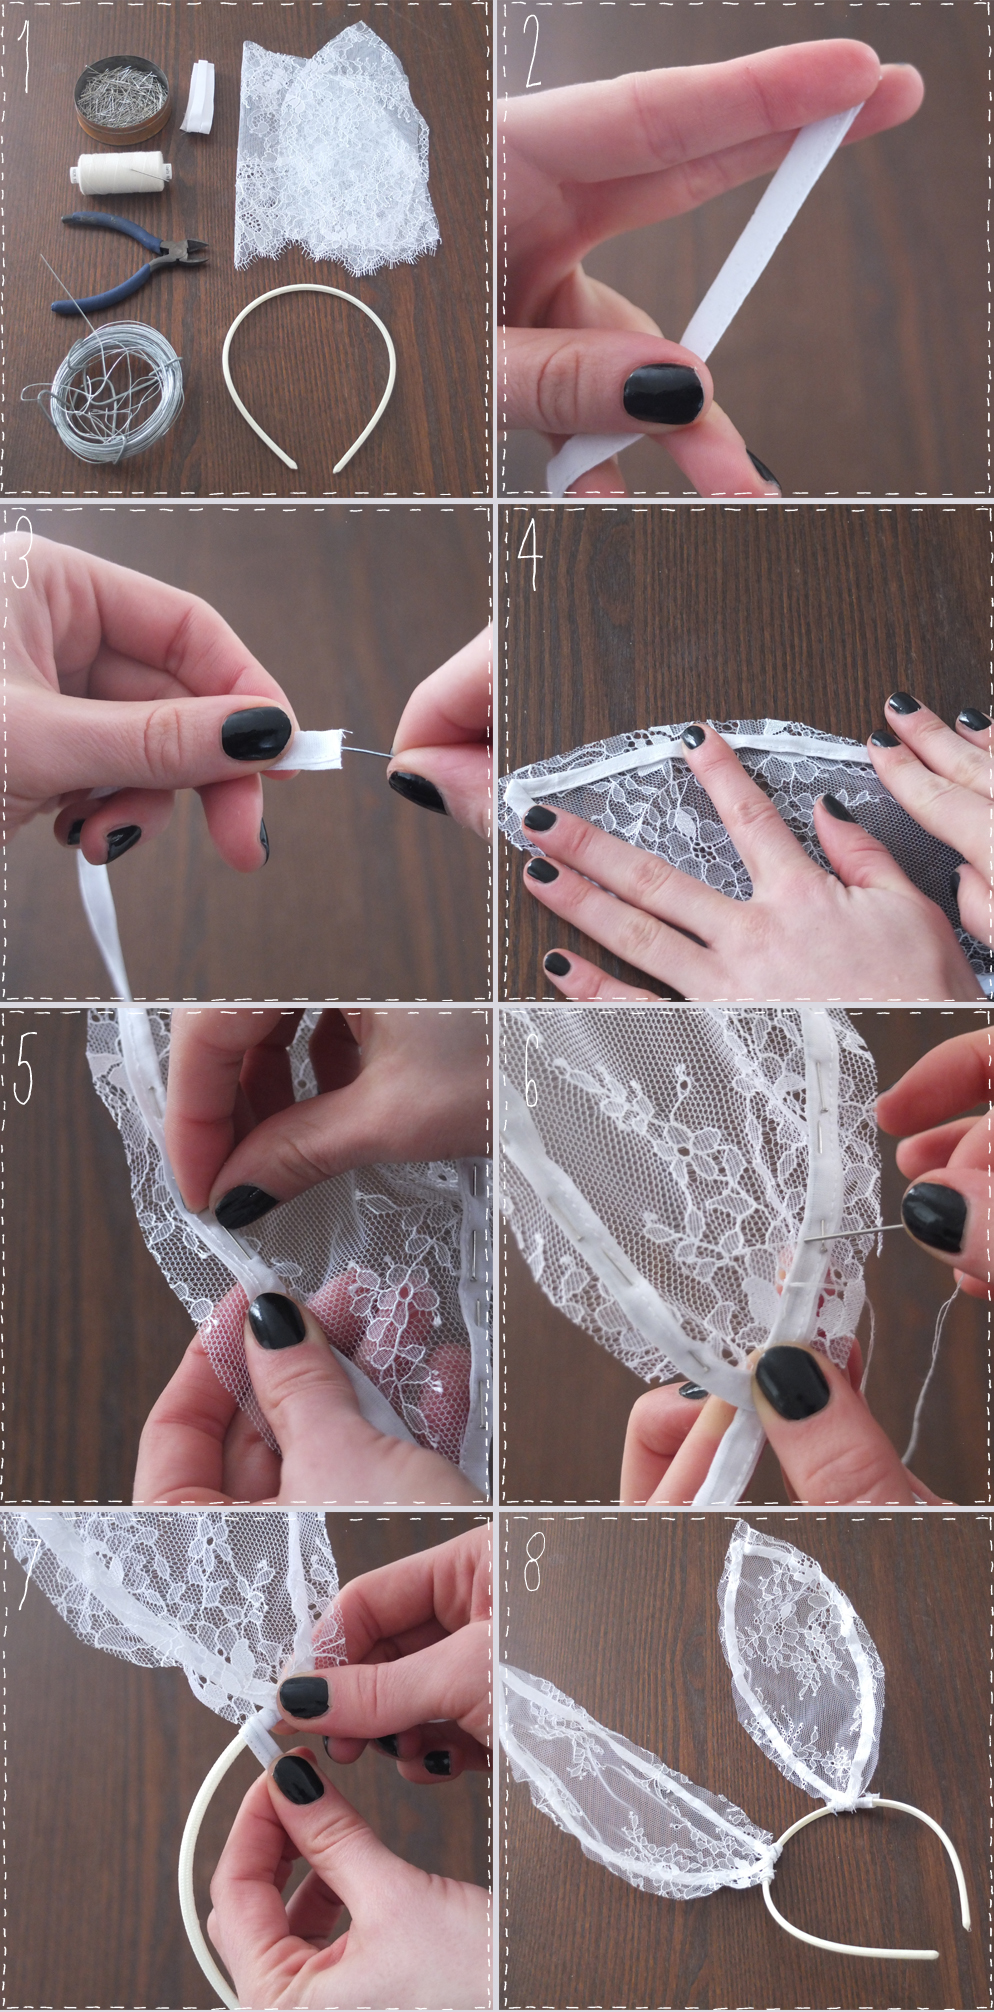
Before starting, cut your lace using your pattern, cutting about 1 cm wider for the ears. Next, cut your bias in 2 and stitch it close to the edge to create a fabric tube. Using wire cutters, cut 2 pieces of 55 cm wire and slide the wire into the bias tube. Slide and let the wire protrude on both sides (2&3). "Shape" the ears on the lace, then pin them in place before sewing (4&5). Get out your needle and thread and attach the bias to the lace - nothing too complicated (6). Once your ears are ready, wrap them around the headband with the bias and wire you've left hanging out (7). Tadam you want with your bunny ears you can also stop there but if you want to go even further, closer to the original follow these steps....
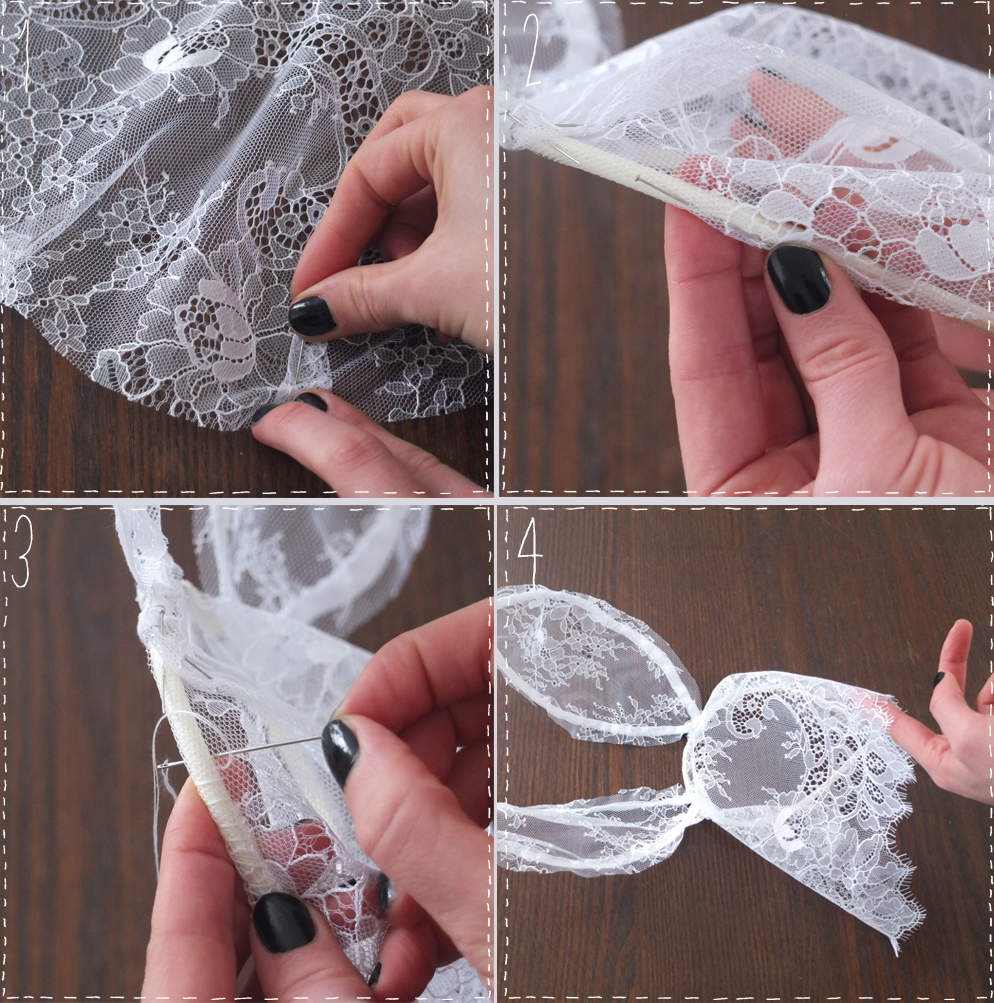
With the lace veil cut out, use pins to form the 2 clips shown on the pattern (1). Then pin the veil to the headband (2), which is why it's a good idea to choose a corded, fabric-covered one... Then sew it all together (3) and TADAM!
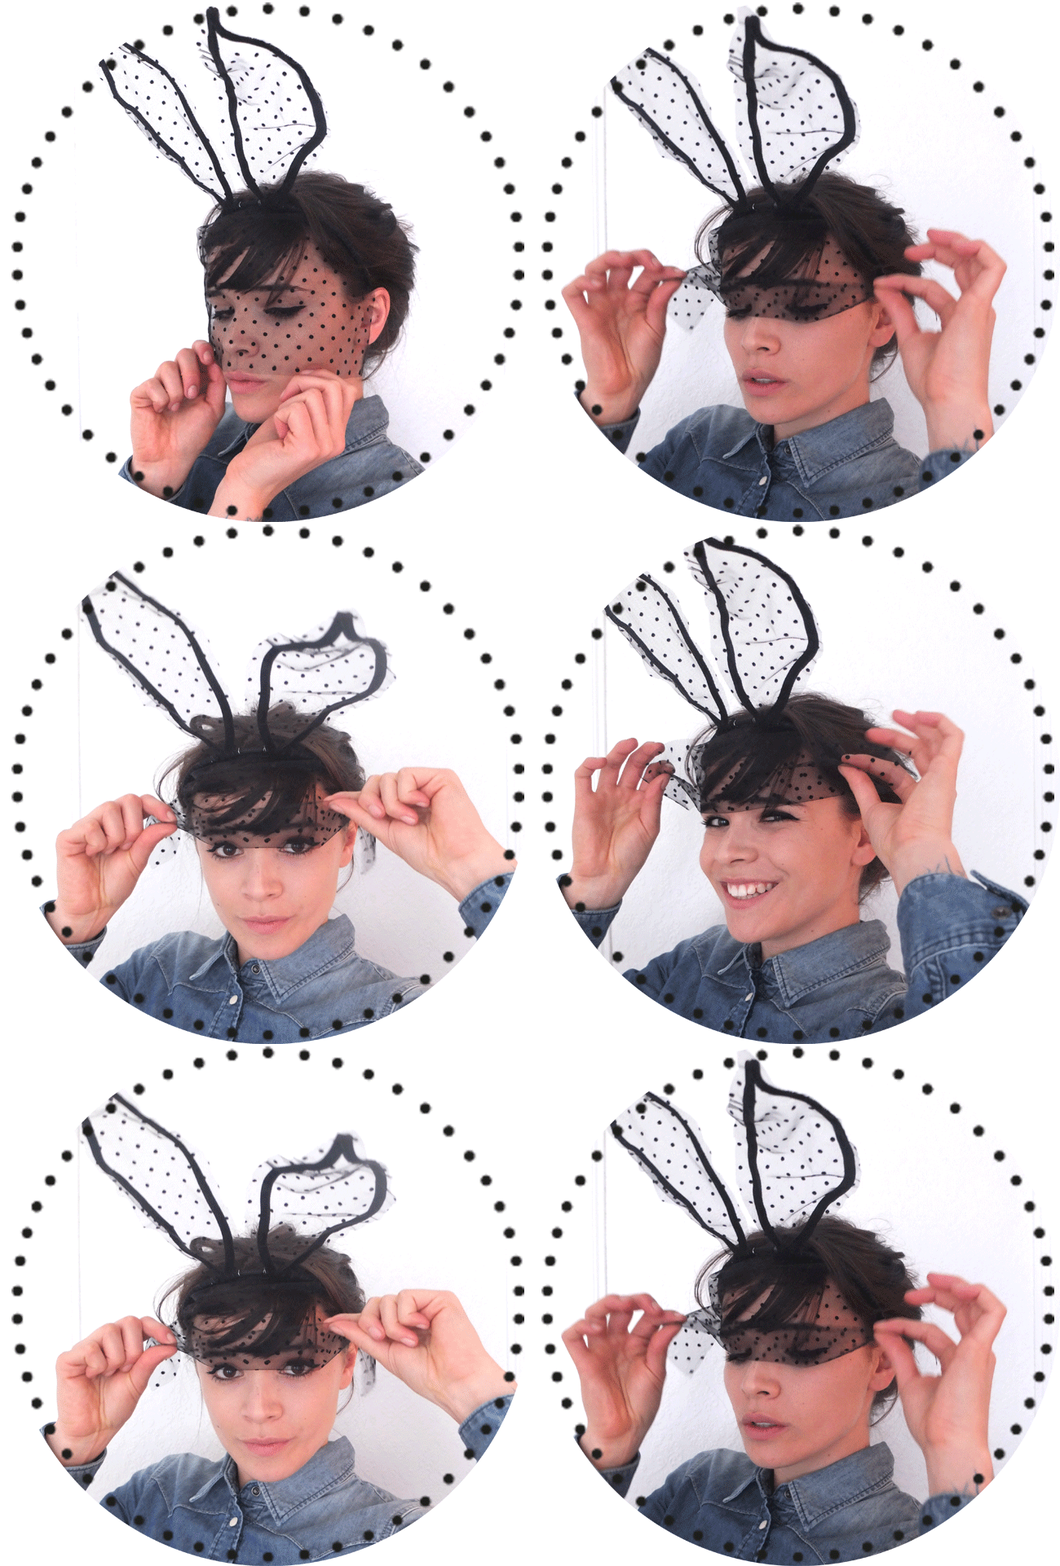
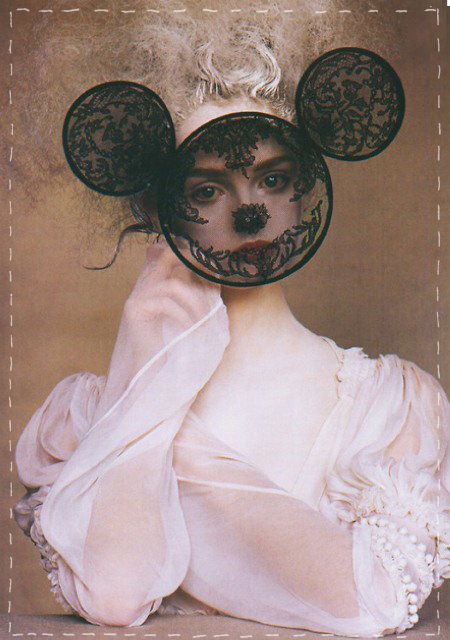 Little bonus, an inspirational image that I love and that I think has undoubtedly inspired the creator of Maison Michel... See you soon, folks....
[:]
HAPPY FRIDAY#6
Happy friday a todos,
I'm not in great shape this weekend, I'm sad to have to put my tights back on, there are words echoing in my head like "En Avril de te découvre pas d'un fil..." Yeah, this morning I almost wanted to put on mittens, but that's not a very good sign... For this Friday I've prepared a "Grrrr" look for you, during a detour into my mum's closet (I'm definitely talking about my mom on Fridays...) I found this 80's leopard jacket, and then my heart stopped. My mother said something like "Don't even think about it, your grandmother made it, it's much too valuable for me" But in my head I heard "Stop looking at me with your big bright eyes or I'll give in in 5,4,3,2,1.... "and then she said "Ok, but I'll get it back when I want...". BINGO I've got my granny's jacket on my back, nothing can happen to me, the leopard boots of my dreams tracked down in London in January and my cheapos h&m cheetah cardigan... When I do something, I do it all...
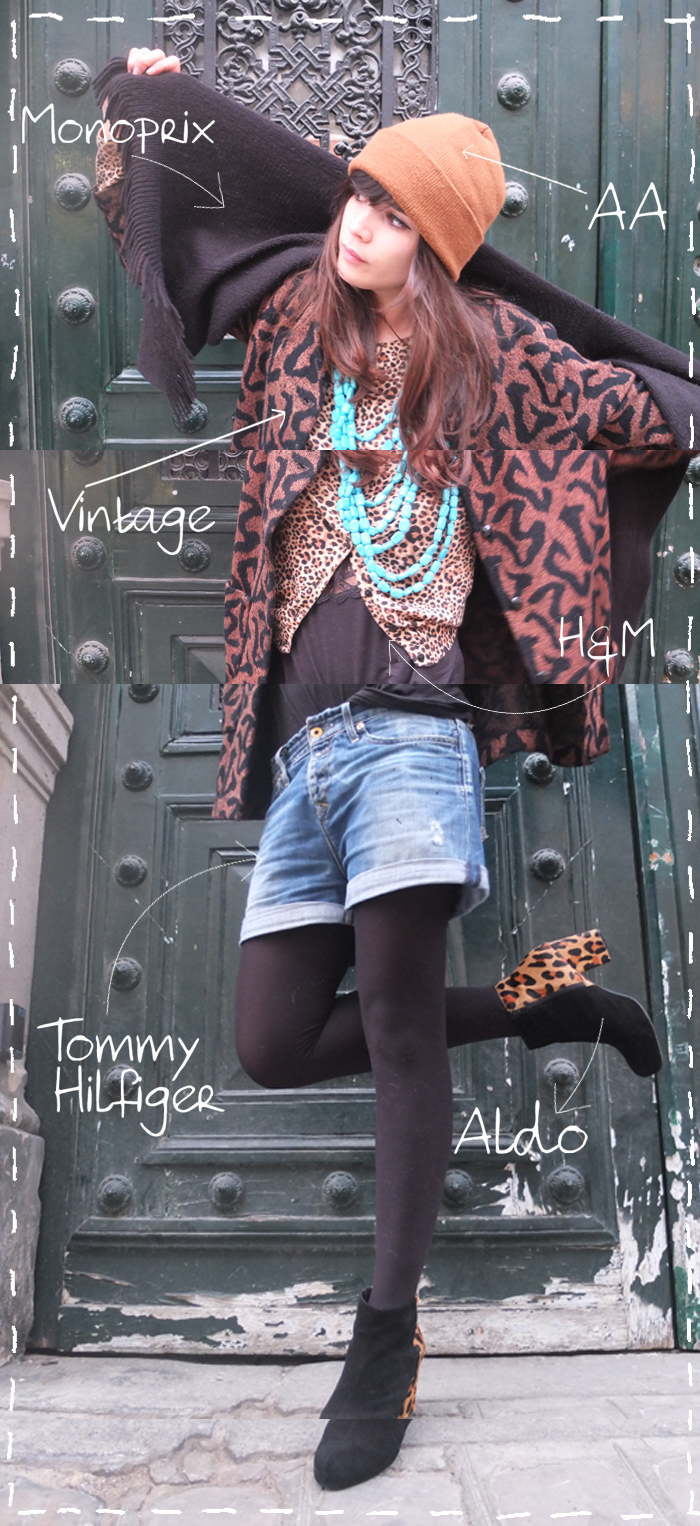 Bonnet American Apparelvintage mémé forever jacket, vest & babydoll tank top H&MShorts Tommy Hilfiger DenimBoots AldoSoft shawl Monoprix and Turquoise necklace la redoute very very old...
Tonight is a long 3-day weekend and that's just too good.... I've got a beauty DIY in the works, but also a special Easter DIY that's sure to make you laugh, a yummi chocolate recipe! see you soon!


